I previously posted about fight control in Rise of Nations, and briefly mentioned how the conventional wisdom regarding Age V combat (which I had also subscribed to until briefly before writing that article) was misguided. Age V combat is not “Age IV combat but with more guns” — it’s actually fundamentally different.
Note: this article only fully applies if you play a version of the game with fully working damage modifiers. If you’re unfortunate enough to be playing EE (where damage modifiers are bugged) then things will be a bit wonky for you unless you have bugfixes.
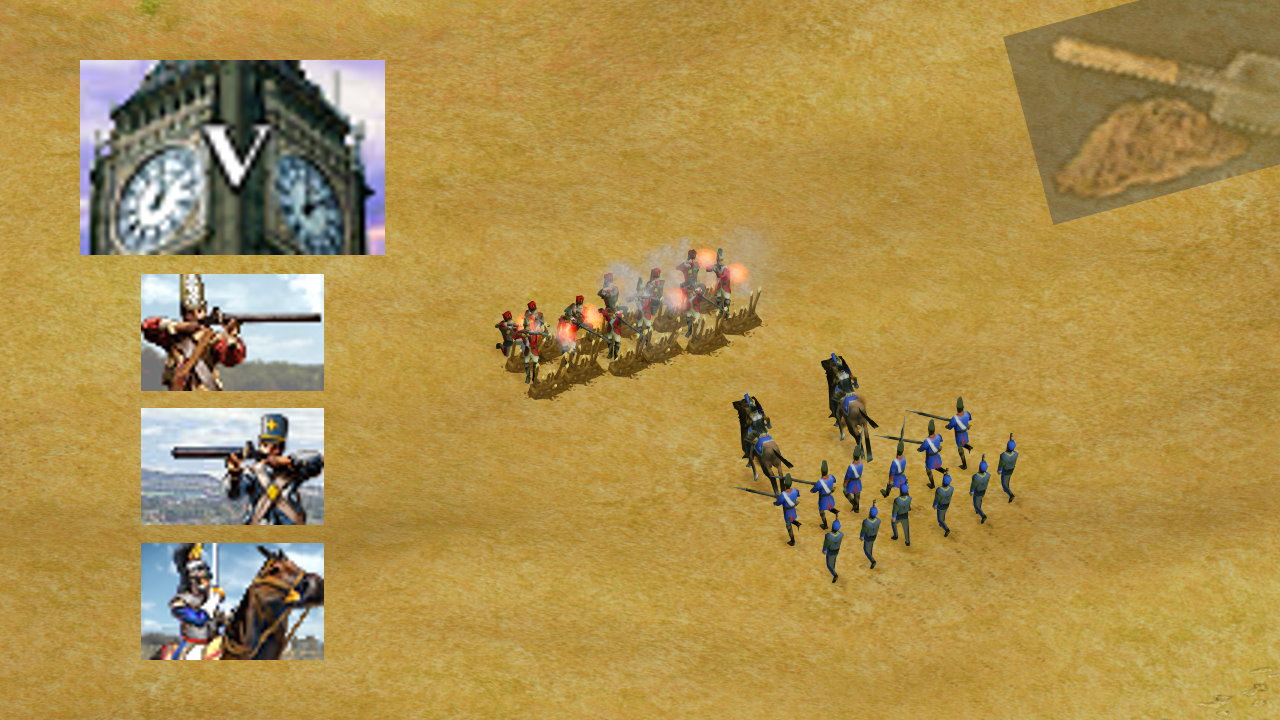
Enlightened combat
In Age V army-vs-army combat, Musketeers are the “default”, “primary”, or “main DPS” unit since they have both high range and above-average matchups.
The standard cycle of unit counters here is:
Musketeers > Fusiliers > Melee Cav > Musketeers
On the surface this looks very similar to the Age IV version of the above cycle of counters:
Arqs/Crossbowmen > Elite Pikemen > Melee Cav > Arqs/Crossbowmen
But as you’re no doubt aware if you’re a veteran RoN player, there are a couple of key differences that are critically important between the two.
The first, and subjectively less important difference, is that Crossbowmen are replaced by gunpowder infantry in V. This makes their DPS go up against almost all unit types, and they also gain a significant durability bump (+63% HP and +2 armor!). If you have many leftover Crossbowmen in IV, this upgrade will be a great boost to your army’s overall strength.
The second difference — which is of far more relevance to this article — is that suddenly the anti-cav unit is ranged. In Age V, for the first and only time in the entire game, the frontline cavalry unit (Cuirassiers) is substantially outranged by its counter (Fusiliers).
Compounding this, gun-wielding Heavy Infantry such as Fusiliers are placed BEHIND Musketeers in the default army formation.4 This means that for enemy Musketeers to be in range to attack your Fusiliers, they must all but guarantee that they’re also going to be within range of your own Musketeers. In a default formation of Age V units, there is no safe way to hit HI that does not expose the attacker in return.
This has some consequences in terms of an army that relies heavily on hit-and-run kiting tactics, but where it’s most impactful is when you make use of this arrangement in tandem with an ability that is almost never a good option in other circumstances: Entrench.
Immovable Object
Other than forcing a stationary position, the main issue with Entrench in literally every other age is The Range Problem. Sun Tzu, an avid Rise of Nations player, defined The Range Problem as this decision:
You either put your “default” unit at the front of your formation and it dies to the cav-type unit (Melee Cav / Tanks), or you put your anti-cav unit at the front of your formation and it dies to the default unit (e.g., Crossbows killing Pikemen). Neither path leads to victory.
A mobile (read: not entrenched) army formation usually gets around this by having HC try to take the brunt of enemy ranged attacks — and being the most durable unit available, they typically survive somewhat longer in that precarious frontline role than other units. In an entrenched formation they can’t really do this, because if they move forward to engage then the infantry behind them can’t follow up.
Age V units are uniquely5 capable of solving this issue. Your Musketeers are able to sit at the front and defend your Fusiliers. Your Fusiliers are able sit behind your Musketeers whilst still defending your Musketeers.
Further, the difference in damage output between Elite Pikemen (IV) and Fusiliers (V) against Cuirassiers (V) is significant. If the Cuirassiers have +6 armor (a General/Patriot nearby with Tactics and Operations both researched), it’s 12.57 DPS compared to 23.72 DPS, an 88% increase — not even factoring in that they’re also gaining a ranged attack.
Entrench is the final piece of this puzzle, allowing the infantry units to have enough durability to not need HC taking up the projectile-sponge role at the start of the fight. Just so everyone’s on the same page, the relevant part here is that Entrench reduces damage taken from frontal hits by 1/3.
If we assume all units have +6 armor, these are the relevant DPS numbers for frontal hits only:
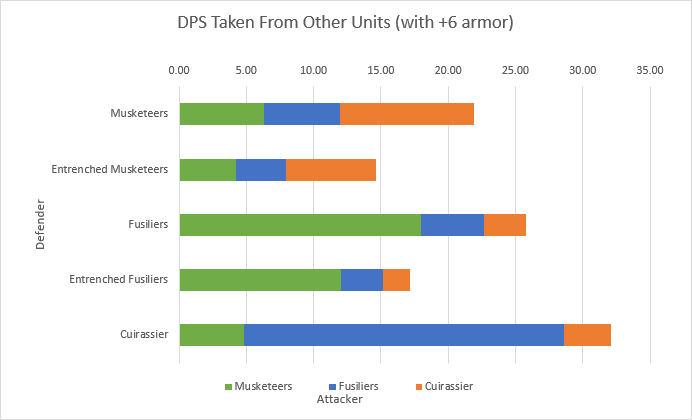
This graph has a few key takeaways:
- The entrenched units are actually quite resilient overall, even when being hit by the unit that counters them.
- Fusiliers annihilate Cuirassiers.
- Musketeers kill Fusiliers almost as quickly, but with Entrench’s damage reduction they kill Entrenched Fusiliers significantly slower than Fusiliers kill Cuirassiers.
- Cuirassiers kill Entrenched Musketeers much slower than Fusiliers kill them.
If ever you needed a reason to keep your Cuirassiers away from Fusiliers, this chart is it. But if you can’t use them in their classical frontal charge role, what do you do with them? Let’s map out how we, the entrenched defender, want the fight to play out.
Example Fight
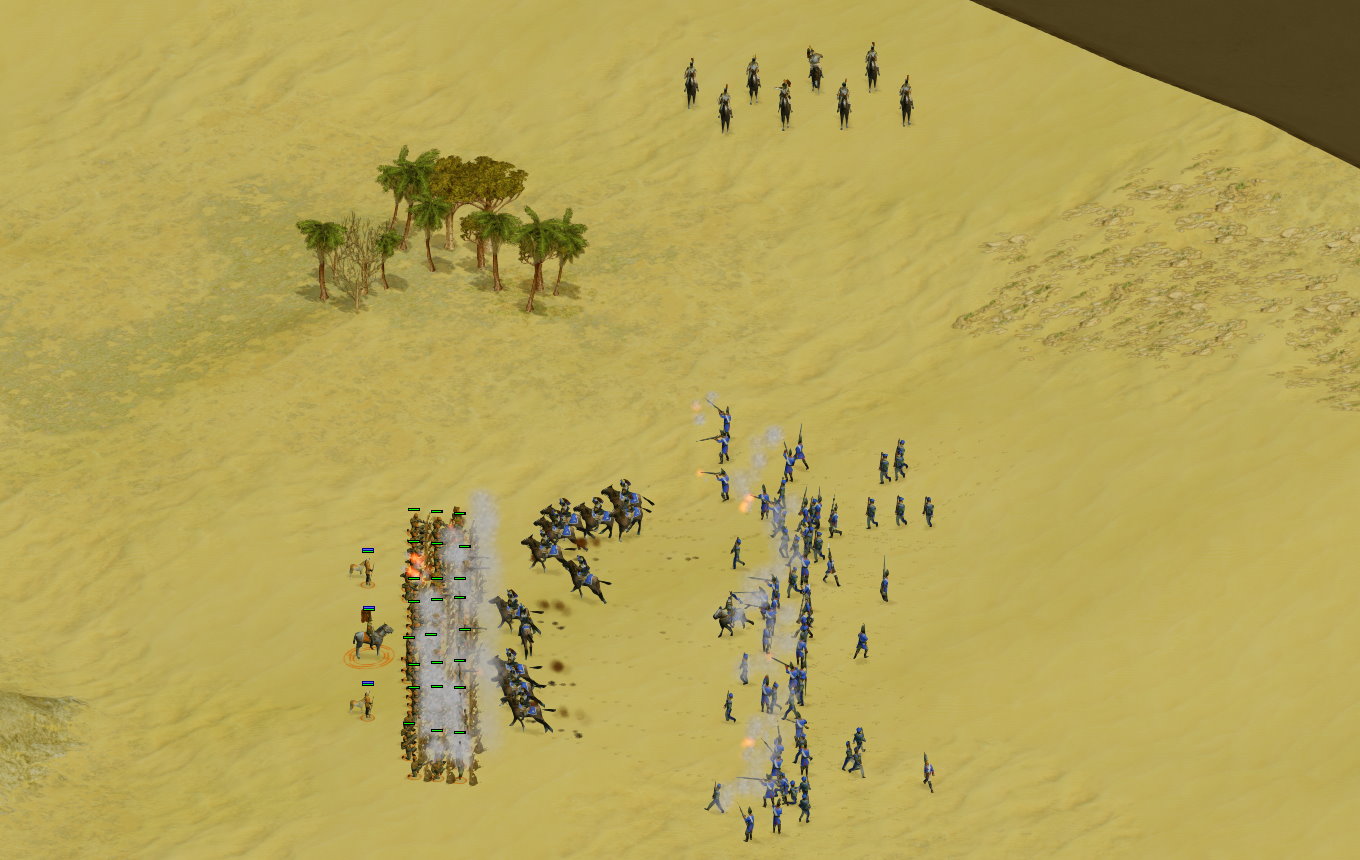
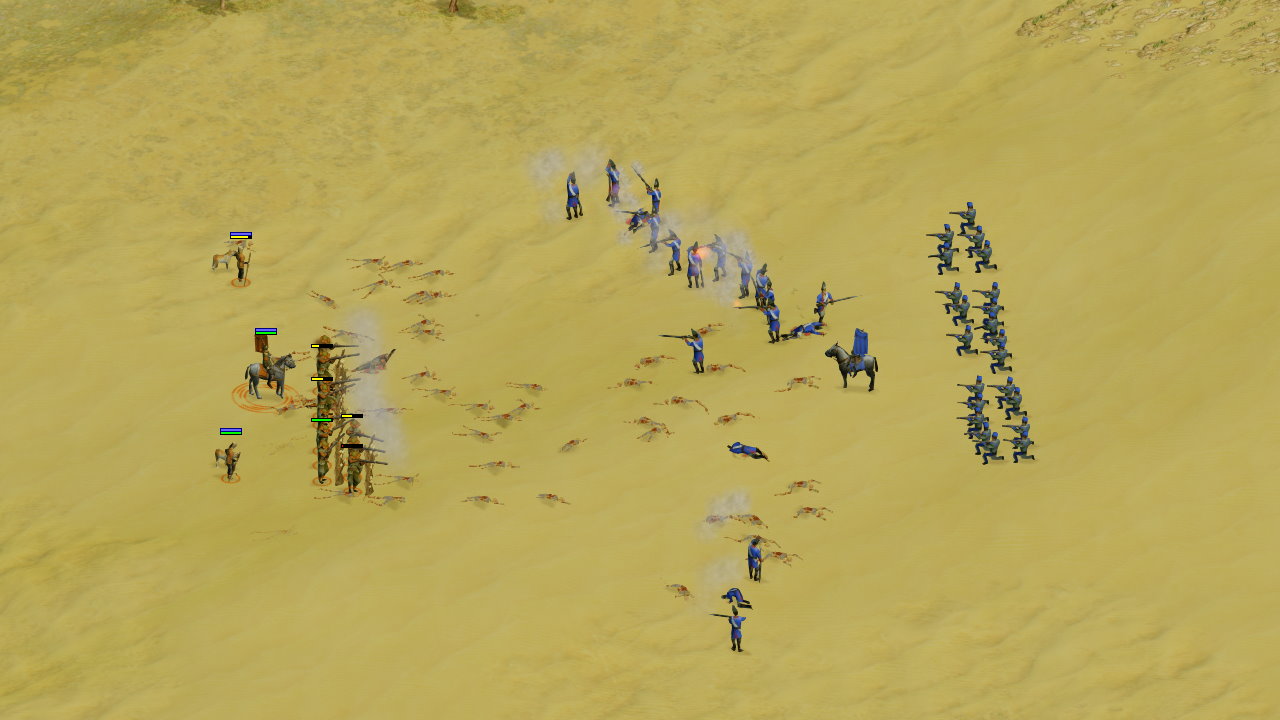
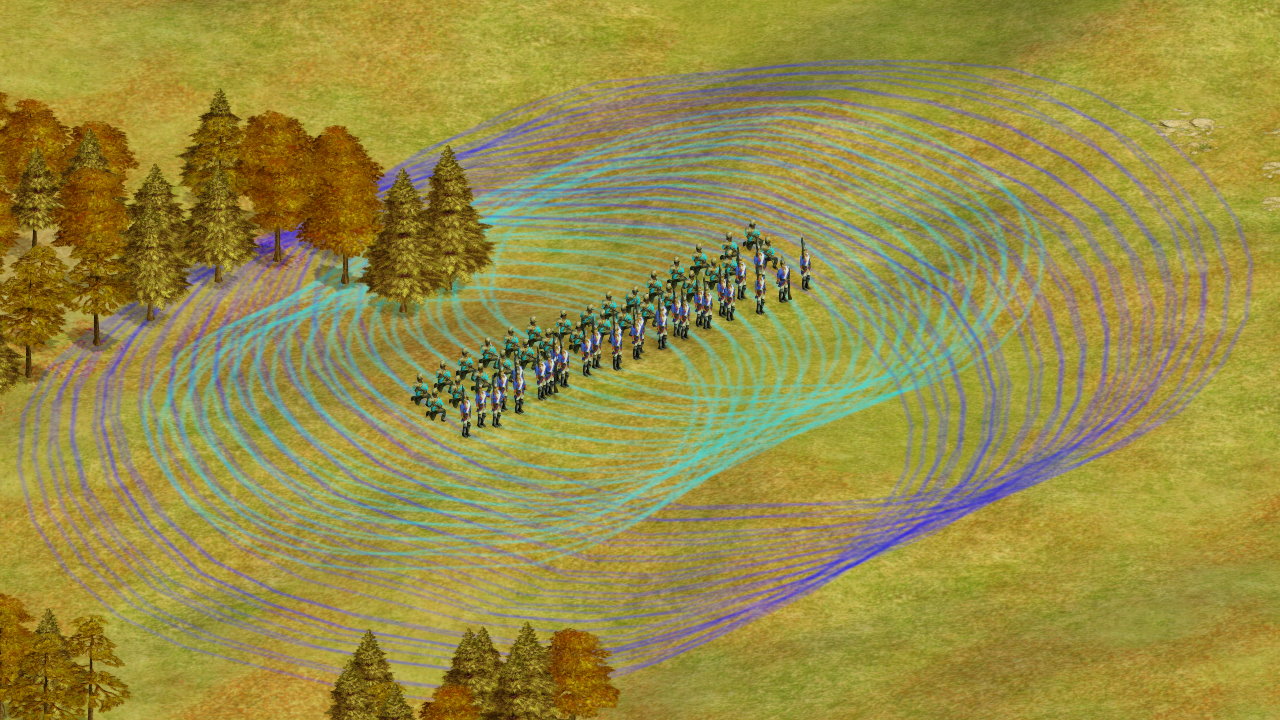
Starting formations
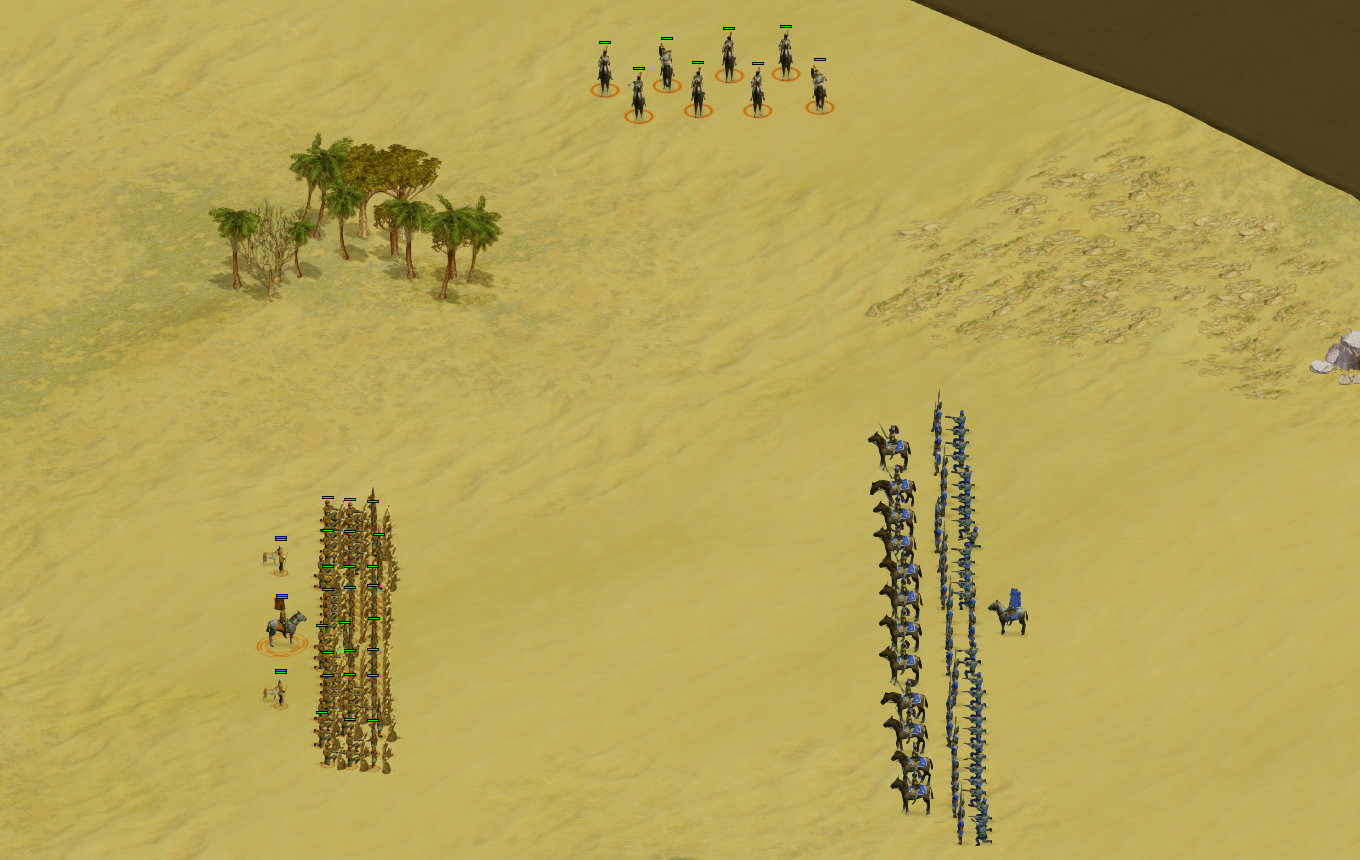
We start off with the defender’s infantry entrenched as the opposing force approaches. The defender’s cavalry should be separated so that they can join from the flank partway into the fight. They should be out of line of sight. Ideally you’ll have your melee cavalry distributed on both flanks for best results, but it’s much easier to find one good flanking position than two.
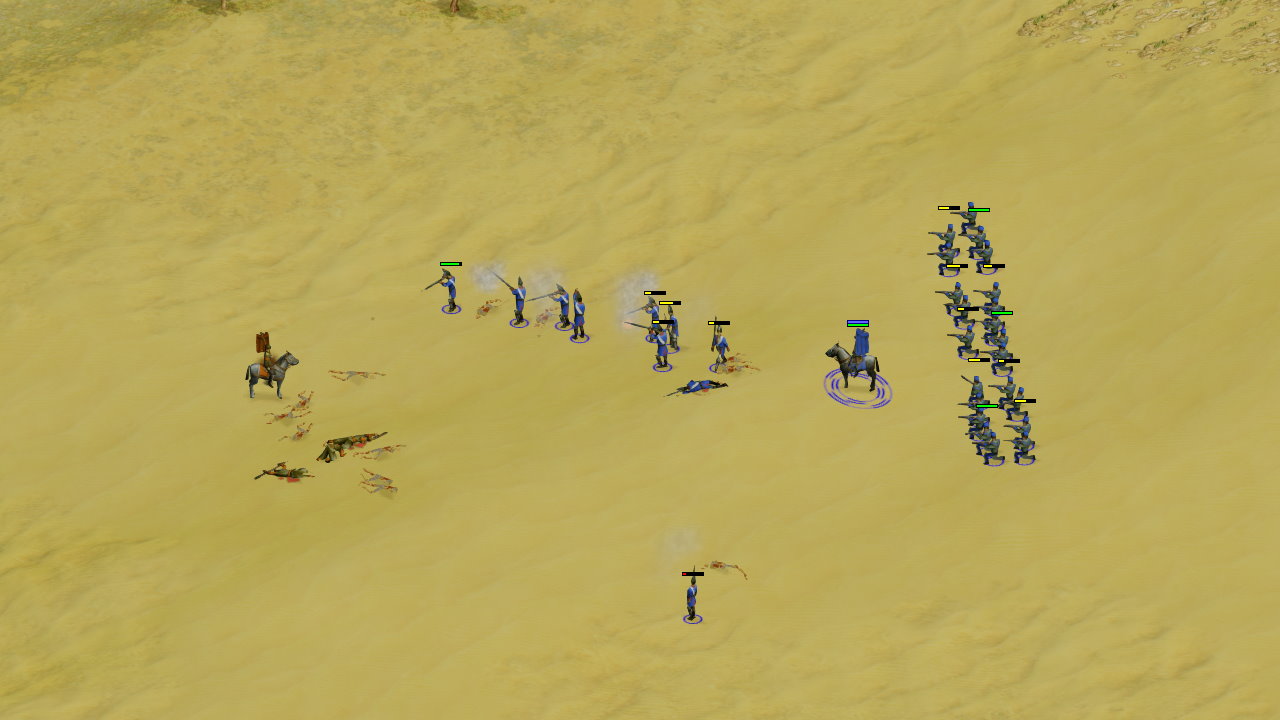
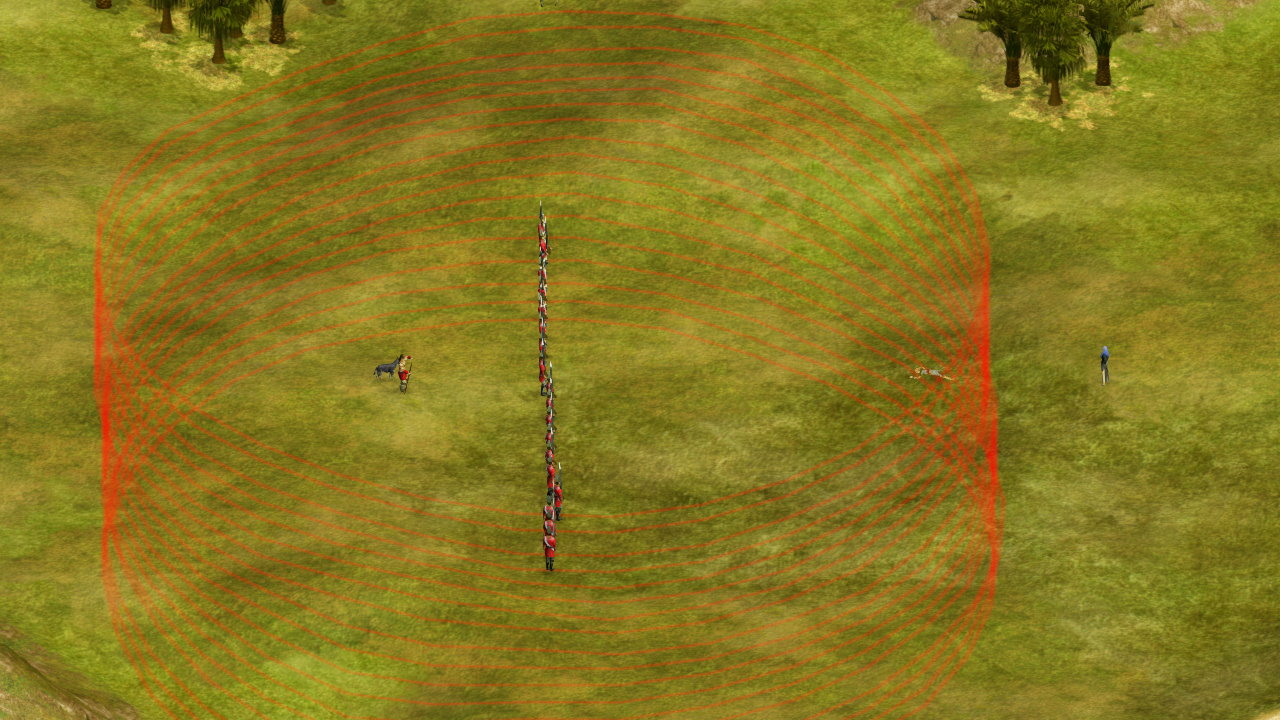
Opening moves
The entrenched defending infantry stay put as the attacker Force Marches their army directly into the fray.
At this point the two sides need to make their big decisions about whether to commit everything or hold units in reserve.
Commitment decisions
Seeing no defending cavalry in sight, the defender has a few seconds to decide whether to commit their Fusiliers to the fight anyway (which most players will probably do), or hold them back in reserve.
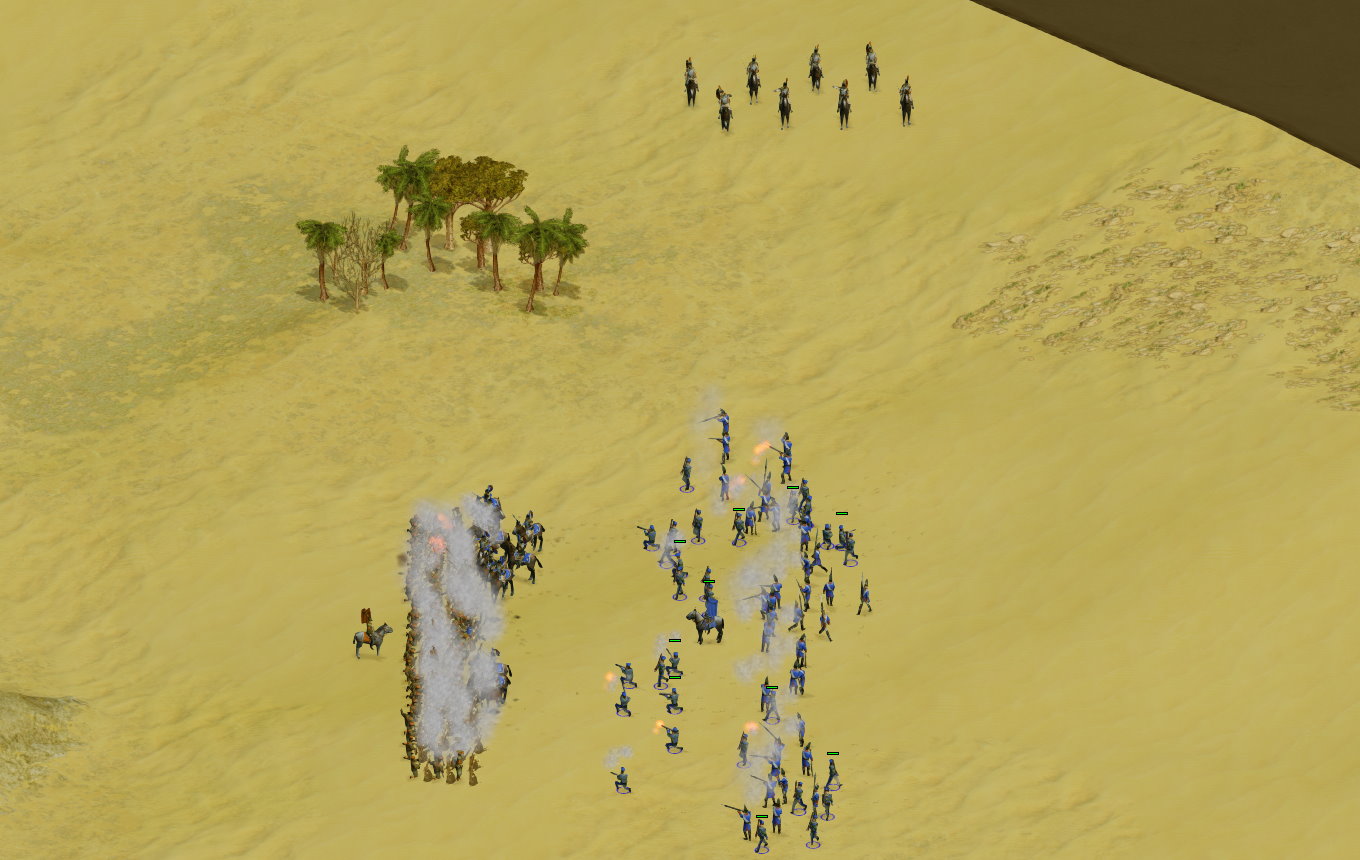
If the attacker holds their Fusiliers in reserve, the defender once again must choose whether to continue holding their Cuirassiers in reserve, or to commit them despite the reserved Fusiliers. It’s generally risky to continue keeping them in reserve, as this places an extraordinary amount of pressure on the defending Musketeers to be able to handle the attacking Musketeers right after being slapped around by the attacker’s Cuirassiers.
The flanking cavalry will take substantially more damage and contribute much less to the fight if deployed from this situation — but the defending force may struggle to win the fight at all if the cavalry continue to be held them in reserve.
Regardless, as we saw in the chart earlier, the attacker’s Cuirassiers will be dying to the defender’s Fusiliers fairly quickly. After most of the attacker’s Cuirassiers are killed, the fight will continue with a numerically-superior, entrenched defending infantry force against a comparably smaller force of attacking Musketeers.
Unfortunately for the defender, that numerically superior force is made up of injured Musketeers and healthy Fusiliers, which isn’t a great matchup against Musketeers — entrenched or not. The Fusiliers in particular will not be able to fight without leaving their entrenchment. If the defender needs more firepower and can sustain the losses, those Fusiliers can be sent in to contribute against the opposing Musketeers. They’ll basically be slaughtered doing this, but despite the high cost of doing so it’s likely to be necessary to have any hope of winning the ensuing fight without using the Cuirassiers.
Overall, it’s usually better for the defender to commit Cuirassiers to a flanking attack regardless of the attacker’s decision.
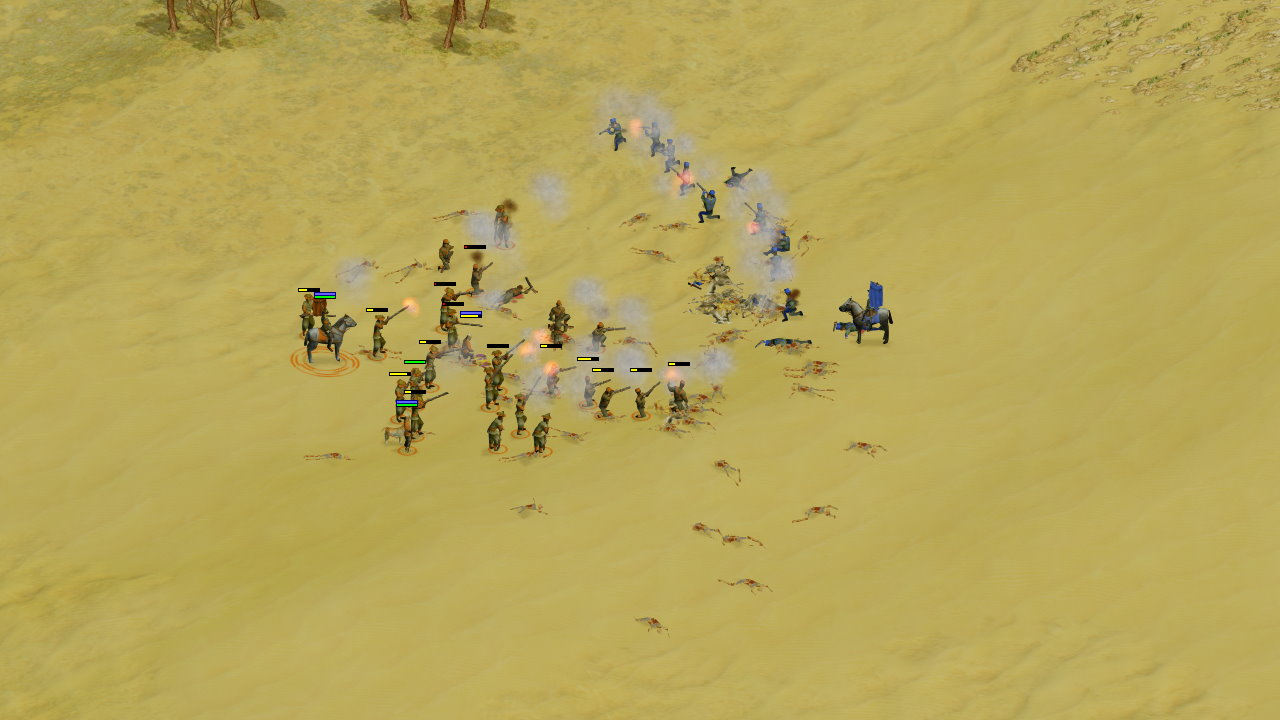
If the attacker commits their Fusiliers (the more commonly expected decision), then it’s time for the defender to get their flanking Cuirassiers ready. Timing-wise, you want to have them hitting Musketeers while the Fusiliers are all in front of them and the vast majority of the attacker’s own Cuirassiers are dead. Entering at this point in the fight disrupts the attacker’s formation and exposes their Fusiliers at the front to flank hits from the defender’s Musketeers if the Fusiliers turn around to fire on the incoming cavalry. Just remember that it’ll take a few seconds for the Cuirassiers to get into melee range, so they’ll need to start moving before the situation looks ideal.
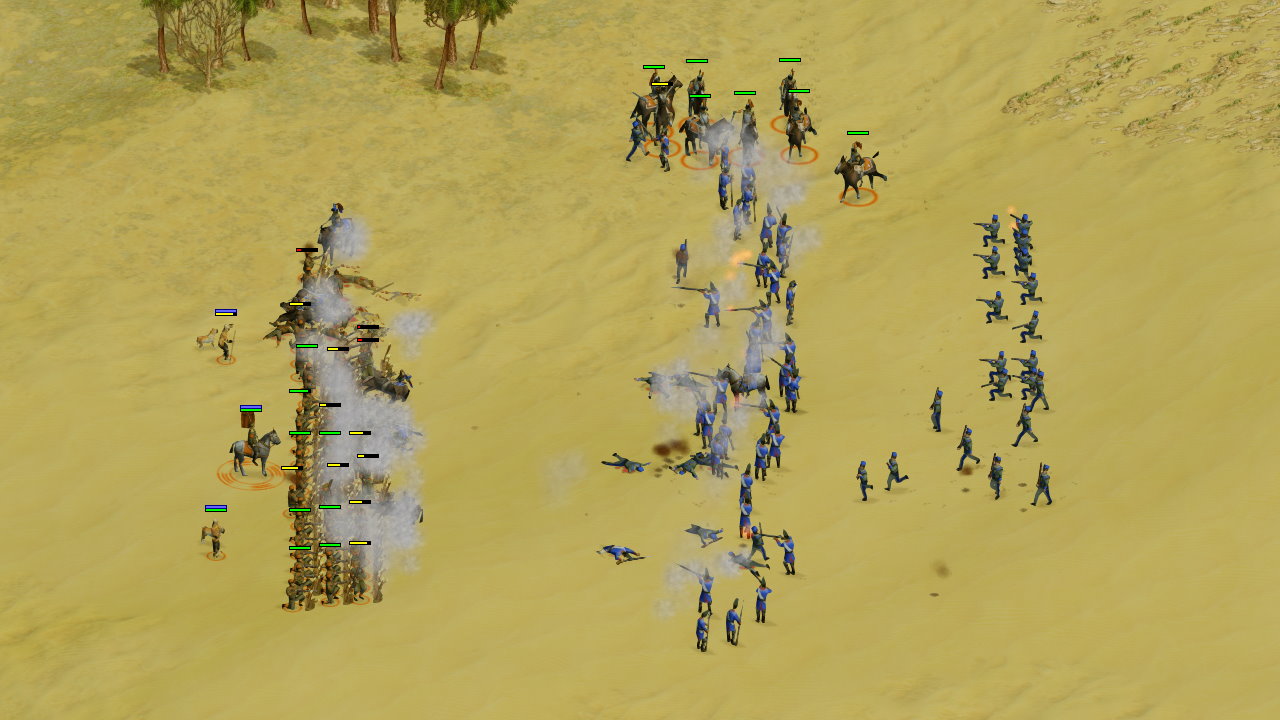
Fusiliers committed: defender advantage
If the fight plays out from this position, the defender will win handily. Enemy Musketeers will get sliced up by the flanking Cuirassiers, and the Fusiliers that are stuck at the front can either take a frontal fight against Musketeers (which they lose, and which gets their own Musketeers killed), or turn around to shoot Cuirassiers and get shot in the side and back.
Fusiliers in reserve: situational
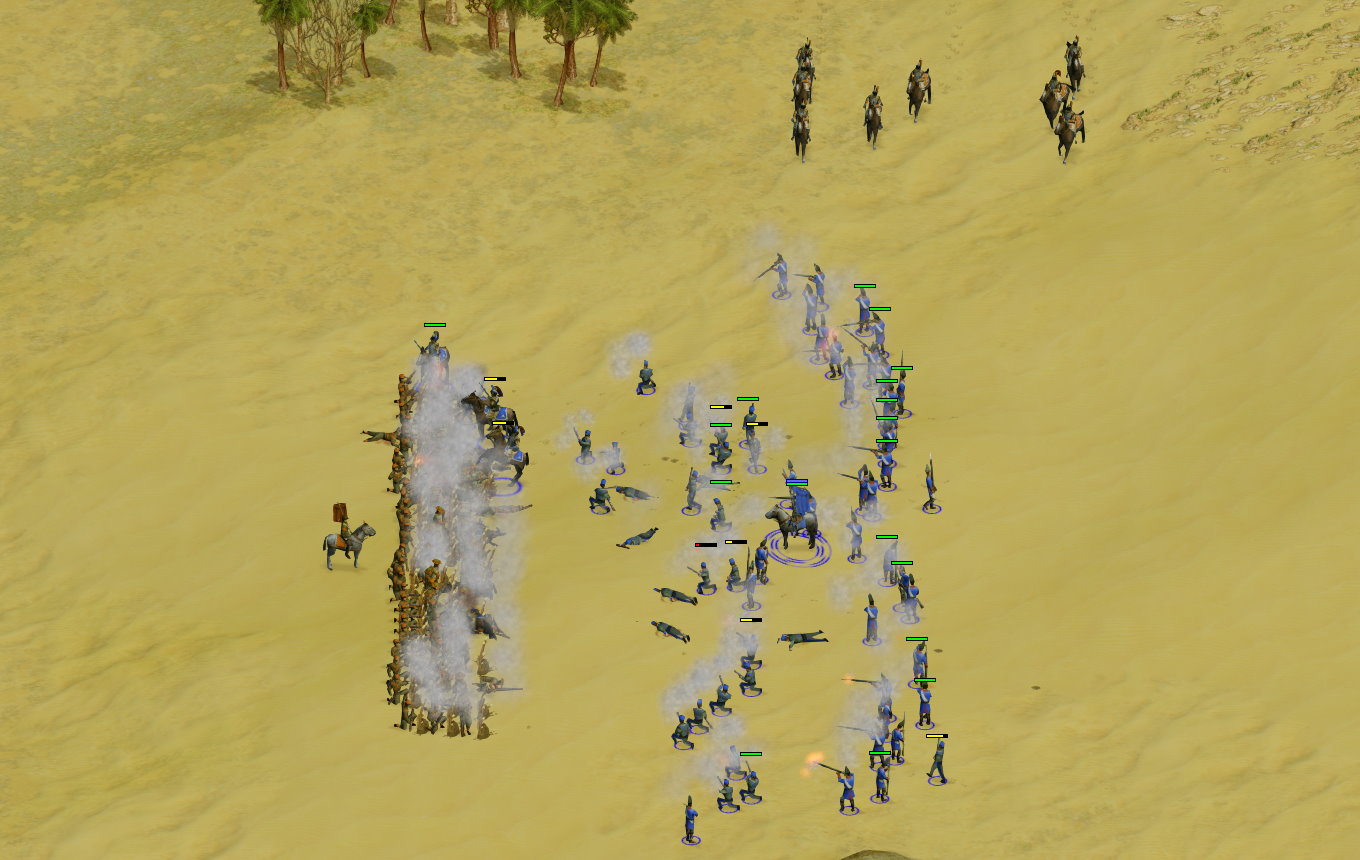
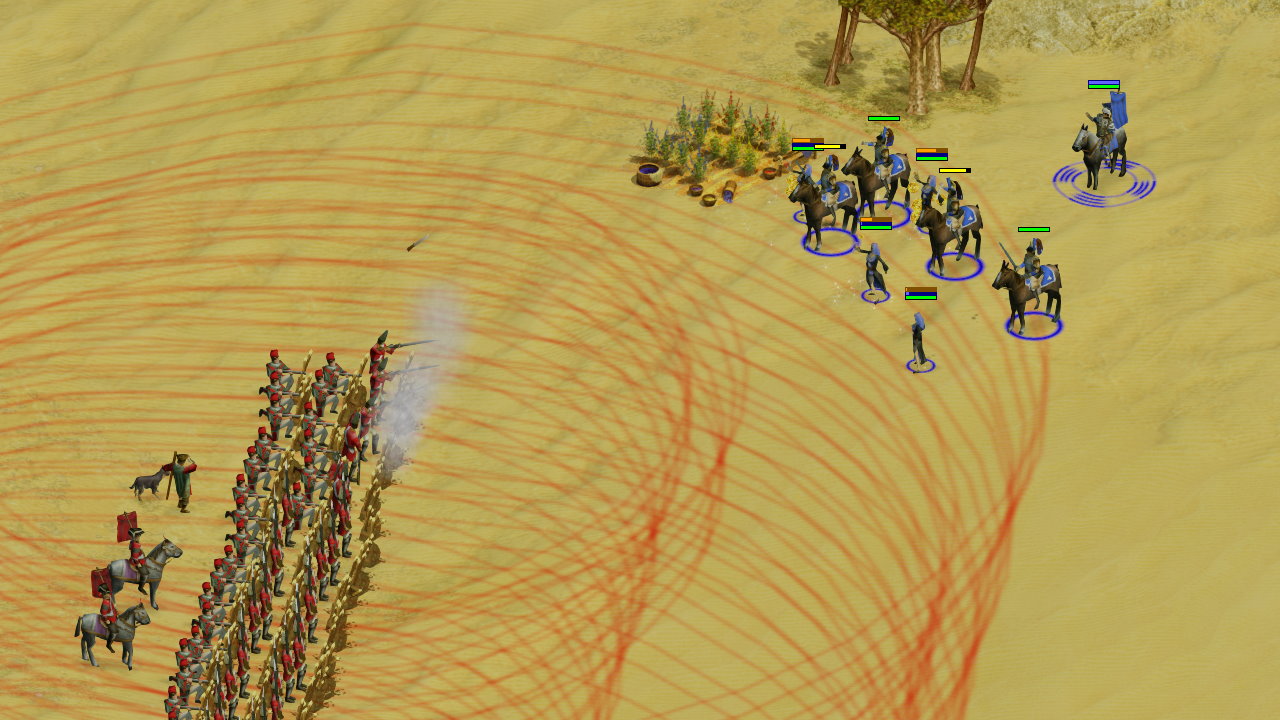
If both players are holding a group of units in reserve, this stage of the fight will look a bit less bloody.

Although it’s numerically similar once the attacker’s cavalry are downed, it should be noted that this position is nonetheless dangerous to be in for the defender. Their remaining healthy troops will be Fusiliers and Cuirassiers, a composition which loses to the attacker’s mix of Musketeers and Fusiliers. If the fight continues to play out, it’ll be close, but I would ultimately say that the attacker is favored because of the surviving units.
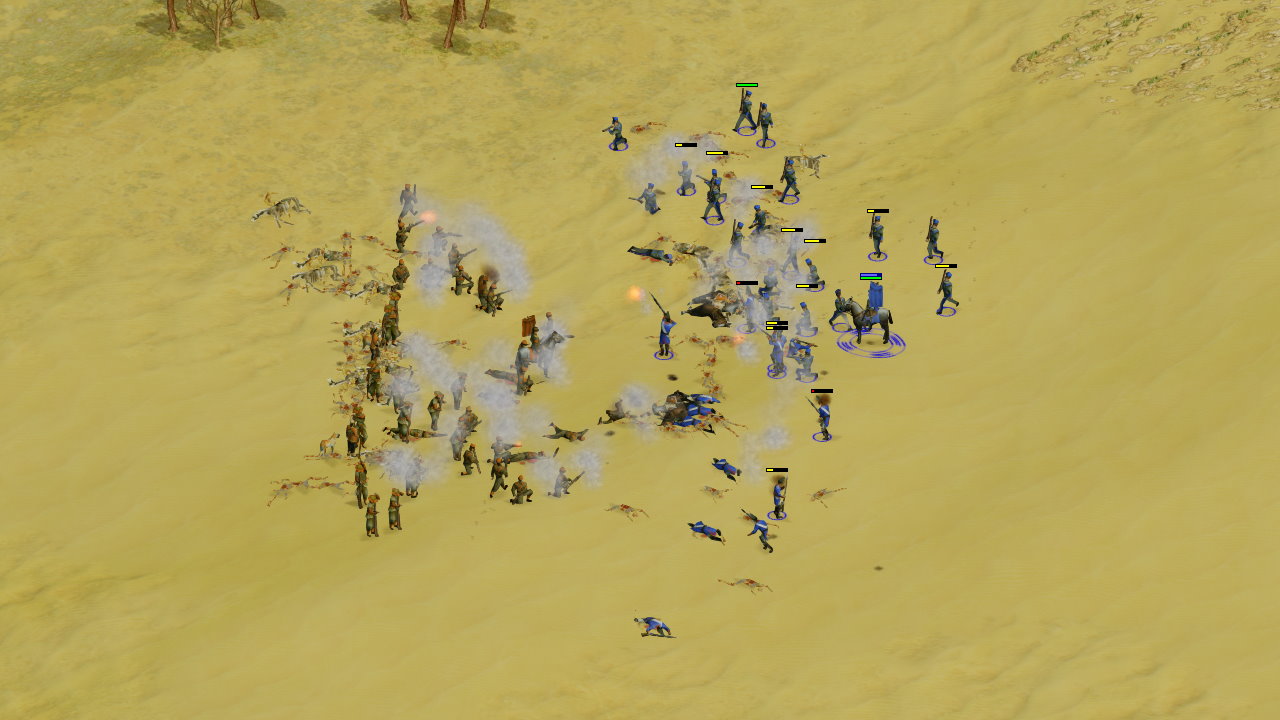
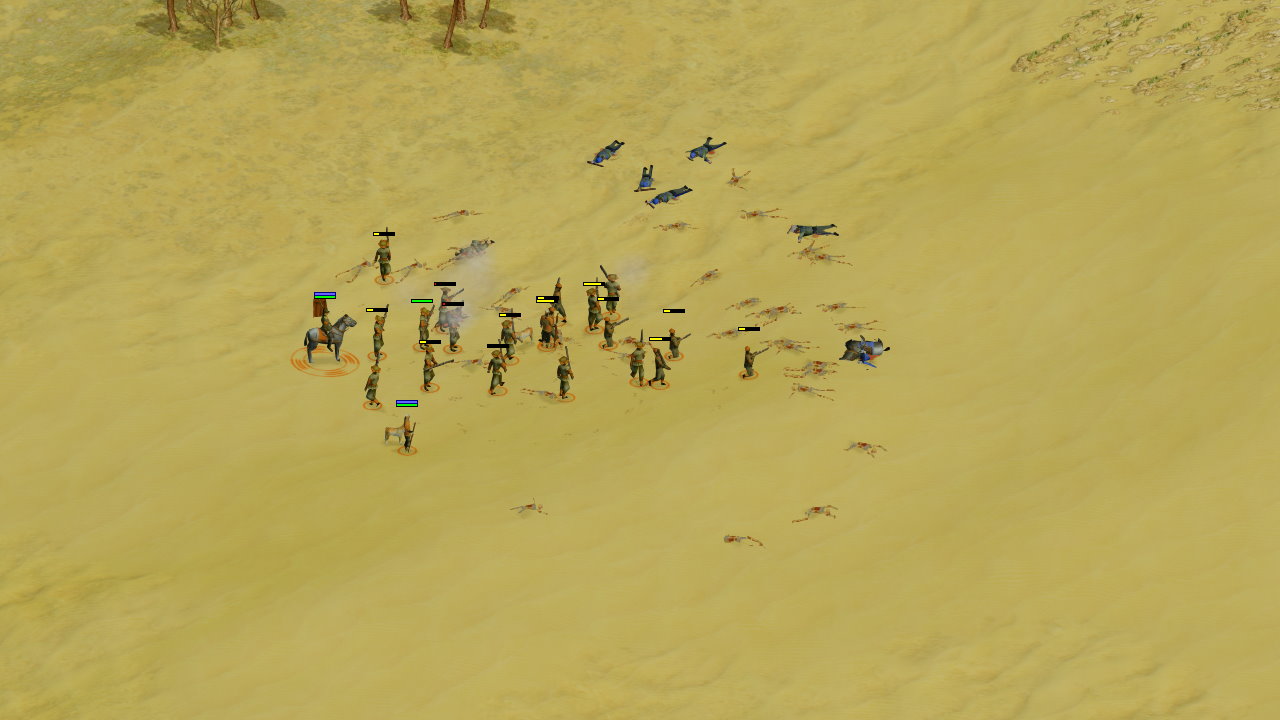
Here’s the above fight played out, with defending Fusiliers throwing themselves into the attacking Musketeers in an effort to keep their own Musketeers alive. They die en masse doing this, and the attacker finishes with a modest win (note the off-screen Cuirassiers for the defender are still alive and healthy).
This shows why it’s important to commit those flanking Cuirassiers. They will endure significant, likely rapid losses when wading in against awaiting Fusiliers, but they’re nonetheless critically important for breaking up the fight and exposing the attacking infantry to flank damage.
I would say it’s still possible for the defender to go even in the infantry fight here if they had perhaps a 14/12/8 composition facing the attacker’s 12/10/12 instead of their 12/12/8 which I tested with. However, going even in the fight amongst non-reserved forces would still leave a squad of defending Cuirassiers facing off against attacking Fusiliers, a recipe for disaster and a clear tactical win for the attacker.
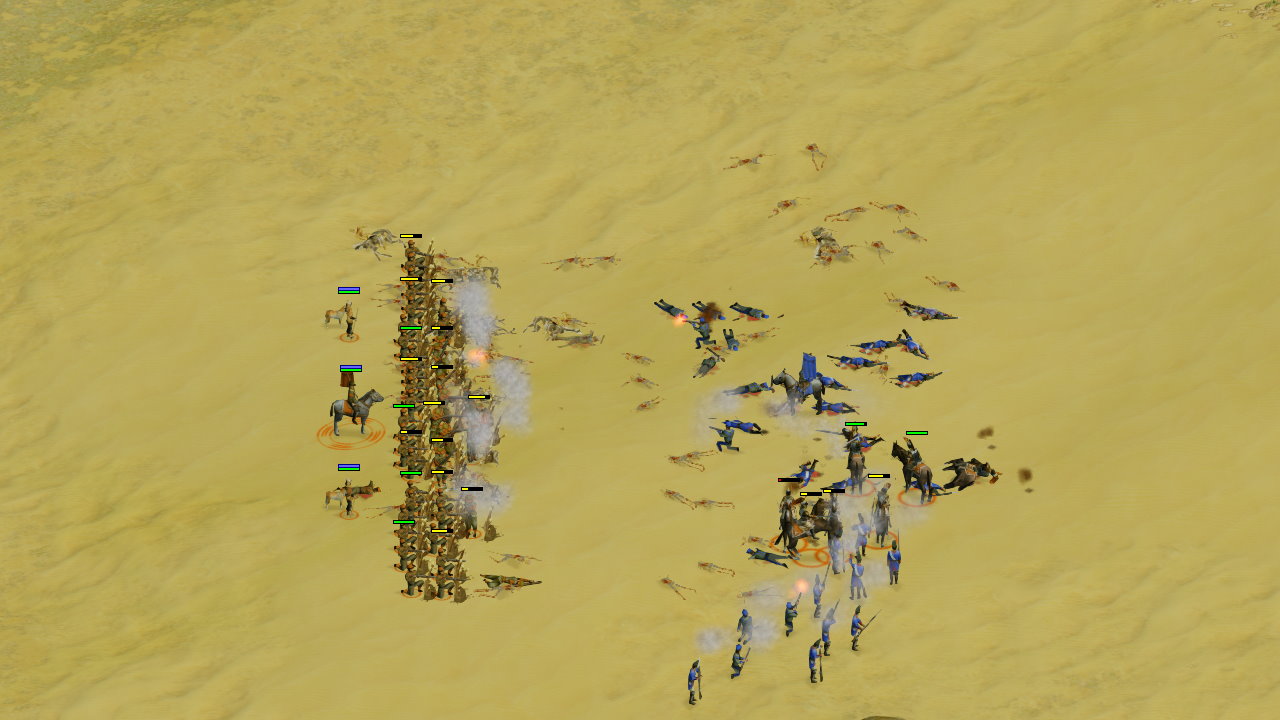
Let’s run that fight again where the attacker keeps their Fusiliers in reserve, but this time the flanking Cuirassiers swoop in on the attacking Musketeers despite the reserved Fusiliers:
Typical result: defender victory
If attacking Fusiliers were committed and defending Cuirassiers got a decent flank, the defender can expect a landslide victory (even when starting with marginally fewer units, such as in this example!).
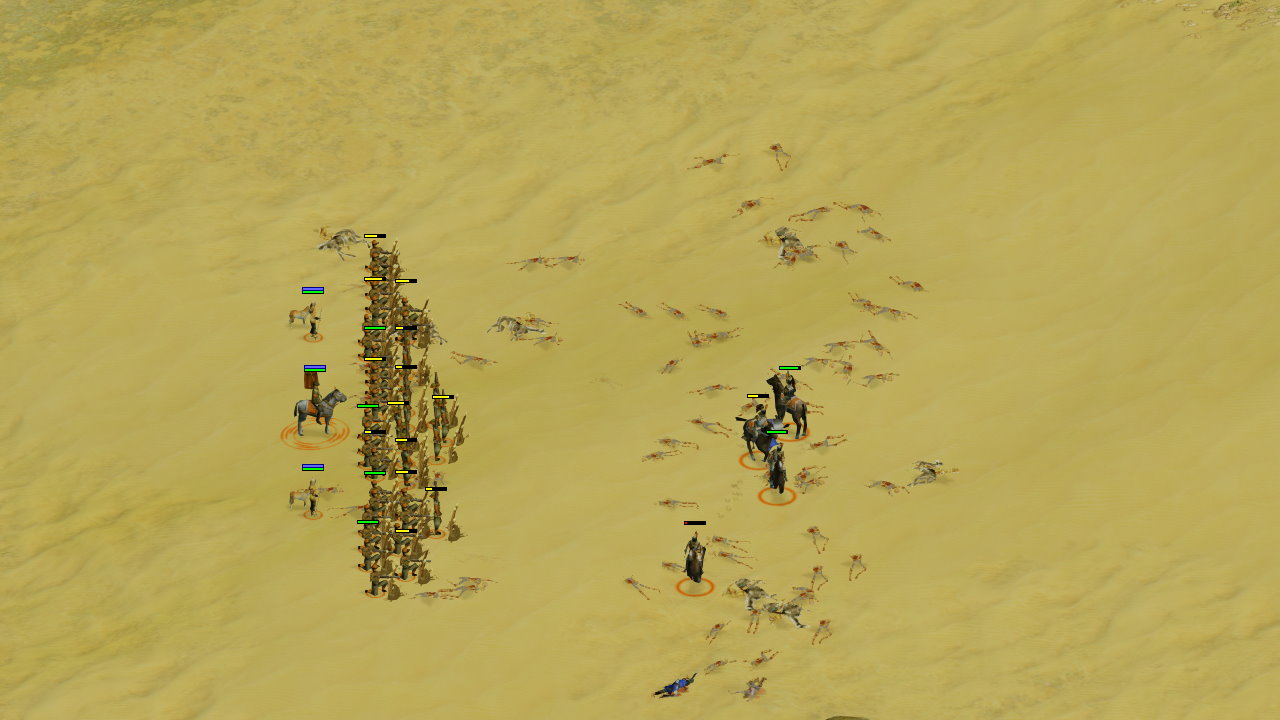
If attacking Fusiliers were held in reserve followed by the flanking cav being committed, that superior tactical play by the attacker significantly reduces the size of the defender’s win, but it’s still a win nonetheless.
Limitations and Counters
Prepared defenders only
This should be obvious, but an Entrench-based strategy will only work properly as the defender, not the attacker. Even the American UUs’ auto-entrench isn’t able to get around this fact. Regardless of how the Entrenchment is created, it requires your troops to 1) not have recently been in combat, 2) not be moving at the time the cast finishes, and 3) to continue to not move afterwards.
The out-of-combat limitation means that you probably can’t pull this off as an unprepared last-second Hail Mary, as your troops will need to not have not recently been in combat when the entrenchment is created, and this includes while Entrench is casting. Sitting still and not shooting is rarely a viable strategy when the enemy is literally mid-charge.
Limited formation width
Although ranged, Fusiliers are still not long ranged.
If you spread your formation quite thin — such as a 2-man-deep formation in an army of 10 Musketeers and 10 Fusiliers — then you can quickly end up in a situation where many of your Fusiliers have nothing to shoot at (since they can’t move without losing their entrenchment).
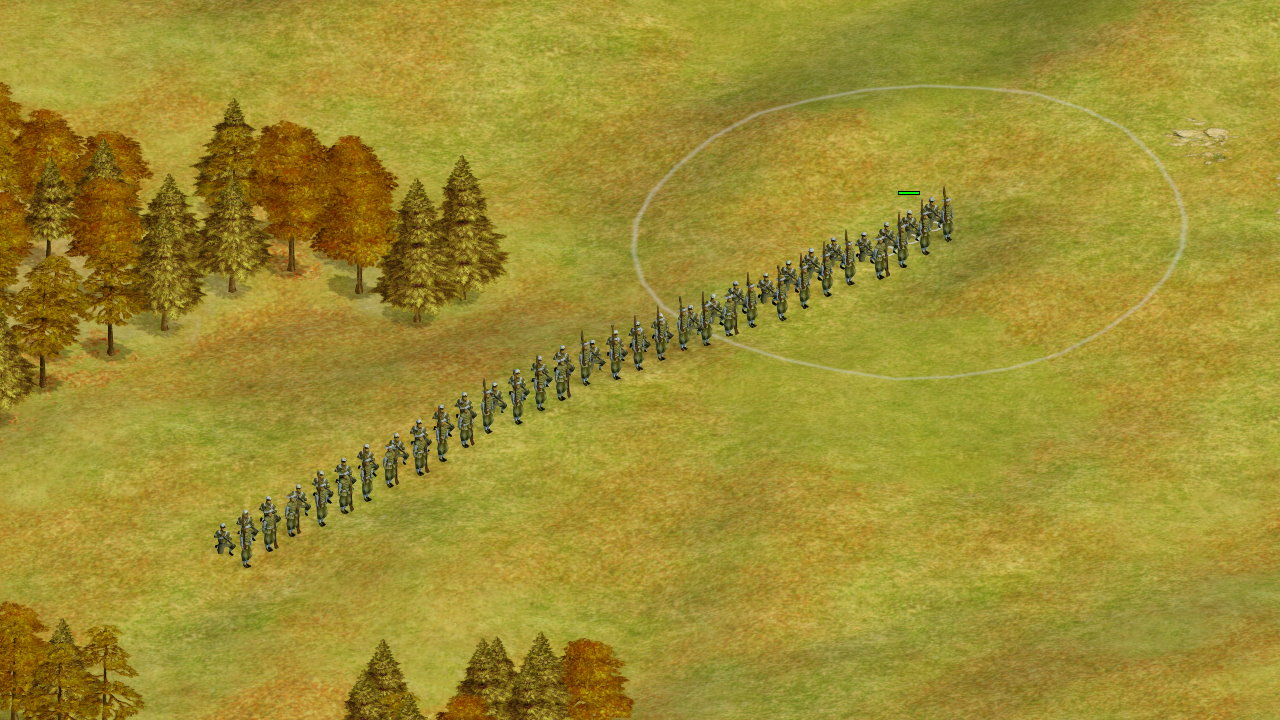
If your opponent makes this mistake, it can be punished by focusing your assault onto one side of the formation only, effectively removing a portion of the opponent’s army from active combat. Because of non-linear army scaling, keeping even 20% of enemy troops out of the fight is a very significant advantage.
Conversely, as the defender you’ll need a fairly tight formation – probably tighter than what you’re used to.6 To ensure that most of your Fusiliers are covering most of your Musketeers, you might need to use a formation several units deep. Tighter/deeper formations have a few secondary tradeoffs, such as keeping your Fusiliers safer but also making it possible that some of your Musketeers are out of range of enemy Musketeers (if the enemy Musketeers attack in a wider formation, which they almost definitely will).
Slow advance from the flank
Broadly speaking, my observation is that players in RoN heavily underutilize flanking, both at the army-wide and individual-unit level, so it’s unlikely that you’ll have to deal with this.
Nonetheless, it is possible for a cautious, patient opponent to bring in a similar unit composition and simply fight at maximum range. If they do this from a flank, they will beat your army unless you move it (which would be a win for them, as it breaks your entrenchment).
As the defender, you can make this vulnerability hard to exploit by choosing an entrenched location that allows terrain and other obstacles to guard your flanks – if you’re defending a city in particular, it will often be very difficult for an enemy army to maneuver on your flanks due to the buildings scattered around the battlefield.
Another significantly different counter to a slow advance would be to just simultaneously (and quickly) raid the attacker. It takes significantly more time/attention to be the attacker than the defender in a measured push, so you can do something of a mental version of a fork in Chess. Make them choose between spending attention on your raid vs spending attention microing their advance.
Specialized unit compositions
Depending on exactly what your unit composition is, it may be possible to counter it with an unusual unit composition — if your opponent scouts your army (and players don’t seem to do this much, so you’re probably fine).
Let’s say the baseline army is 12x Musketeers, 12x Fusiliers, and 8x Cuirassiers (separated a bit from the main army of infantry, as shown in the example fight). For shorthand, we’ll use the notation of 12/12/8 for this composition.
If you have a low number of Musketeers (say 6/12/14), an infantry-heavy force such as 16/14/2 can probably beat it with a bit of simple micro, as they can commit enough Musketeers to overcome the benefits of the entrenchment if they position units appropriately.
If you have a low number of Fusiliers (say 14/6/12), unsurprisingly you may be vulnerable to a composition with additional MC, such as 6/12/14. If your formation is too wide, this would be an especially dangerous fight for you.
After reading everything above you may be tempted to try an entrenched defence with a low number of Cuirassiers. While this can work, I consider it to generally be a mistake unless you’ve scouted your opponent’s army. If you go something like 16/16/0, you are extremely vulnerable to tactical maneuvering. For one, your infantry formation is simply going to be either too wide with this many units — leaving you vulnerable to concentrated attacks, or too deep — leaving you vulnerable to a simple slow advance.
You’re also extremely vulnerable to counter-specialization; if you try to ensure that the attacking Fusiliers have nothing to shoot at, that can be completely negated by the attacker not building them (although that relies on them scouting).
An extreme variation of the immediately prior army comp, I also tested 15/15/0 (entrenched) against a heavily micro’d 15/0/15, and it’s possible for the latter to win fairly reliably if every unit is hitting its optimal target — although as far as I know there is not and never has been a RoN player with the superhuman micro needed to manually control targeting for 30 units in real time in the laggy multiplayer environment which RoN unfortunately has.
However, even when the defenders in this comp matchup are also unrealistically micro’d (using very slow game speed), they still lose despite being entrenched. The main issue is that although the defender can kill many of the Cuirassiers reasonably quickly, their Musketeers-only frontline has to contend against damage from both those Cuirassiers and Musketeers. So you end up losing a lot of Musketeers, at which point you’re stuck fighting an enemy force of mostly-Musketeers with a force of mostly-Fusiliers — obviously a terrible matchup.
So yes, you do need the MC (particularly HC) for effective Age V combat.
Spies (situational)
The same Fort techs which upgrade armor also upgrade the range of the Spy’s Bribe ability.7 However, because Musketeers have the same range as the twice-upgraded Bribe, they’ll be able to shoot at any Spy attempting bribery so long as that Spy is being revealed.
This can potentially allow a Spy to bribe an entrenched unit from safety if the defender isn’t proactive about Scout placement, but even a quick reaction to reposition a Scout might be enough to prevent a bribe from completing without needing to break the entrenchment. It can also punish a player for not having Science and/or the Explorer upgrade, as both provide +2 LoS,8 although I doubt this opportunity will manifest in real gameplay with much frequency.
There are a couple of potential ways to improve the odds of successful bribes in this situation. The first is the “brute force” approach of simply sending more Spies. This may actually be viable to do if done on the extreme end of the enemy formation, as if send in four Spies you have pretty good odds of successfully bribing at least two units. That would mean you lose two units (your Spies) and they lose two units – a roughly even trade. If you get any more successful bribes or lose any fewer Spies then it’ll be a trade clearly in your favor, and I think better-than-par is certainly very doable.
Another, more devious approach is to send Cuirassiers to sit right at the edge of the Musketeers’ range to soak their fire, and have Spies move in just a couple of steps behind. Countering this requires either the Musketeers being micro’d to target Spies, or Scouts being in position to immediately snipe them instead. There is of course a risk here: the defender can also choose to trade their entrenchment to briefly charge forward and kill your Spies (so long as there’s at least one detector around), and kill — or at least damage — some of your Cuirassiers too.
Unentrenched?
Most of the broad details of the Age V combat dynamics apply to both entrenched and unentrenched units, so why have I focused on just the first?
As per the already-linked control article, the defender usually doesn’t get to pick where they fight. If you’re defending a city, the location is pre-determined. If you want to retreat then you’re no longer the defender because you’re no longer fighting.
There is essentially only one niche situation where you can pragmatically make use of the combat dynamics as the defender without entrench, and it requires:
1: Blocking an enemy force before it reaches its desired target.
The objective you’re both fighting over is the same, but now you’re de-coupling the fight’s location from the objective’s location – e.g., you could theoretically fight over a city without fighting near the city.
This is difficult to do, as you need to both successfully track your opponent’s movement and successfully deploy your own already-ready-to-fight army ahead of time. If you fail to scout it doesn’t work. If your army isn’t fully built it doesn’t work. If you move too slowly it doesn’t work. Lots of failure points!
2: Fighting in a fairly open area that allows you repeatedly kite backwards.
..and then actually executing that successfully.
The first of these two — finding the right terrain — is difficult when you consider the constraint that it actually has to be blocking your opponent per the previous requirement. It’s not really within your control whether the terrain is usable for this or not unless you specifically plan our your city building earlier with a heavy emphasis on optimizing for terrain location .
Even if you do do that (and you probably shouldn’t), your opponent could still just find another route through.
Let’s look at an example:
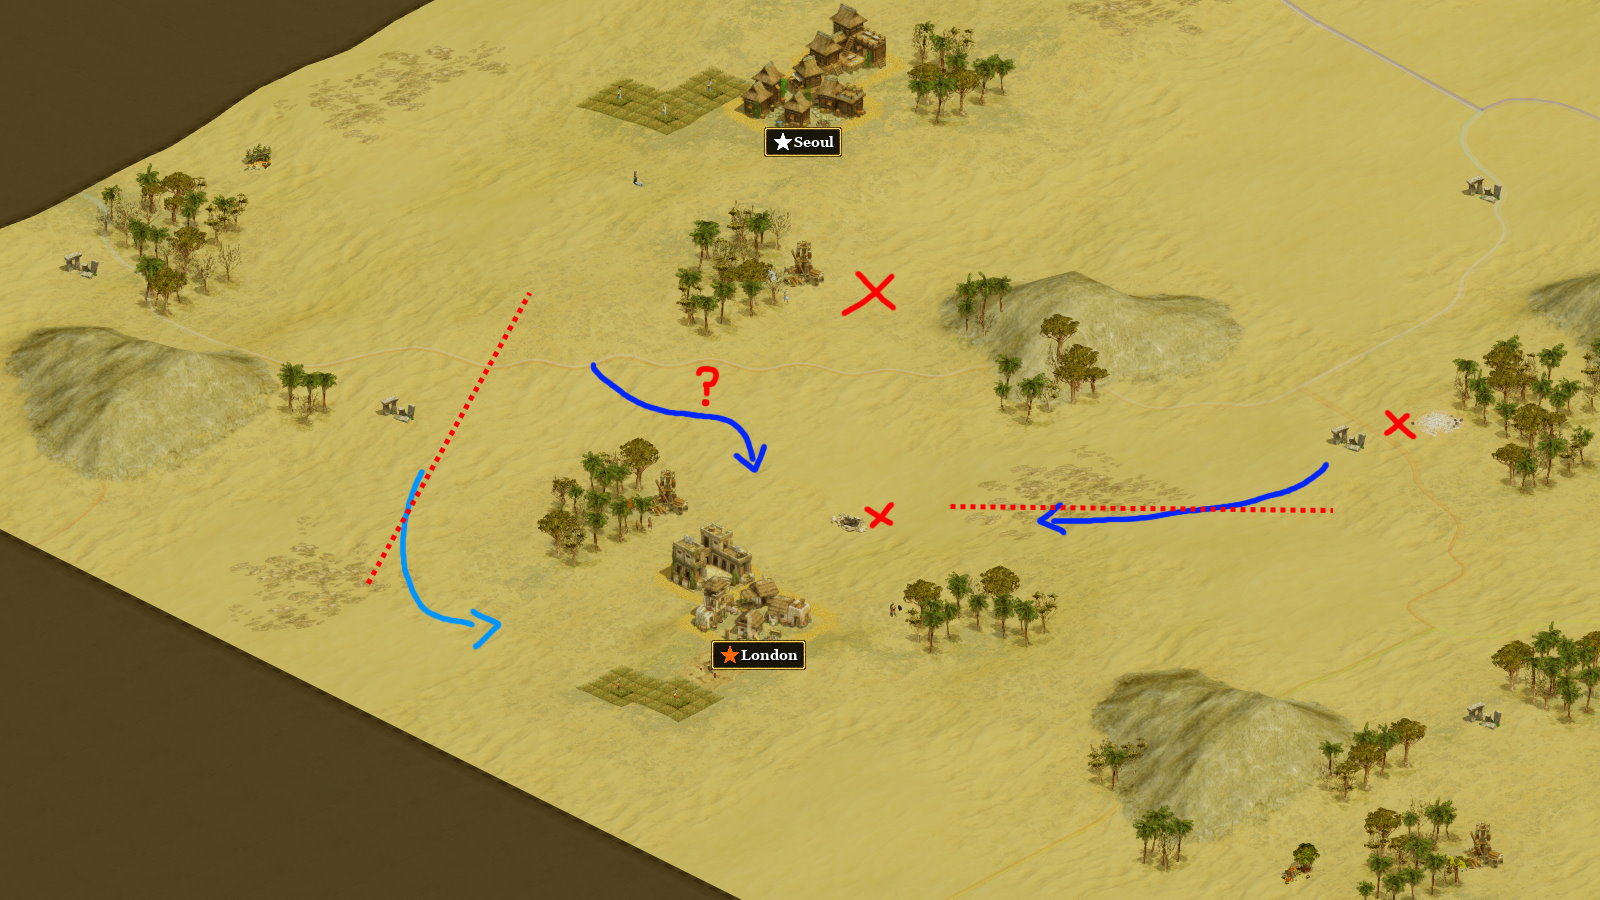
There are two clear attack paths (dark blue) to London’s east and north-west, and one alternative path (blue) to the west. The western path is vulnerable to being flanked and/or being isolated from reinforcements, hence it being being strategically weaker than the two primary paths.
The red dotted lines are the paths you can kite backwards along, with red crosses indicating blocking terrain features.
To the far east, Salt prevents safe army-wide kiting, as you just know a few of your units are going to get stuck on that a little as they run past. Just to the bottom left of Salt is a viable open space though, and it aligns pretty well with the attack path there.
For the west/north attack paths there’s only one clear kiting path for the defender, and it only blocks the west path, not the north path. This makes this kiting path troublesome to use, as it doesn’t successfully block both paths (allowing an attacker to re-route to the unblocked path, namely the north path).
The same area which the attacker is willing to move through to the north of London is a risky path to retreat through given its questionable width. Remember that the defender does not have the initiative. When the defender kites/retreats, the retreat path MUST be clear of obstacles and units MUST not be blocked or re-path around terrain — otherwise units die. In contrast, the attacker normally doesn’t have to worry about being slowed down by a couple of seconds as they march through to the city, since this transit route (usually) isn’t where the combat is taking place. I wouldn’t personally be willing to try kiting an entire army through that region, but a more risk-tolerant player might.
It might be possible for the defender to deploy far north-west of London in order to block both of the attack paths originating from there, but that’s a long way out to deploy troops — it’s unlikely that you’ll have the logistics required to track, deploy, and move in time (and again, failure on any of the three results in total failure). Such an aggressive interception would require significant preparation, but that preparedness may be rewarded.
Summary
- Age V combat dynamics are unique because it’s the only age in which (non-UU) HI can annihilate melee cav from afar whilst also not being at the front of a formation of infantry.
- Entrench can be used by a prepared defender to make full use of this dynamic. Kiting backwards can be a viable alternative, but is often prevented by terrain and other obstacles.
- There are strategies that may be able to break an entrenched formation, such as Spies, counter-compositions, and abusing the immobility of entrenched units.
- Because Fusiliers melt Cuirassiers, it may be best to hold your HC back until later into the fight during age V combat.
- Sun Tzu was better at RoN than you’ll ever be.
- Excluding UUs.
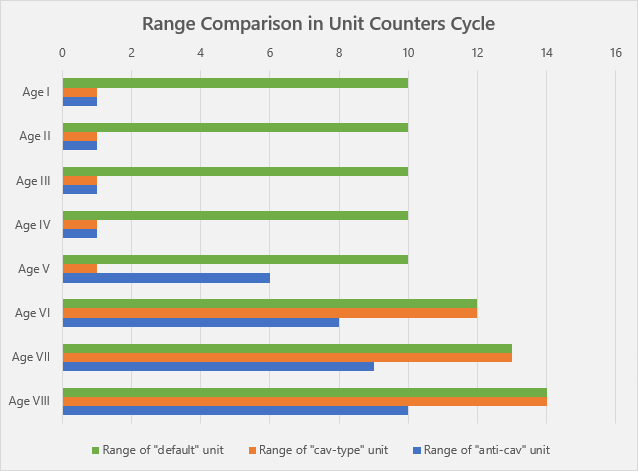
- This is half the reason why late-game ground combat has a tendency to devolve into a meatgrinder of just Modern Infantry and Tanks — the range discrepencies make the prior rock-paper-scissors cycle dysfunctional.
-
Age I-IV: Heavy Infantry have the same range as Melee Cav but are outranged by Foot Archers and Arquebusiers (10 range).
Age V: Fusiliers (6 range) OUTRANGE Cuirassiers but are outranged by Musketeers (10 range).
Age VI: Anti-tank Rifles (8 range) are OUTRANGED(!!) Light Tanks (12 range) AND Riflemen (12 range).
Age VII: Bazookas (9 range) are OUTRANGED(!!) Tanks (13 range) AND Riflemen (13 range).
Age VIII: Anti-tank Rifles (10 range) are OUTRANGED(!!) Main Battle Tanks (14 range) AND Assault Infantry (14 range).
- This formation order also applies to Spanish Tercios, but excludes the gun-less early ranged Persian HI.
- Well, not factoring in Spanish/Turk UUs in IV.
- haha yes, big funny
- This actually applies to The Senator as well!
- As a related aside, the Commando was originally an Age V unit and that also gave another +2 LoS. The patch that moved it to be in Age VI also incidentally buffed Spies a little as a result.