Also known as the part where we fix all of the storage and storage-related things.
- Primary storage: 1TB SATA SSD -> 2TB NVMe SSD
- Secondary storage (data): 2x3TB -> 4+1x4TB parity array
- Secondary storage (backup): 2x3TB -> NAS
- NAS: doesn’t -> exists
- OS: fucked -> not
This is part of The Big 2022 PC and NAS Upgrade.
Primary storage
Starting from the top, my primary drive is now a Seagate FireCuda 530 2TB, a high-performance, high-durability PCIe gen 4 NVMe SSD. This is actually a slightly higher-end (and more expensive) drive than I had initially planned for, but I couldn’t find an attractively-priced mid-range PCIe drive and was seduced by the 530’s high write endurance (2,550TBW for the 2TB model)1 and unusually high sustained write performance when it went on sale.
In my opinion, once you get to the mid-range NVMe drives the most noticeable differences are largely drives’ weak points rather than their strong points. It’s hard to notice if a game level loads in 9.5s instead of 9.75s, but you can sure notice if you have an unusual workload and one drive can complete it twice as fast.
The 530 appears to have exceptionally good post-cache write speeds compared to other high-end gen 4 drives,2 seemingly matched only by other drives also using the same Phison PS5018-E18 controller. Even the newer WD SN850X and Samsung 990 Pro don’t hold up on this specific metric.
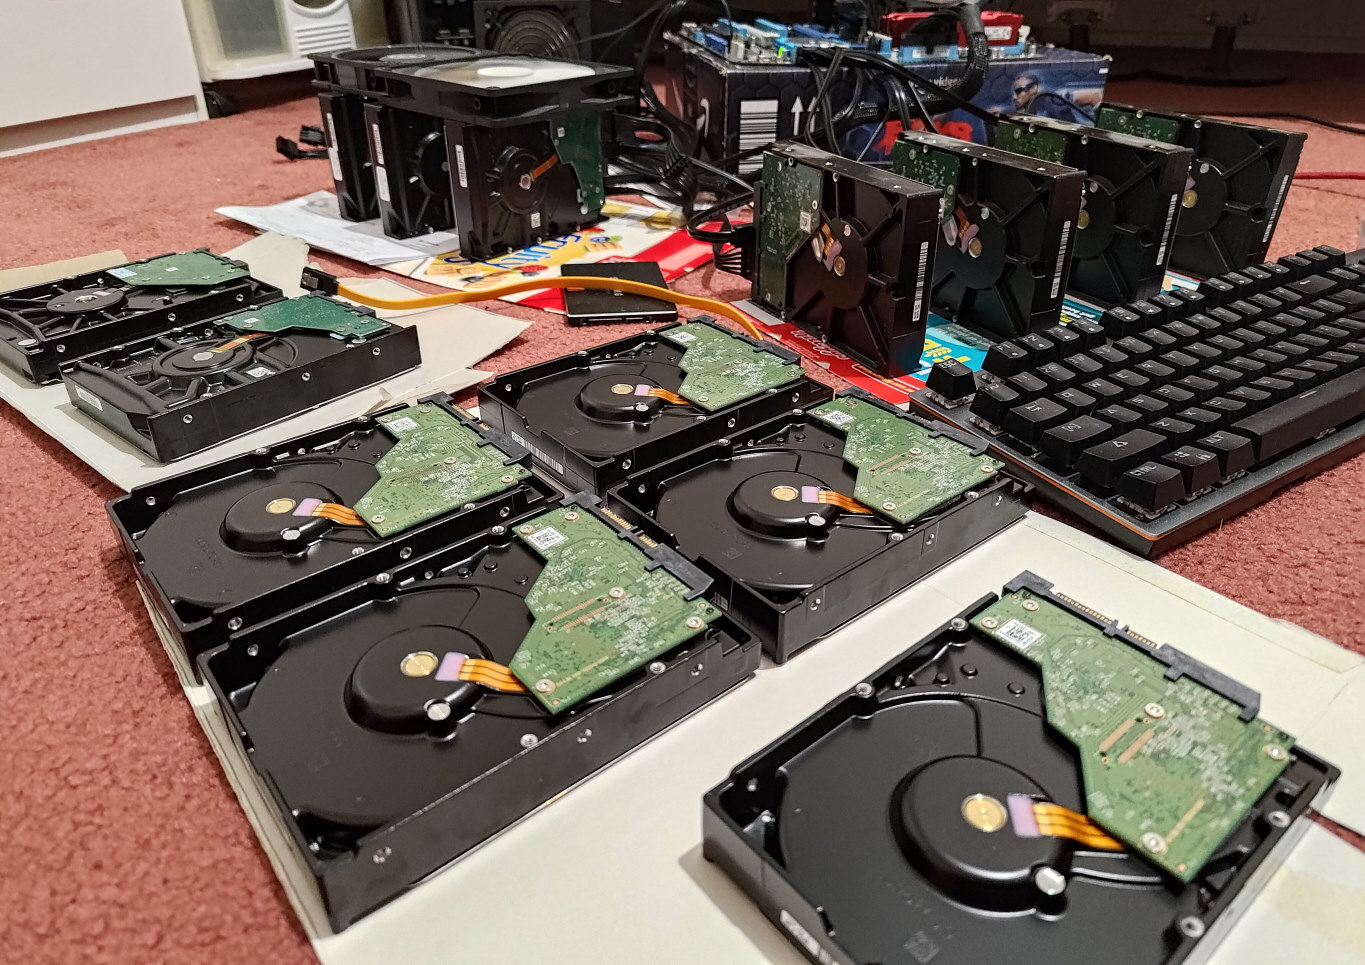
Secondary storage
For secondary storage I’ve had to balance a variety of factors, namely performance, acoustics, cost, and data resilience. In the end I’ve opted for a slightly-unpopular Storage Spaces array in a 4+1 parity configuration using low-RPM HDDs. Researching Storage Spaces showed that the “has >10TB of home storage” crowd is generally not a fan of it, citing anecdotal evidence of difficulties with it.
I sifted through a lot of discussions in an attempt to read these anecdotal reports, but it seems that Storage Spaces is just largely niche and not used very much, so there are only so many people talking about it. It’s also seemingly gotten a bit better over time, having initially been introduced somewhere around the Windows 8 era and incrementally improved since then. On balance I was willing to risk using it – I do also have a fairly good backup system in place in the event it does fuck everything up.
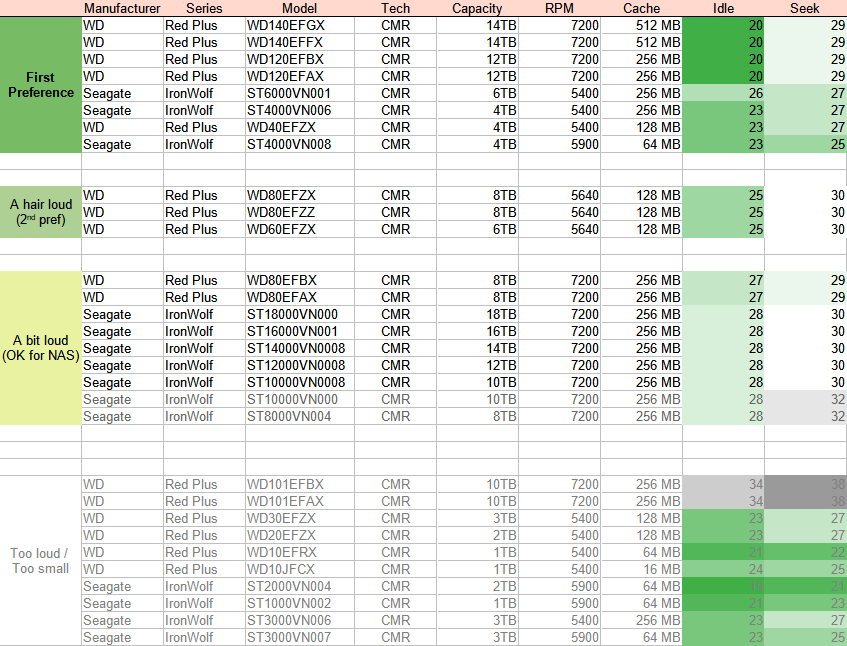
For the drive selection, I limited myself to CMR NAS drives from the big two: WD and Seagate. Limiting to CMR drives helps with both performance and durability, and limiting to NAS (or NAS-like) drives may help with reliability given that I’m packing quite a few drives close together and running them a bit more than the average user. I limited to the duopoly just to make my life easier; their drive lines are relatively easy to understand for this segment, their drives are readily available from a wider variety of stores, and they both provide easily-accessible datasheets for drive specs.
I used those datasheets to compile a list of drives and their basic specs + rated acoustics. This is definitely not an ideal way to choose drive acoustics, but with SPCR functionally dead it’s very difficult to get accurate 3rd party acoustics data for drives and so I’m more or less stuck using the manufacturer ratings here.
Given pricing, my storage needs, and given that my FT02 case can only natively house 5 drives, I targeted 4TB drives for a 5x4TB array. This was favorable over any 2-4 drive option where higher-capacity drives would have lower storage efficiency and probably lower array performance as well.
| Drive | RPM | Cache | Idle (dB) | Seek (dB) |
|---|---|---|---|---|
| Seagate Ironwolf ST4000VN006 | 5400 | 256MB | 23 | 27 |
| WD Red Plus WD40EFZX | 5400 | 128MB | 23 | 27 |
| Seagate Ironwolf ST4000VN008 | 5900 | 64MB | 23 | 25 |
In this context I don’t really care about small performance differences between the drives, so the differences in RPM / cache are unimportant. I’m more interested in the VN008 shedding a couple of dB when seeking, which looks like it may be a consequence of being a newer model, despite possibly using more total platters.
What I ideally wanted to do here was use 2x WD40EFZX drives, 2x ST4000VN008 drives, and then a lucky dip of the last drive (ideally it would be a VN006). That reduces the odds of a bad model destroying the array, whilst also automatically reducing the risk of a bad batch (which could otherwise be reduced by buying drives of the same model from different sources).
In reality, for some reason the WD Red Plus 4TB drives were almost universally cheaper for me at time of purchase than either of the Seagate 4TB drives. So in the end I bought 5 WD Red Plus drives from two different sources at two different times (avoiding getting drives from the same batch), and one Seagate VN008 from a slightly sketchy high-feedback ebay seller for a total of six drives (one drive out of the six being a cold spare for five actively-used drives). I ended up getting a mix of EFPX and EFZX versions of the Red Plus.
What I actually received from that seller was a Chinese-market version of the drive which has no valid warranty outside of China — that’s what I get for trying to save $20 I guess. It’s made me a bit suspicious of the drive in general, but I can’t easily tell if there are any physical differences between the Chinese and western variants of the drive and I’m not disassembling it just to find out.3 I do at least know it’s got a real Seagate serial number (and by extension that it’s probably a real Seagate drive), since Seagate’s website helpfully lets you look up serial numbers for warranty purposes.
So my array is exposed a bit to bad-model risk by using mostly WD Red Plus drives, but doing this did save a good chunk of money with the weird pricing disparity going on (excluding sketchy ebay sellers sending un-advertised Chinese-market drives). My available funds are bounded and my stored data is valuable but not critically so. I have to be pragmatic about saving costs where the tradeoffs make sense, and I think it did here.
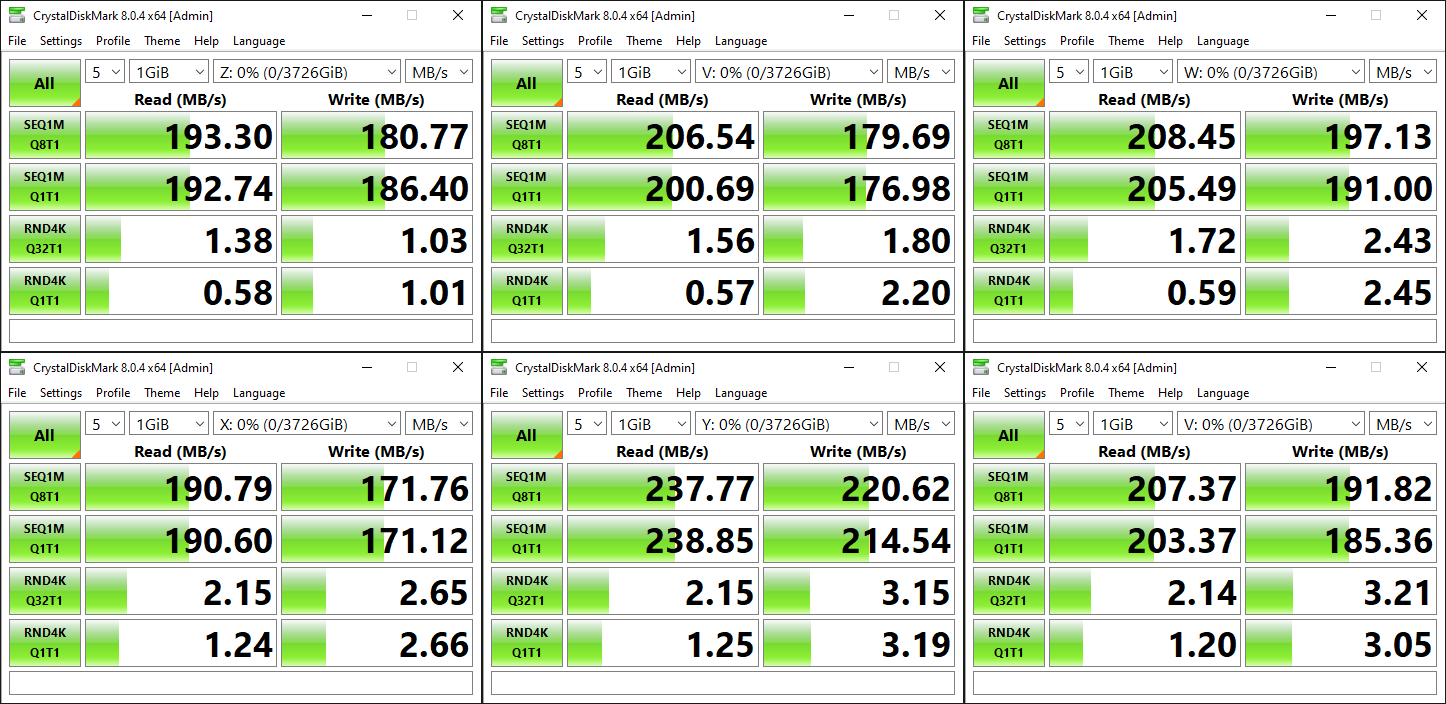
Here are basic CrystalDiskMark results for each of the drives for your perusal. The suspicious VN008 is underwhelming performance-wise, but I’m more surprised that there’s this much variance in drive performance for the five WD drives given that they’re all the same model:
The Storage Spaces parity array
Storage Spaces supports three configurations, compared below against a “normal” configuration of drives. Note that I’m specifically comparing the options for my context:
| Configuration | RAID equivalent | Performance | Data Resilience | Storage efficiency |
|---|---|---|---|---|
| Normal partition(s) | None | Low (baseline) | None (one drive failure causes one drive of data loss) | 100% |
| Simple | RAID0 | ~High | Awful (one drive failure wipes out more than one drive of data) | 100% |
| Mirrored | RAID1 | ~Medium | Very Good (one+ drive failure with no data loss) | 50% (for single-mirror) |
| Parity | RAID5 / RAID6 | Godawful to Medium, or Medium to Very High* | Good to Very Good (one drive failure in single-parity with no data loss; two in dual-parity) | 80% (for 5 columns on 5 drives) |
* See below.
With careful configuration, by far the best balance of performance, data resiliene, and storage efficiency (and therefore cost) comes from a parity configuration. However, parity configurations come with two significant gotchas:
- You have to use enough drives (and columns) to be able to get high storage efficiency. For single-parity, the highest possible efficiency is always <total number of drives> minus one, meaning you only have a max of 67% efficiency for three drives but that goes up to a max of 80% at five drives (when using five columns). Maximum space efficiency is also not “automatic” — you have to choose the right number of drives and columns to get it.
- You have to be really specific about the array’s interleave size compared to its number of columns and AUS (aka cluster size (sector size?)) otherwise write performance to the array will be absolutely terrible (literally ~20x worse in my case). This one is EXTREMELY NOT-OBVIOUS, SO MUCH SO THAT OPTIMAL CONFIGURATION IS USUALLY IMPOSSIBLE WHEN ONLY USING THE STORAGE SPACES GUI. YOU HAVE TO CONFIGURE THE ARRAY MANUALLY IN POWERSHELL. I AM YELLING BECAUSE THIS SEEMS INCREDIBLY STUPID AHHHHHHHHHHH.
The short version of point #2 is that for write performance that doesn’t make you want to claw your eyes out, you have to follow this formula (for single-parity):4
AUS = (columns – 1) * interleave
If you don’t, you end up in Write Cache Hell. In WCH, Storage Spaces dices your sustained write performance into little cubes, douses it in lighter fluid and then giggles as it strikes a match and burns the whole thing to ash.5
For further reading on this specific thing, I suggest:
- Waste of Server: “Storage Spaces with parity, very slow writes. Solved!” (Shorter, easier read with less detail; references the second link)
- Storage Spaces War Stories: “Storage Spaces and Slow Parity Performance” (Longer, more detail)
One sidenote is that for reasons unclear to me, CrystalDiskMark doesn’t accurately measure the performance of a correctly-configured Storage Spaces parity array.6 I tried ATTO and that exhibited similar issues.
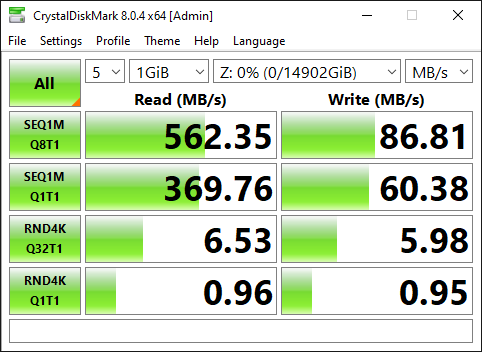
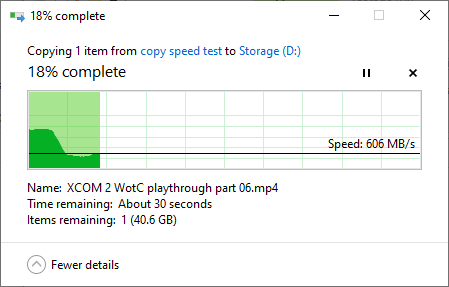
Because of these issues I resorted to doing less rigorous manually-timed file copy tests in order to evaluate write performance.7
I performed two tests:
- Large file test: a single ~50GB MP4.
- Small file test: an entire vanilla install of RoN:EE v1.10 (12,415 files, ~1.9GB)
Of these, I care much more about the large file test for my usage because the array is going to be mostly populated with media files (and especially video files), so I ran each setting at least three times for the big file test8 but only at least once for the small file test. The reported result is the average of however many tests were run for that configuration.9
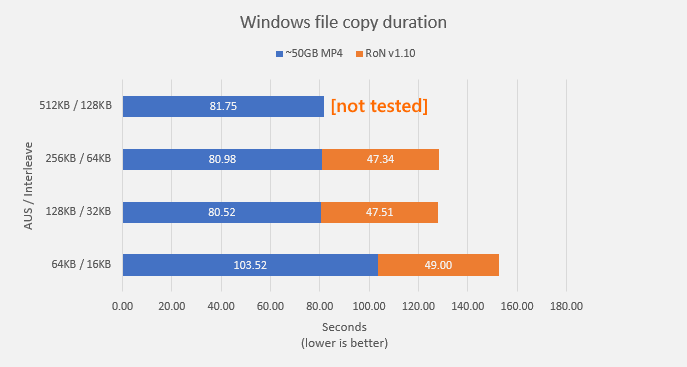
I don’t really know why there’s such a large gap in performance between 64KB/16KB and the other configurations, but I sanity-checked the results of the large file test multiple times including deleting and remaking the array from scratch to make sure it wasn’t a misconfiguration issue or a fluke. Despite re-tests, the results for that specific pairing were consistently slower by a wide margin. It’s possible that it’s a quirk specific to something about my setup; I don’t really have enough information to speculate much as to the cause.
While testing I did also briefly check the performance of 2M / 512KB — and it seems like 2M in this case actually means 2M and not 4x512K because performance was abysmal, with a sustained write speed in the sub 30MB/s range for the ~50GB MP4 (meaning we’re not in a goldilocks configuration and are instead in WCH). Given that result I didn’t let the file transfer complete and didn’t bother testing the small file performance for that configuration either.
In any case, the difference between the three “fast” configurations is basically within margin of error, so I was happy to use any of those performance-wise. I went with 128KB / 32KB to reduce the wasted overhead for small files, which I also briefly checked using the RoN v1.10 files:10
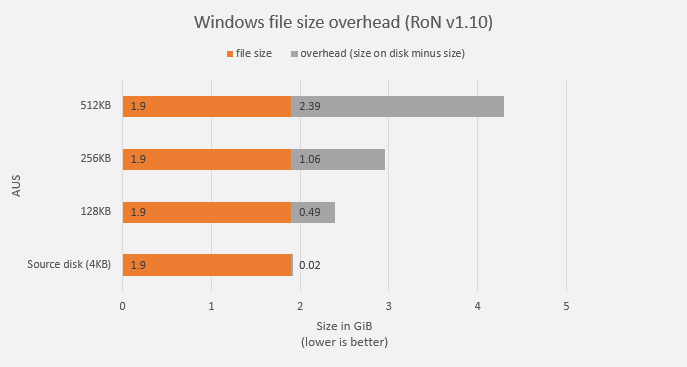
Based on all of my testing, 128KB / 32KB is definitely the best configuration for me, so that’s what I’ve ended up using for the array.
The overhead for this configuration may still look quite high at around 25% in the graph above, but remember that that was done with RoN, which has heaps of small files. Because I’ve solved my lack of primary storage with a new 2TB NVMe drive, I don’t have to split program installations between primary and secondary storage anymore and this array can be dedicated nearly exclusively to media files — particularly large video files which will have very little overhead regardless of what AUS is chosen.
Given the types of files being stored on the array, I imagine that the total overhead is going to be ~5% or less, which is perfectly serviceable.
A quick reminder if you’re reading this and interested in setting up your own Storage Spaces pool/array/what-have-you: Windows reports 1024 bytes as “1 KB”, whereas storage manufacturers will present 1000 bytes as 1KB.11 So although a pool can be configured to exceed the size of your physical storage, if you want an accurate match you’ll have to do some converting. In my case I just converted 16TB to 14.55192TiB and used that second number when setting things up in Storage Spaces. The result is that the size of my pool (factoring in space required for parity) neatly matches how much space I actually have on the drives.
As one little final thing, it’s often suggested to set a flag on the storage spaces pool telling it that the computer has backup power (like a UPS) using the IsPowerProtected bool to improve write performance. I had forgotten about this when doing the initial testing, so presumably it was set to false at that time. I did a quick test using the same ~50GB MP4 with and without this flag after already setting everything up and didn’t notice a performance difference outside margin of error.
I unfortunately couldn’t find documentation on exactly what this bool controls, but it evidently isn’t something with an obvious performance effect on my specific array. I’ve seen reports in the wild note something in the ballpark of 50~100% improved sustained write performance when this flag is set on a parity array that isn’t in the goldilocks zone. I guess since we are, we don’t get a slice of that performance-enhancing pie. I’ve left it set to true in any case.
Never Anuff Storage (NAS)
I’ve been wanting to build a NAS since at least 2015~2016, but I’ve only recently had enough money to be able to justify throwing down enough cash to do it.
For OS, the main contention was Unraid vs TrueNAS Core (formerly FreeNAS). I considered some other solutions such as Open Media Vault and XigmaNAS too, but I really wanted to make use of something very widely used in order to have better community support / tutorials etc.
TrueNAS’ use of the ZFS file system is both a pro and a con; array configuration and expansion is much more complex but the file system is more robust. On the other hand, Unraid doesn’t natively support ZFS (although it can be added via an unofficial plugin, which is apparently good enough for GN),1213 but it’s super easy to expand the array and supposedly a bit easier to navigate through for a novice.
NAS OS choice is already well-discussed elsewhere so I’ll keep it brief and say that I ultimately opted to start with Unraid,14 with a view that I’ll very likely migrate to a ZFS (or even BTRFS etc) system in 5-10 years if I continue to use a NAS. Unlike Steve/Wendell, I’m a bit more skeptical on the merits of using a third-party plugin to add ZFS support on Unraid and then trusting that with all of my data, so I’m sticking with officially supported file systems.
The drive configuration starts off with the four old 3TB drives that are coming out of my main PC. Because I’m more-or-less expecting at least one of these drives to fail in the coming years, I want the Unraid array to be dual-parity unlike the single-parity of the Storage Spaces array.
Most of the data on the NAS is just going to be a mirror of the media files on my PC, so for total storage size I’m looking at having it be a bit over 16TB (the size of my PC’s secondary storage). With 12TB already coming from the old drives, I didn’t need to add much in the way of further data drives to reach that target.
Based on a combination of my budget and drive pricing at time of purchase, I focused mostly at drives at ~8TB to fill out the rest of the NAS whilst keeping an eye out for deals on anything slightly larger as well. Anything too large was a bit too expensive given the parity requirement — if I bought a 16TB drive for example, I would need to buy three just to get 16TB of useable storage because the other two would need to be parity drives. Unraid’s parity system uses an entire drive for parity (it’s not distributed parity striped across the array), which necessitates that parity drives be equal or larger in size as the largest non-parity drives in the array.
That raises the question as to why I bought 8TB drives at all instead of say, 4TB drives. The biggest reason is forward-looking; I don’t want to be in a situation in 5 years where the NAS’ array is nothing but 3-4TB drives, as it makes expanding the array more complicated due to SATA port limitations. Yes, it can be solved with expansion cards to add more ports, but part of the reason I’m doing all of this is to make use of existing hardware where feasible instead of going out and buying a bunch of new components for everything.
Noise was only a secondary concern for the NAS because it’s in a separate room. I’d like to avoid the system being obnoxiously loud of course, but if an individual drive is a few dB louder than what I selected for my desktop then that’s not an issue.
In a reversal of the 4TB drive situation, for some reason it was much more cost effective to get 8TB Seagate Ironwolf drives than 8TB WD Red Plus drives when I was buying.15 I was also willing to save a bit of money by buying some lightly used commercially-supplied drives I found that were still under original warranty (nearly $100 cheaper per-drive in my case!). I also saw some interesting deals on ex-business higher-capacity Ironwolf Pro and some enterprise SATA drives, but the capacities (hence cost) just didn’t make sense for my needs.
So in the end the NAS drives are:
- 2x used Seagate Ironwolf 8TB ST8000VN004
- 2x new Seagate Ironwolf 8TB ST8000VN004 (different source)
- 2x old WD Red 3TB WD30EFRX (from 2013)
- 2x old WD Red 3TB WD30EFRX (from 2016)
The ST8000VN004 is a 7200 RPM drive, so it’s a bit faster and louder (and as I found out later, noticeably hotter) than the other, lower-RPM drives I’m using.
I had a brief scare with the two used drives, as for reasons unclear to me their noise output is substantially more sensitive to being amplified by whatever surface they were on than the two new drives (but both sets of drives sound mundane when suspended in the air). I actually initially contacted the seller about RMA’ing them because I was so concerned about it, but while making notes about which drives were making what noises I physically picked them up (while they were running) and had the “aha” moment of it being a bizarre surface-coupling issue.
Speaking of scares, three of the four 3TB drives also presented with a single current pending sector, with two of the drives actually getting it only in the middle of me pulling data from them just prior to their NAS redeployment. However, I precleared all eight of the NAS drives in Unraid and that process (which involves overwriting the whole drive, including the questionable sector) restored the count back to 0, so I’m keeping an eye on those three drives but they should be fine to use in the array for now. I really don’t want to have to throw any probably-okay-to-use drives into ewaste if I can avoid it so minor risks like these are well within my tolerance.
I have the eight NAS drives configured in a 5+2+1 configuration:
- 4x 3TB drives + 1x 8TB drive for data storage.
- 2x 8TB drives for parity.
- 1x 8TB drive as a cache disk to improve write speeds to the array.
Even though the cache disk in this case itself isn’t faster than the drives in the array,16 having a separate cache disk delays parity operations which otherwise slow down writes significantly.17 Originally I had the cache as a cold spare, but because of the performance disparity with a cacheless-parity configuration (which I didn’t know about beforehand), I conscripted it and now it’s essentially pulling double-duty as both a cache disk and as a hot spare instead of a cold spare.
The heart of the NAS was originally spec’d out to be an old Sandy Bridge system which I have spare, but at some point during the yearish-long (on and off) planning process I crossed some wires and lost an early note I made that that motherboard only had six SATA ports and that I needed plan out the storage system around that. Since I only realised my mistake after buying some of the drives (thinking I had 8 ports), I swapped out that platform for my own prior i5 3570K + Asus P8Z77-V Pro combination which I had wanted to redeploy as a TV/media PC.
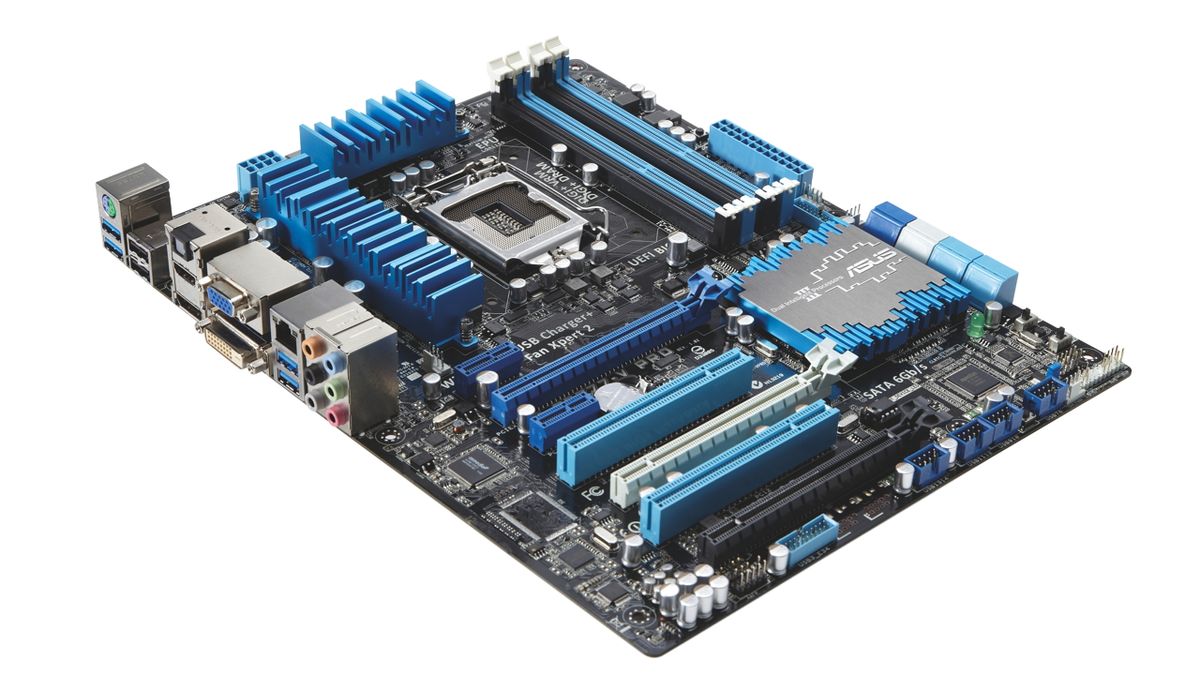
The Asus P8Z77-V Pro has eight SATA ports:
- 4 native SATA 3Gbps ports
- 2 native SATA 6Gbps ports
- 2 non-native (ASMedia) 6Gbps ports
Both the 3Gbps and non-native 6Gbps ports are of course a bit slower than the native 6Gbps ports, but since we’re dealing with spinning rust the real-world difference between should be insignificant for my usage.
RAM is basically what I could scavenge from old systems: initially 2x4GB sticks for 8GB, but later 2x8GB sticks for 16GB after rotating some old hardware around. A NAS in and of itself is comparatively resource-light though so even the initial 8GB would’ve probably been plenty, but if I do more with it later like muck around with VMs then the extra can be handy.
I don’t currently need a dGPU or modern hardware-accelerated video operations so the weak iGPU on my 3570K is plenty. Powering everything is a Corsair TX750M that I was using a few years ago for a dedicated AI/ML system. It’s not necessarily something I’d recommend people copy, the the system is set up on two shelves of.. a shelf; there’s no case. Shortly before wrapping up writing this article I was donated my brother’s old CM Stryker case (which has 8 3.5″ drive bays), so I’ll probably move everything to that when I can be bothered, but the shelf is very much out of the way and unlikely to actually encounter physical hazards.
It’s chronologically ouf-of-order, but the final part of the NAS hardware list is a couple of spare fans to help keep the 7200RPM drives cool; without them they were running at >=45C under load on warm days. With the fans servicing those four drives, all eight drives seem to stay at <=40C even when being written to which is a more comfortable temperature.
It took a while for all the various parts (mostly drives) to be purchased and delivered, but eventually it was time to set everything up.
I had… a host of issues actually getting everything working. It seems unnecessarily verbose to go into everything in gory detail even for me, so going a little bit quickfire here, I had to deal with:
Dead M.2 slot
The singular M.2 slot on my motherboard seemingly being dead, as confirmed by installing the new 2TB drive into my dad’s PC, then pulling the M.2 drive out of there and cross-checking whether that known-working drive actually worked in my motherboard.
There’s a small chance it’s actually a configuration issue of some sort, but I updated the board’s UEFI and repeatedly tinkered with the various sometimes-can-cause-an-issue settings to no avail. My eventual18 solution was to buy an M.2 to PCIe slot adapter. That did the trick, except for the:
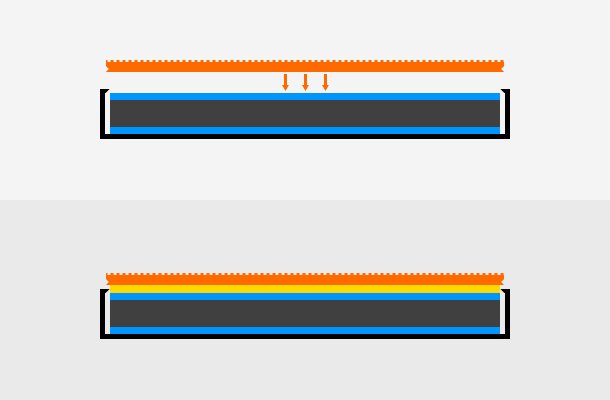
Bad (?) SSD heatsink
I bought a separate heatsink for the 2TB SSD since unlike recent motherboards, my slightly older X370 motherboard doesn’t integrate one in its design. It seems there was a small tolerance issue with my particular sample though, as I needed another millimeter or so of internal height/width in order to actually install the heatsink properly.
Whilst trying to snap it into place (which I triple-checked was the correct installation method), I used enough force that I worked up a sweat and was worried that any more force would break something. I tried carefully filing off some excess aluminium which helped but still didn’t quite let me install the heatsink properly, so I resorted to installing it improperly. Basically I’m using an extra thermal pad which I’m not supposed to use, doubling the total thermal pad thickness on one side of the drive (lowering thermal performance) and providing dubious structural integrity.
The heatsink would be secured nicely to the drive when installed properly, but with my… bespoke installation method, it’s literally held in place by just the thermal pads. It makes me a bit uncomfortable, but it’s been a few weeks and the heatsink hasn’t fallen off (yet), so I’m calling that a success.
Pop! OS popped
Prior to upgrading everything, I was running a dual-dual boot of Pop! OS (linux) and Windows 10 and 8.1.19
Pop! has five years of support for their LTS releases, but because I was mostly just playing around with it rather than seriously using it, I had installed (I think) 21.04 or 21.10 non-LTS, support for which ended during 2022. When I finally went to upgrade it, the upgrade failed in a variety of ways with a variety of errors which I tried and failed to overcome. (hand-waving details for brevity)
I eventually resorted to wiping all of Pop’s partitions entirely to do a fresh install of 22.04 LTS.20 I haven’t gotten to actually doing the re-installation part of the process yet, but it’s on the to-do list alongside a couple hundred other things.
100Mbps home network
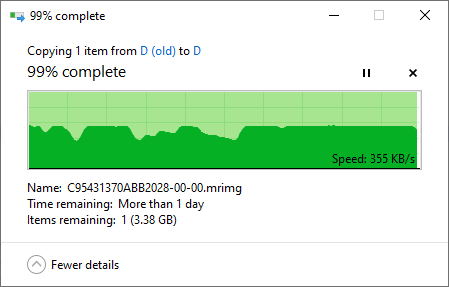
We’ve been using more-or-less this network configuration at home for I think at least six years and nobody ever noticed that this part of the network wasn’t gigabit — I guess because our internet wasn’t fast enough to tell. Thank you poorly-implemented NBN.
This speed made it — let’s say slow — to try to copy the terabytes of data over the network. I needed all that data moved off of the secondary storage storage in my PC so that those drives could be moved to the NAS, so this a show-stopper, not just an inconvenience. I did a combination of things to work around this:
- Endured some amount of slow copying. During this dark period I discovered we have not only a 24/7 Mythbusters channel on our TV, but also a 24/7 Iron motherfucking Chef channel, so not all was lost.
- Connected my PC to the NAS directly with a crossover cable to copy the files over at gigabit, which made doing much on my PC difficult until I remembered that I could just tether my phone to use the WiFi lol. Still, it was pretty janky having to do this, and my NAS also seemed a bit confused by this arrangement at times.21
- Made use of the cache/spare 8TB drive to directly copy some files to that drive, perched precariously just outside of my temporarily side-panel-less case because cable management in the FT02 is too much of a pain in the ass to have installed the drive properly if I was just going to take it out again anyway, and also because the SATA cable being used was the one originally hooked up my optical drive (it wouldn’t reach if I put the drive in a safer location).
- Got a new gigabit-capable network switch during Black Friday sales.

BIOS misconfiguration
This particular issue was completely on me. Since the 3570K used in the NAS is from my own prior system, it had been running a 1GHz overclock (yay free performance!). It was perfectly stable, but I wanted the NAS to not suck up too much power for no reason, so I briefly tested more conservative overclocks in order to reduce power consumption.
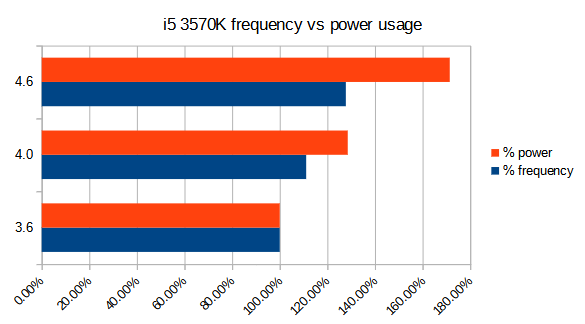
The thing I did wrong was that I eventually decided to run the CPU at stock after looking at the power consumption vs CPU frequency data, but I forgot to actually set the stock settings before installing Unraid (whoops). For a week or two Unraid was running an overclock which wasn’t stability tested and which likely wasn’t stable; I had used that setting exclusively to ballpark the power consumption of an intermediate value between the known-stable OC and the stock settings.
It’s unclear which crashes were caused by this and which were caused by other things (such is the issue of having not individually isolating every potential cause), but it certainly can’t have helped.
Unraid problems
It’s fair to say I have not been thrilled with my Unraid experience so far.
The main reason I bought it22 instead of using one of the various other OS options is because it was supposed to make my life easier. Instead I literally had an issue on the exact version I was installing where Unraid couldn’t format drives over 2TB (i.e., all of the drives in my NAS). As a new Unraid user this felt really awful to troubleshoot, as I had every reason to think that my inability to format the drives was my own inexperience. In reality it was a bug in part of the core purpose of the operating system which surely would be part of basic testing before getting released — but evidently not. Apparently I’m back doing more unpaid testing except this time for a company instead of a community.
Once again hand-waving around specific details for brevity, I experienced recurring system hard-locks which only seemed to be solved after:
- Disabling a bunch of novel but ultimately not incredibly important-to-me things, such as LanCache (which is pretty cool).
- Changing some server configuration options — particularly changing Docker’s network configuration from macvlan to ipvlan (because apparently the default setting of macvlan is known as the cause of some system crashes – like really? why the hell is it the default then?).
- Repeatedly relievedly saying I think I’d solved it, only to not be able to access the server a few hours later and have to physically restart the system.
As of writing, the NAS has now not crashed for over a month, so I think whatever the cause(s) are or were are solved. Now we’re just dealing with uh-oh the server’s log file is being completely filled with error messages and we’re not completely sure why. :DDDDDDDDDD
Maybe I just got unusually unlucky, the same way that some people have sworn off either WD or Seagate due to bad luck with the drives of one or the other. What I do know is that a deployment which was supposed to take a few days ended up sucking a few weeks of my life on troubleshooting and testing.23 My Unraid experience is the only convincing ad I’ve ever had for why someone might drop a hefty 1K for a prebuilt NAS solution which doesn’t even have any drives in it — although no doubt those are also not immune to having bad luck either when it comes down to it.
What’s left
I still haven’t finished re-installing and re-configuring everything on my new Windows install, and I still have to reinstall Pop! and get a secondary Windows 10 install going where I can safely do dangerous things without worrying about ruining my main OS (again).24 I got pretty worn out with installation fatigue from getting the NAS fixed up, and at the end of each day I usually didn’t want to faff around too much with my PC afterwards. I do have most of the important stuff done though, which is why I’ve been spending a bunch of time writing this instead of continuing to do more installs.
I also have almost all of my data where I want it right now, which is a relief after some of my NAS crashes happened at extremely inconvenient times.
Part of the storage and software-side of things of this phase involved checking and updating my encoding settings in OBS and Vegas, which I’ve pushed into a separate article (linked below) given its significant length and the shift in subject matter.
With all the storage and software stuff (more or less) sorted, next up are the performance and hardware items, namely CPU and GPU. Despite the hiccups, Phase 1 of the big 2022 PC + NAS upgrade is mostly over, and Phase 2 is in progress.
Random appended note: If you’re looking to buy a batch of NAS or NAS-like drives in Australia, consider waiting for an OzBargain group buy. The prices are better than what you can normally get, although warranty / drive condition isn’t quite as good. Overall it’s extremely likely to be worthwhile.
If you happened to notice a technical error or have something helpful to add (especially regarding Storage Spaces) feel free to leave a correction or comment!
Phase 1: storage + software (2022)
- OS Reinstall, 71TB of Storage, and Setting up an Unraid NAS
- Re-Evaluating Video and Audio Encoding in OBS and Vegas
Phase 2: CPU + GPU (2022~2023)
- CPU and GPU Upgrade (ongoing)
- Leftovers and Looking Ahead (ongoing)
- Backed by a premium-ish 5-year warranty that includes data recovery services no less. Not that I’m banking on using it, but I appreciate the thought.
- Although the linked testing is at the unrealistic queue depth of 32; I’d be more interested in seeing the QD1~QD4 performance.
- Beyond performance, I’m suspicious that the drive runs louder, as the array is now-and-then much louder than average when doing seeks (which implies to me that the VN008 is in use for those seeks). I unfortunately didn’t double-check this before putting it into the array, and I don’t really have the heart to go and remove the drive to check it now that everything’s already set up. It looks like these days it might be possible to remove a drive from a storage space array without too much trouble, but I haven’t tried it.
- I assume dual-parity would be (columns – 2), but you should double-check that if you’re about to build a dual-parity array.
- There may be some wiggle room between hellishly slow and relatively fast for some configurations outside of this exact formula (e.g. with an AUS the same size or smaller than the interleave), but I haven’t investigated further.
- And it’s not just me, see comments in thread.
- This post suggests that this isn’t a good way to measure the performance (do they mean in general or do they mean sequential write performance, which is what I’m using this to measure?), but they don’t elaborate on it and neither does their link. Idk.
- Except for the 2M/512KB test which I didn’t even complete once.
- One outlier of 99.2s was recorded and discarded as for the 64KB/16KB small file test.
- Larger AUS’ have this extra overhead because the value dictates the minimum amount of space which a file must take up, regardless of its actual size (with the exception of files that are around 1KB and smaller, which are stored differently). For example, with an AUS of 64KB, a 4KB file needs to be allocated 64KB of space, wasting 60KB of space because the AUS size vastly exceeds the file size. A file that’s 65KB will need to be allocated 2×64=128KB, wasting 63KB of space.
- Hence the usage of units such as KiB for the base-2 versions of the units to reduce confusion.
- https://youtube.com/watch?v=Hix0l8cFaMw
- https://youtube.com/watch?v=SqaAmVN4J4A
- If you’re considering Unraid, remember that they do have a 30-day free trial for you to evaluate whether it works for your needs.
- This ended up reversing in the weeks after based purely on what good sales were on offer.
- Normally you would use an SSD as a cache disk in this situation, which would naturally be faster than the individual drives in the array.
- Having a single cache disk does risk data loss if the drive fails before all data is moved from it to the array, but basically everything on my NAS is either a copy of something on my desktop or a file which can be replaced without too much fuss.
- don’tsayfinaldon’tsayfinaldon’tsayfinal
- Not to be confused with a tri-boot, because it was a series of a two two-option choices, not a single three-option choice 🙃
- (I had no important user data on those partitions)
- “You FOOL, having the audacity to plug a CROSSOVER CABLE into MY ethernet port. For your CRIMES, the sentence is a HARD CRASH with NO ERROR LOGS.”
- Unlike other NAS OS options it is not free!
- And to be fair, some of that wasn’t Unraid’s fault. The CPU configuration was 100% on me, and obviously Unraid doesn’t control the speed of my home network.
- Although I’m thinking of using this chance to play around with Windows 11.