At the end of last year, I documented the never-built parts list for my dad’s PC.
Now, nearly 26 months since the original parts list request, that system has finally been purchased and assembled – and at just about the worst possible time.

September 2020 Update: It’s been brought to my attention that Thaiphoon burner often can’t tell the difference between Samsung B-die and C-die (since manufacturers don’t always program that information into the RAM) and that using the sticker codes on the stickers is the way to figure out what you’ve got when that happens. It looks like the sticks I got are in fact C-die, not B-die. I feel a bit miffed that TB doesn’t say “hey this information in this field is actually just me guessing”, but at least I know now.
If the system was built on the 11/11/2019, the total cost of the parts (sans OS + peripherals) would’ve been just over $1,500, and the overall performance would’ve been roughly the same since the parts list was nearly identical.
If the system was built at the end of that same month, the cost would’ve been actually dipped to just under $1,500 due primarily to better sales on the CPU and RAM choices.
Instead the parts were ordered at the end of July 2020, with few active sales, and at just about the latest possible time before post-human-malware price normalisation and not long before a new generation of parts on both the CPU and GPU side. So the price was unnecessarily high, the system’s performance is weaker for its time period than it needed to be, and the user (my dad) missed out on at least 8 months of being able to use the new parts, which offer a significant performance uplift over his 7+ year old system. The inefficiency of the timing almost makes me want to scream.
If a 10% cost increase doesn’t sound like a lot to you, remember that PC hardware moves fairly quickly. The system under normal circumstances would’ve been more like 10% cheaper after 8 months.
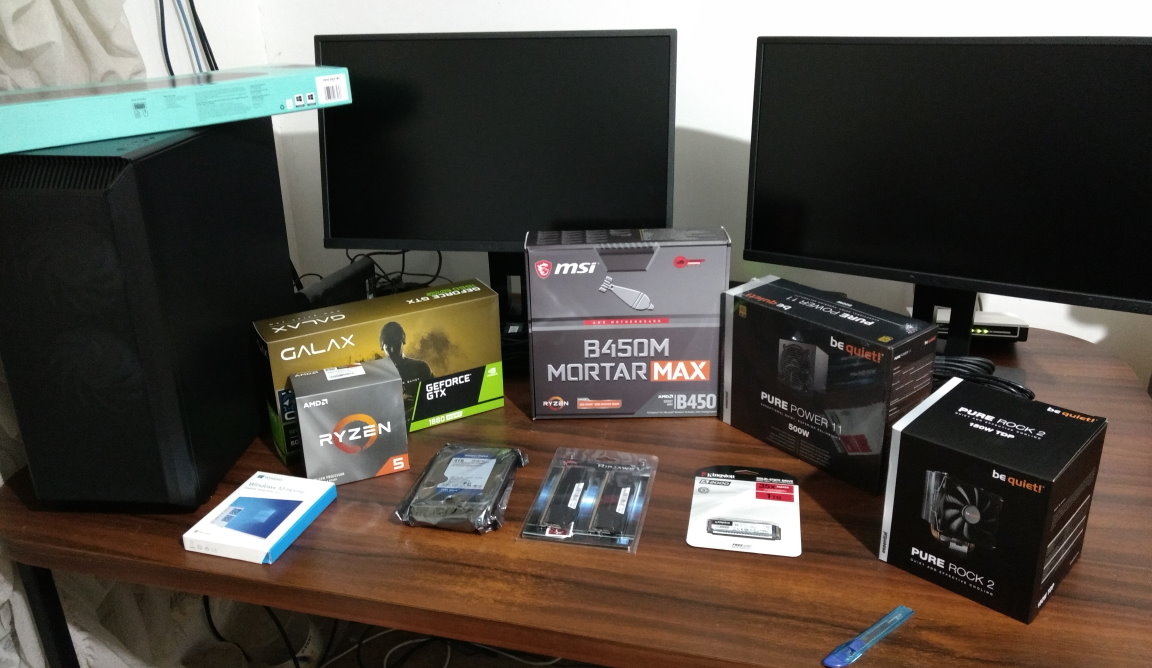
Here’s an updated table for the parts list, outlining exactly where money was tossed overboard for unexplained reasons:
| Component | Model | Nov 2019 Cost | July 2020 Cost |
|---|---|---|---|
| CPU | AMD Ryzen 5 3600 | $267.75 | $299.00 |
| CPU cooler | be quiet! Pure Rock 2 | $49.00 (Pure Rock 1) | $65.00 |
| Motherboard | MSI B450M Mortar MAX | $145.00 | $179.00 |
| RAM | G.Skill Ripjaws V 16GB (2x8GB) DDR4 3600/C18 | $84.15 (3200/C16 kit) | $139.00 |
| GPU | Galax GTX 1660 SUPER 6GB | $412.25 (MSI GTX 1660 Ti Gaming X) | $399.00 |
| Primary storage | Kingston A2000 M.2 NVMe 1TB | $140.25 (Crucial P1) | $179.00 |
| Secondary storage | WD Blue 4TB | $155.00 | $165.00 |
| Case | Phanteks Eclipse P300A RGB | $109.00 (be quiet! Pure Base 600) | $130.00 |
| PSU | be quiet! Pure Power 500W | $99.00 | $139.00 |
| Extra intake fan | N/A | $16.00 (be quiet! Pure Wings 2 140mm) | $0 (not needed in new case) |
| TOTAL: | $1477.40 | $1639.00 |
You’ll notice that there are some minor parts changes between the Nov 2019 list and the finalised one, so let’s dive into a breakdown of the parts.
CPU
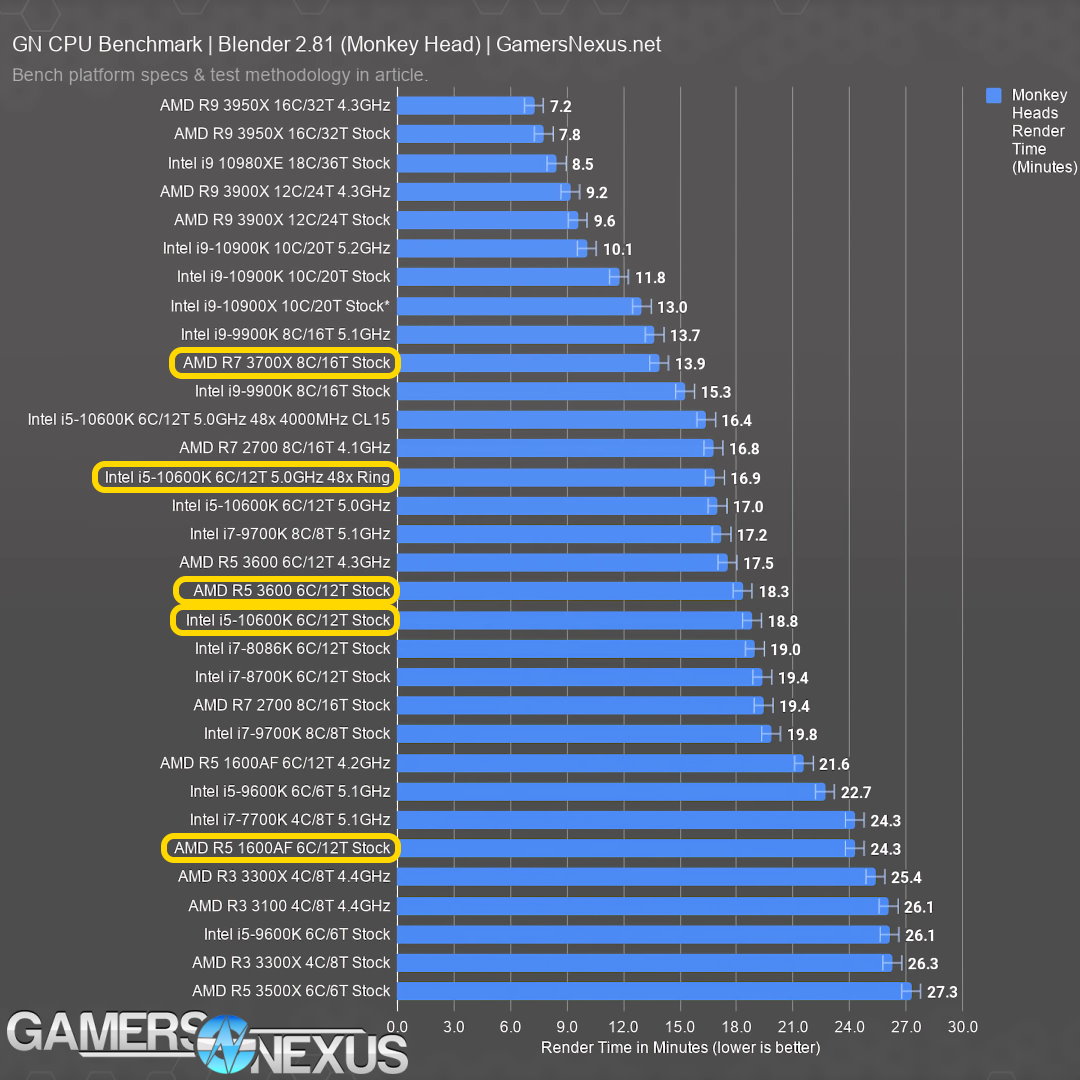
The Ryzen 5 3600 remained from the previous parts list(s). The 3600X and 3600XT hold a price premium of ~$100+ over the base 3600 (at its sale price) for an extra 100-300 MHz. +33% price for at most around 3-6% performance is rather poor value, particularly considering the typical performance increase will be lower than those numbers since most tasks don’t have perfect 1:1 scaling between CPU clock frequency and actual task performance. One anomaly here is there’s an oddly high spread in performance of the X and XT chips across reviews. Still, on average it looks like somewhere in the realm of 4% in games between the 3600 and 3600XT even with those anomalies, which isn’t at all worth such a cost increase.
On the reverse side of the price spectrum is the previous-gen 2600, but given the overall cost of the system its pricing was insufficiently cheaper to justify the performance deficit that switching to it would incur (reduce system cost by ~4.4%, reduce system performance by ~15%).
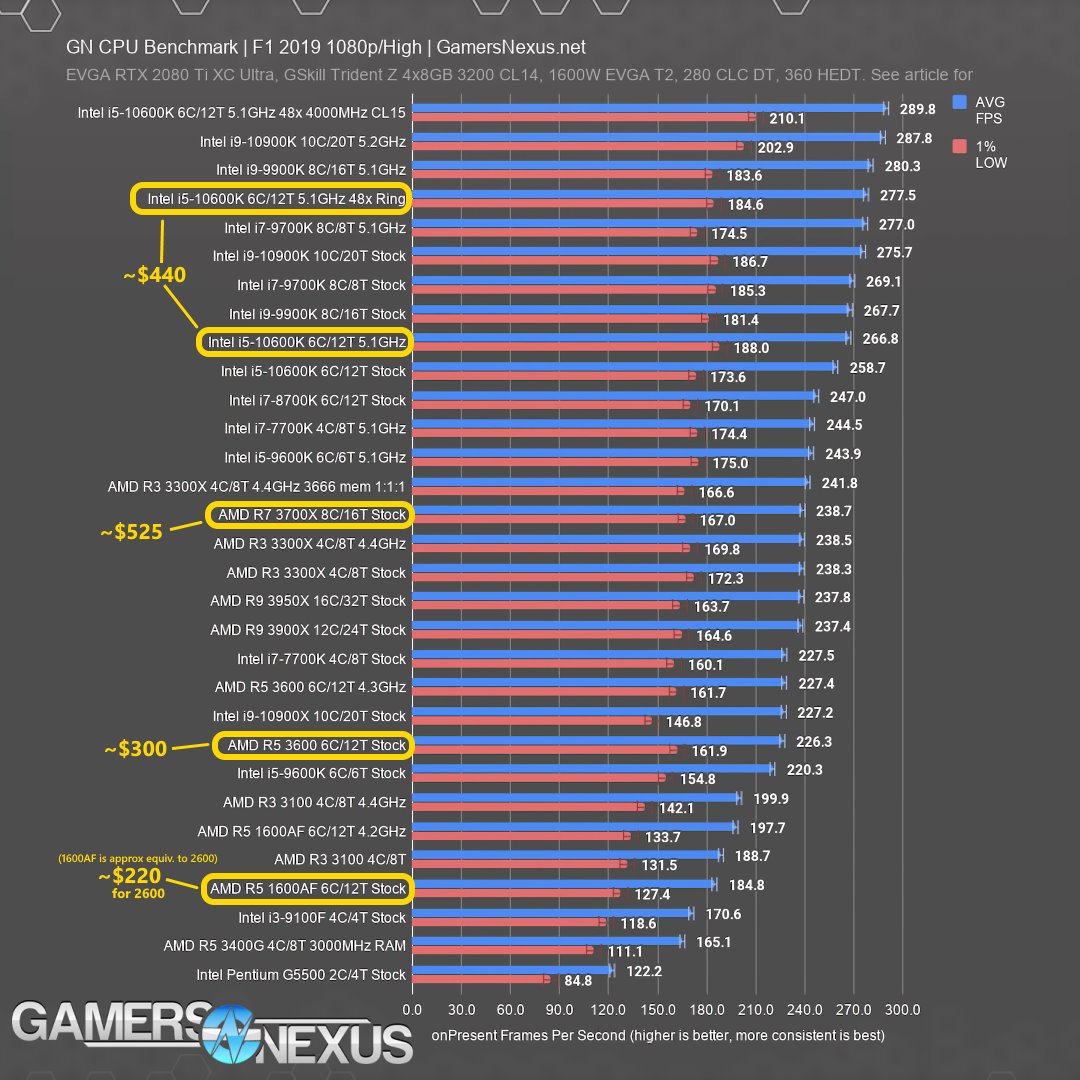
I also once again considered the 3700X as a price change in the upwards direction, but at the price gap of over $200 it was too large to justify given that I expected performance would improve by <10% in the majority of workloads which the system would be exposed to. There is some argument to be made (again) that the next-gen console releases will push core counts closer to 8 core / 16 threads, but I expect a fast 6C/12T CPU should be able to hold its own well enough in the coming years to warrant simply bagging the significant cost savings (unless you’re doing regular production workloads).
Although gaming was one of the key workloads for this system, the performance requirement for it wasn’t so high as to justify jumping up to an Intel 10600K (or similar), which would provide a modest performance uplift in games (particularly with some tweaking) but an accompanying price tag slightly that was difficult to justify. A 10600KF (which loses integrated graphics but a bit of its asking price to go with it) at a sale price might’ve been an okay choice, although it would’ve warranted a Z490 motherboard in order to get access to RAM speeds beyond 2666 MHz. Those are substantially more expensive on average than the equivalent B450 board I was pairing with the 3600, so I think as a package deal 3600+B450 was the better option overall.
One final small benefit of going with a Ryzen CPU is a slightly broader range of future CPU upgrade options should the need arise. That alone shouldn’t be enough to sway your decision unless you know for sure that that’s what you’ll do, but it’s unarguably better to have the option than not.
CPU cooler
Given the elevated prices of CPU coolers across the board, I slightly dialed down how strongly I recommended adding an aftermarket cooler here, but ultimately my dad seemed to want to get one anyway. Since the 3600 only includes a Wraith Stealth (not a Wraith Spire), on balance I didn’t have a strong opinion either way and just went with his preference.
The be quiet! Pure Rock seems to have been phased out in favor of the updated Pure Rock 2 in retail channels, so I just swapped over to the updated model and called it a day.
A variety of other, slightly cheaper 120mm cooler options were available, but the time required to vet them for both performance and acoustics didn’t warrant the minor cost saving to me. A smaller (but known-quantity, so as to save time researching) model such as the be quiet! Pure Rock Slim ($49) would’ve been fairly similar for practical purposes due to the relatively pedestrian heat output of a stock 3600, but I prefer to have the better cooler when presented with two functionally-similar cooler options. It allows for better acoustics in harsh conditions (Australian summer with no AC in the room), better accommodates the unlikely event that the CPU is upgraded to a more power-hungry chip in future, and should also provide a very small clock bump on average due to improved boost behaviour.
Motherboard
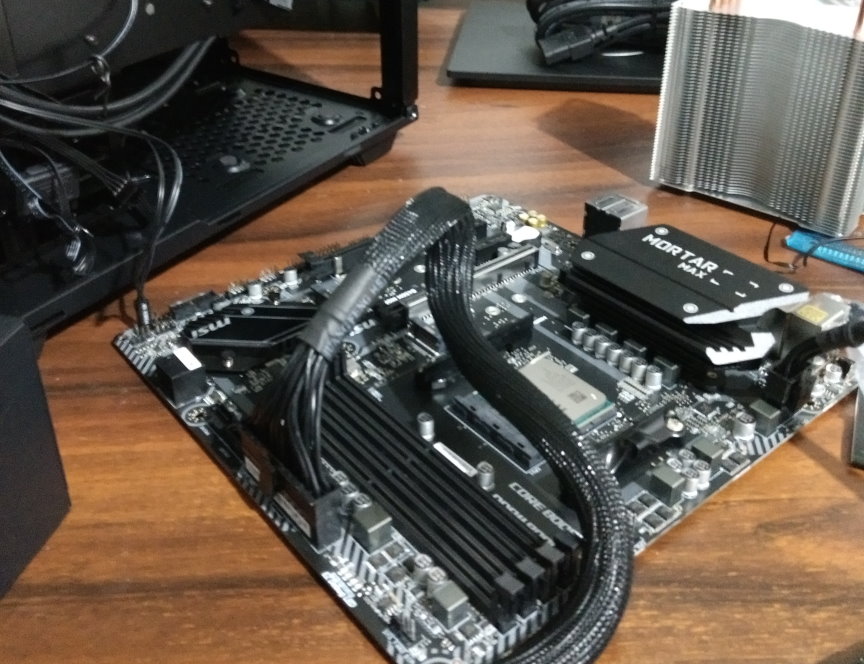
With no significant changes to the motherboard market since the November parts list, I retained the same MSI B450M Mortar Max. You can read last year’s article for a few more notes on this choice.
Due to recent events I’ve now “greylisted” MSI and will now favor competitor’s products going forward if the alternatives are similar. However, it is worth noting that right now MSI still holds the unique position of guaranteeing out-of-the-box compatibility with Ryzen 3000 CPUs on their “MAX” refresh of B450 motherboards. This late into the motherboard product cycle I’d expect other B450 boards to be shipping with newer (compatible) BIOS’, but based on my own personal experience that is definitely not always the case.1
That advantage is something to consider, although it won’t be relevant for much longer with the next generation of AMD CPUs just a few months away.
RAM
At the current pricing these days, I think a build at this price point can be served well by either a 16GB 3200 MHz / C16 kit, or a 3600 MHz / C18 kit, with the preferred option depending on pricing. I actually wanted to get the Team T-Force Dark Z 3600/C18 kit for $129, but the day the parts were purchased, stock for that ran out. I substituted the same-spec G.Skill kit listed that was an extra $10. The alternative would’ve been to drop down to a $119 3600/C16 kit. My decision to trade up to the G.Skill F4-3600C18D-16GVK kit actually ended up causing some headaches during the build which I’ll go into later.
For the most part, Ryzen 3000 CPU buyers should be able to punch in XMP settings for most memory kits and leave it at that – although you also have the option of seeing if you can eke out another couple percent performance by pushing the frequency or tightening timings if you have some patience.
GPU
At $399 it was hard to pass up the cheap Galax option for the 1660 SUPER. Reviews for it actually look okay despite the heatsink appearing to be bulky extruded aluminum (compared to the thinner fin design you might be more used to seeing). Without having anyone dive into quality of onboard components (e.g. power delivery to support the GPU) I’d be a little skeptical of recommending a card like this for long-term use to a power-user, but my dad is anything but.
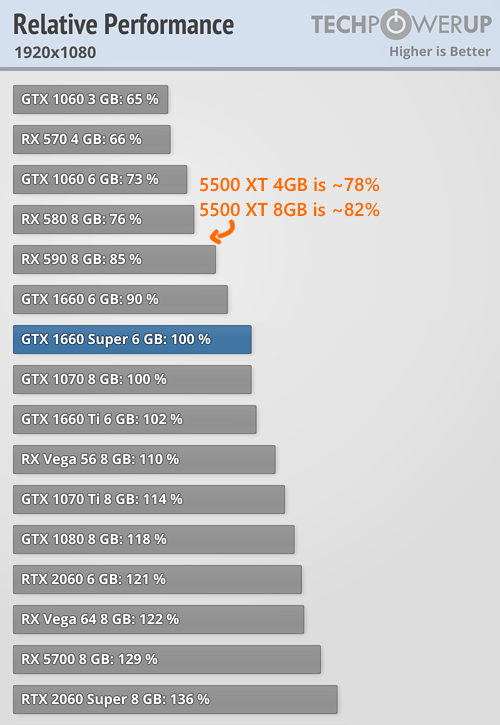
As to why I swapped from the 1660 Ti in the November parts list to a 1660 SUPER, it was just a pricing gap. The current pricing for most 1660 Tis is way too much of a premium over the SUPER, since the performance of each of the two is within a couple percent of the other. Back in November the pricing was much closer, and if I had to guess the drift is due to better supply of the SUPERs than Tis.2
For better or worse, the available pricing on 8GB 5500 XT cards is atrocious in comparison to 1660 SUPER prices, with lots of listings at $399 even though the 1660 SUPER has a firm performance edge. 4GB variants are a little cheaper, but I can’t recommend buying a new card for gaming with only 4GB of VRAM unless you know exactly what titles you will (and won’t) be playing on it for the next 5 years. Optimal minimum VRAM at 1080p is already somewhere around 4GB right now for some new games and that’s only going to creep up due to next-gen consoles bumping up to 8GB+ of graphics memory.
A look at prices for the RTX 2060 didn’t turn up any listings worth the price jump for what is only a modest performance gap, so although he’ll lose out on RTX features (none of which I expect him to use in the near future), the extra cash saved can instead potentially be put towards a GPU upgrade in a few years if more performance is wanted further down the track.
Storage
Now this is a category which I think is quite interesting compared to the previous categories (which were fairly mundane choices, at least at current pricing).
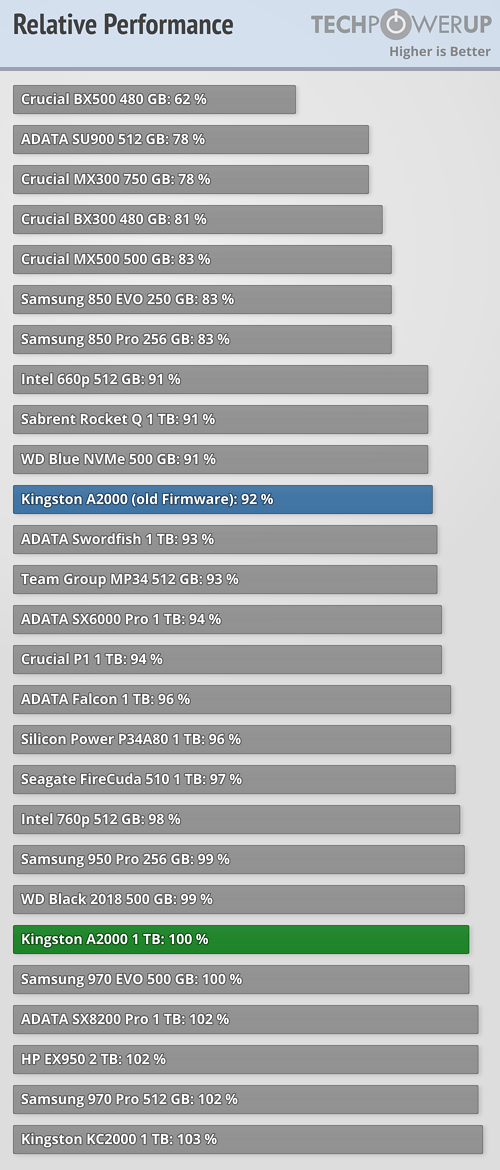
At current local pricing and availability, my new favorite value NVMe SSD is the Kingston A2000 – and by a very wide margin.
Despite being a TLC drive, it’s as cheap or cheaper than many QLC drives like the Crucial P1, Samsung QVO (either type), and Intel 660p. Performance-wise it’s competitive with performance-orientated drives like the ADATA SX8200 Pro (so long as the A2000’s firmware is updated).3
In most markets other than Australia the number of SSD options is far greater, and the relative pricing between drives can also be a bit different. For example, almost none of the budget NVMe drives recommended in July 2020 by Anandtech are available in the Australian market, and those that can be found are still more expensive than the A2000 right now anyway. Go figure.
Available at 250GB, 500GB and 1TB, the A2000 should cover the SSD storage requirements for most builds, and I expect I’ll be continuing to use it in more builds going forward.
As secondary storage, the same WD Blue 4TB (a low RPM hard drive) was retained from the November parts list for cheap, relatively quiet storage of media files etc.
Case
One meaningful update here since the November parts list is that it was now specified that no ODD slot was required, freeing up a much wider variety of cases to be considered.
Since the build was only using a 3600 and 1660 SUPER (far from the most power-hungry / hottest-running components), my main case recommendations were for the value-orientated Silverstone Precision PS15 RGB (which I’m still quite interesting in building in, perhaps in a future build) and Fractal Design Focus G Mini (which is a smaller version of what I previously recommended for Nick’s second build). I also wanted to recommend the be quiet! Pure Base 500, but its current price in Australia is a smidge too high for my liking.
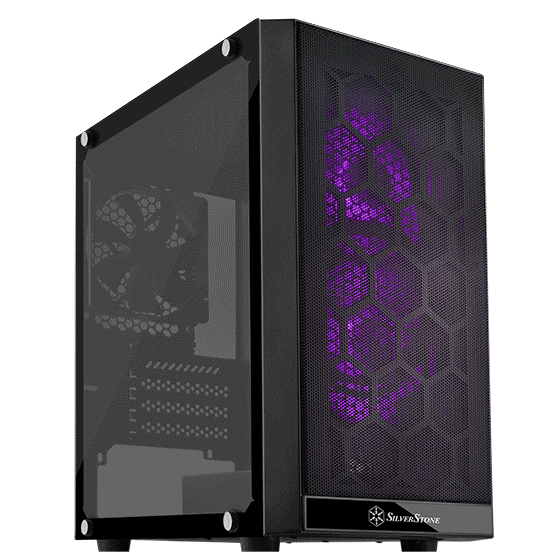
For reasons unclear, my dad was instead drawn to the pricier Phanteks Eclipse P400A_D (RGB). Intuitively you might think it was because he liked the LEDs, but he actually spent some time doing research to confirm that they could be disabled.
At the time of purchase the P400A_D (RGB) went out of stock, but the very similar P300A RGB was available, so that was used instead (and is probably the more sensible option of the two for this build given the cheaper price). It remains unclear to me why either of the Phanteks cases were chosen over the better value options that would’ve suited the build just as well.
The reason for choosing the RGB versions of each case is just that they include more fans, and are available at a price that’s cheaper than adding aftermarket fans instead. Even if you don’t use the LEDs at all, it’s still better value to get the RGB variants if you want the fan slots populated.
PSU
~500W is plenty for a mid range build like this, and would also be enough to handle upgrades to a (somewhat) beefier CPU and GPU as well if it comes to that.
Retained from the November parts list, the be quiet! Pure Power 11 500W is a quiet but otherwise unexceptional unit. Electrically it’s fine-good, efficiency is good at 80+ Gold (but that’s fairly common at its price bracket), component choices are adequate-good, and its pricing under normal circumstances reflects those qualities.
That said, the PSU market in Australia appears to still be suffering some degree of stock shortage in addition elevated pricing beyond that seen for other PC components, so this is really just a $100 PSU at a pretty steep price premium – but other similar PSUs are in the same boat too so the price premium is kind of unavoidable.
There are a number of respectable alternatives here that we could’ve switched to if needed, but at the time of purchase it was in stock so I just stuck with it as my recommendation.
Extras
Since the P300A RGB already includes 3 fans, the extra intake fan noted in the November parts list was unnecessary.
One area which I typically provide minimal input on is peripherals, but in this case my dad was after a couple of monitors with good height adjustment on their stands. He’d previously been putting stuff under his existing monitors to raise them up to eye level (something which I and many others continue to do), but I guess he didn’t like having to do that(?).
He began looking for the monitors himself but was rather inefficient in his search, so I took a quick look as well. Based on a limited search (just monitors at PCCG, which granted is a fairly wide range), I picked out the Viewsonic VG2448, a seemingly well built but otherwise unexceptional monitor that’s interesting mostly because of its strong stand-adjustment features. It’s a pretty bog standard 60 Hz IPS panel, as my dad seemed uninterested in paying an extra hundred+ for higher refresh rates (although I personally think it would’ve been an excellent investment for him).
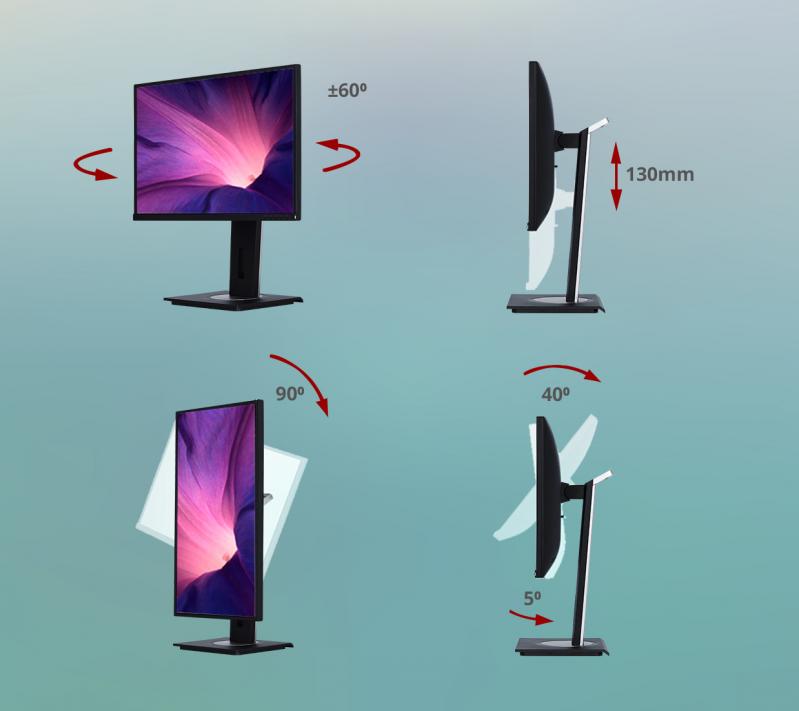
It’s honestly quite wasteful to replace monitors just to get better stands, especially since the new ones he got aren’t especially better than his old ones in terms of refresh rate / image quality etc. I definitely do not recommend that people do this, but he didn’t seem interested in changing his mind for environment / waste reasons. ¯\_(ツ)_/¯
Writing this up with those monitors a couple meters away, there’s one minor little detail that I’ve found myself disproportionately pleased by with the monitor choice. The VG2448’s power LED seems to be specifically designed to be fully visible from both the front and the side – a very thoughtful design decision which I must say appreciate.
The building process
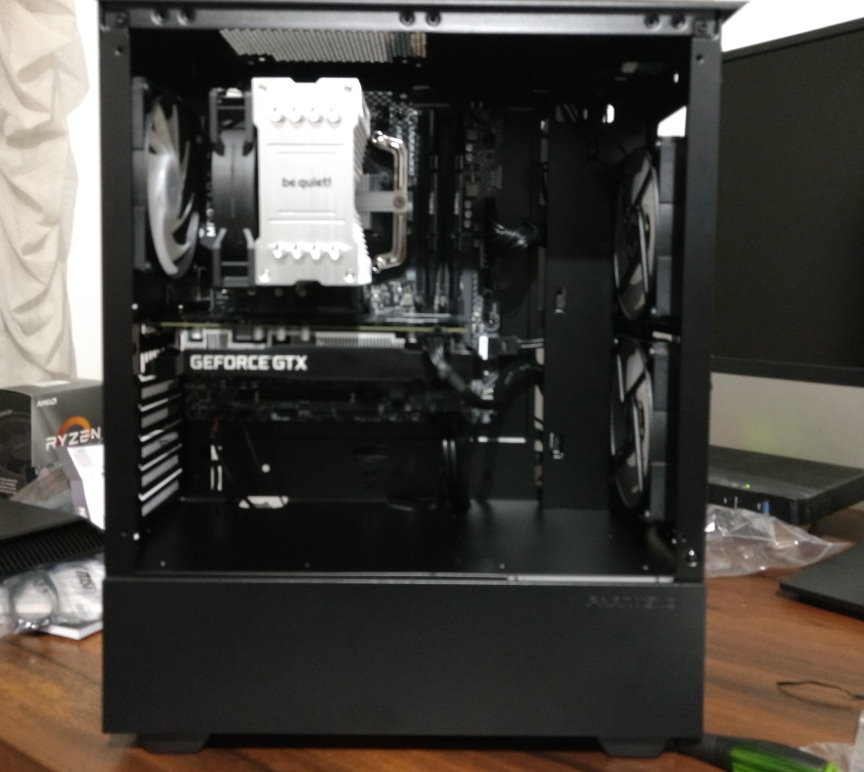
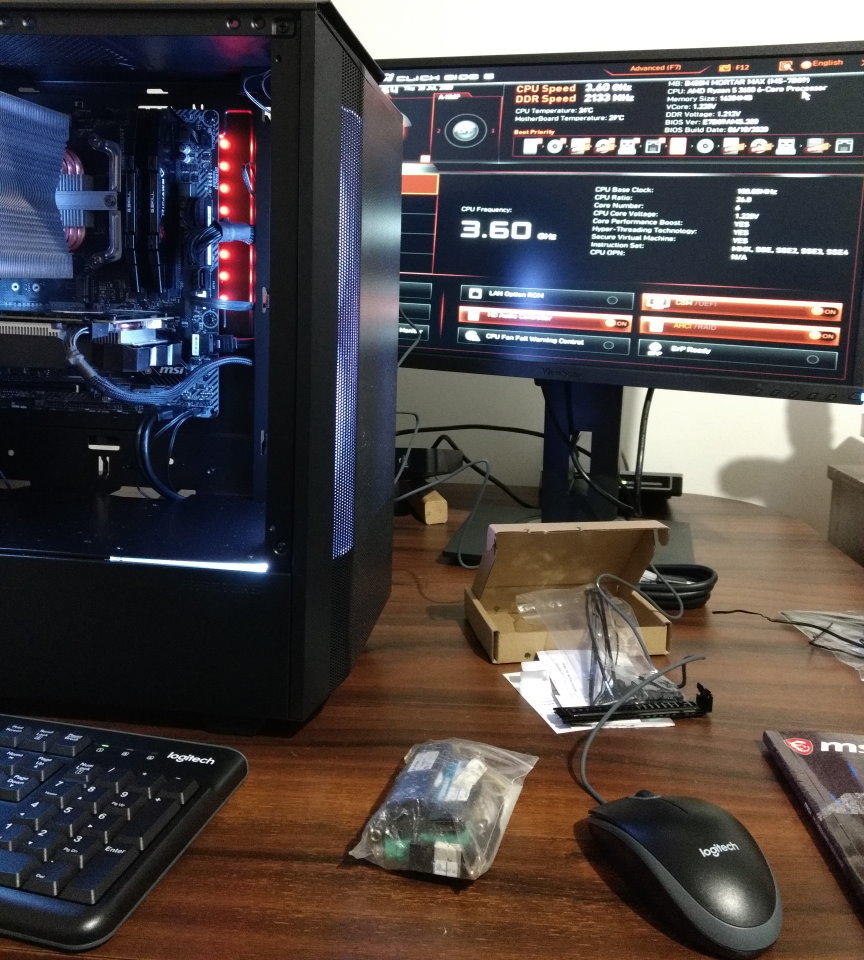
Unlike in most of the builds I’ve helped with during the past decade, this time I was building everything myself, so I remembered to stop and take a few pictures during the build. They’re not well lit since it was done at night in a room without good lighting, but it’s definitely much nicer than not having pictures at all.
The case slowed down the build significantly (much like it did with the P400A_D RGB), as the wiring for all the fans and front panel headers etc takes a while to sort through. The included manual / user guide also assumes we have either the P300 RGB or the P300A, not the P300A RGB, so that didn’t help either. I ended up having to breadboard the system to figure out exactly how the LED lighting worked since it wasn’t spelt out in the manual.
I was hoping that the power LED around / underneath the power button was decoupled from the fan LEDs, but that appears to not be the case4 – both are powered directly from a single SATA power connector, and there seems to be no way to decouple them (unless you want to manually rewire all of that yourself as some kind of case mod).
Looking at the way it behaves post-build, it seems I may at this point have accidentally wired the HDD LED header to the power LED pins on the motherboard. My dad doesn’t care so I haven’t gone back to double check whether that’s the cause of it or not, but so far that LED just stays a solid white while the system is on. If the result is due to my wiring it’s interesting though, as it allows you to turn off the fan LEDs without completely losing access to a power light. Until this build it had never occurred me to that you could “steal” one front panel LED header to power another.
There’s also a chance the motherboard is just not using the HDD LED as expected (maybe a configuration issue in BIOS or something?) and I did actually wire it correctly. Maybe next time the system needs to be opened for something I’ll take another look at the front panel connector wiring.
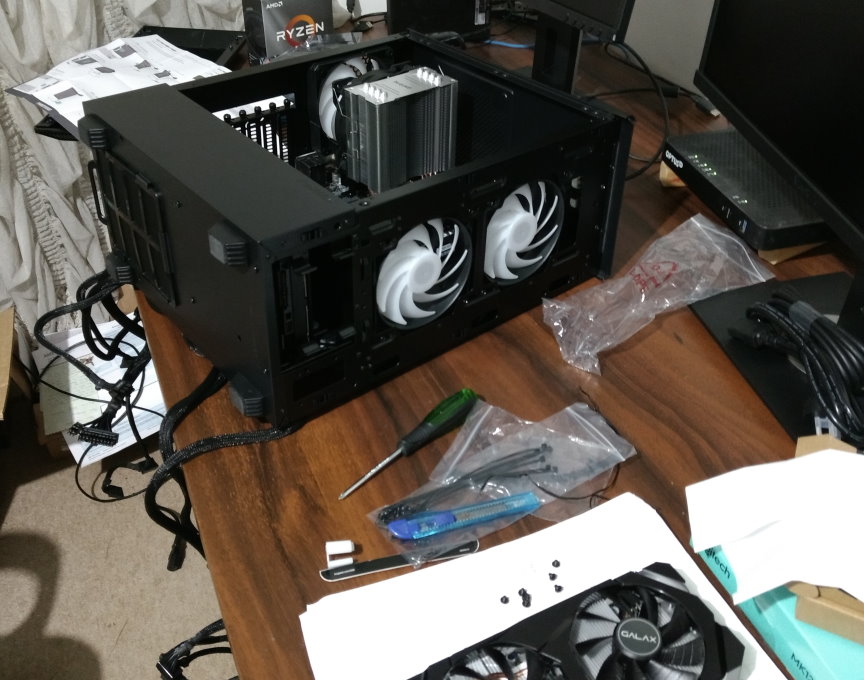
The rest of the build process was fairly smooth. For maintenance reasons I opted to install the CPU cooler fan on the rear side of the heatsink, which is probably thermally inefficient due to its extreme proximity to the existing exhaust fan (and distance from the front intake). At most though it’s probably increasing CPU temps by 1-2 degrees C at equivalent noise levels, which is negligible – but dust buildup in this configuration will occur on the front side of the heatsink moreso than the fan itself, making it significantly easier to clean off.
A side effect of this choice was that I had to reduce the voltage going to the (3-pin) rear exhaust fan to keep its RPM in line with the intake fans (otherwise it was spinning like 50% faster and was perceptively louder because of it). With all those case fans hooked up directly to the motherboard it can run a custom fan profile to keep everything extremely quiet at idle.
One weird issue I had was that both the CPU 4+4 pin and motherboard 20+4 pins didn’t click into place nicely. If it was only the 4+4 I could understand it being because I could only just manage to get them hooked up at all (I should really have done it before installing the CPU cooler, a mistake I also made with the P400A_D RGB), but in my experience it’s very unusual for the 24 pin to be loose unless installed incorrectly. I pentuple-checked that I had its +4 in the right place and that it was all aligned nicely, but nonetheless it never clicked into place, instead just sort of being held there by the friction of parallel plastic and metal pins I guess.
Speaking of power connectors, the combination of P300A and Pure Power 11 wasn’t ideal. The PSU’s cables are a little on the stiff side and also have in-line capacitors, but the cable routing cutouts of the P300A are on the smaller side, so both of those qualities combined made some of the routing somewhat of a high friction experience (literally). It wasn’t too bad, just a small hiccup that I thought worth mentioning.
Rounding out the last of the small hiccups I didn’t expect with the P300A RGB:
- The front panel USB 3 ports are.. a bit wonky? The first time I plugged a device into either of them I was gifted a small sliver of blue USB-3-plastic when the device was unplugged, and the ports themselves are still oddly stiff when you try to plug something into them (I’ve tried multiple devices). I’m not sure if this is just less than perfect QA or a minor manufacturing defect etc, but it was a bit weird to experience on a not-budget case. To be clear the ports do still work fine and are not so bad that they prevent day-to-day use, but certainly it’s not a “nice” connectivity experience.
- The PCIe covers are held in place by thumbscrews, which I thought was good until I actually had to use them. Their location prevents a human hand (except perhaps a particularly small or sleek one) from easily manipulating the screws. Having thumbscrews here saved me no time or convenience over normal screws, and it feels like a design oversight to bother including them if they’re difficult to actually use as thumbscrews.
- The captive thumbscrews used on the side panels of our sample of the P300A seemed very finicky. I found them unusually challenging to both screw and unscrew, and if this is simply a design tradeoff I honestly would’ve preferred regular thumbscrews. It’s possible this was just another minor QA / manufacturing defect/variance issue but blegh. The screws do work, but it consistently takes like 3 attempts to completely screw and unscrew them. Much like with the thumbscrews, it’s frustrating to have a convenience feature become less convenient than the standard option.
One other thing which wasn’t a strictly a hiccup is the way the HDD is installed at the bottom of the case with its connectors facing forwards. The wiring for it is really weird, and it feels kind of unnatural to wire it like that. It’s not strictly an issue, it’s just.. weird.
So overall the P300A RGB building experience was a little more scuffed than I expected, but I suppose most of the aspects that matter for long-term use (e.g. cooling / noise / dust filtration) are unaffected by the minor details above.
The issues mentioned up to this point were generally minor, but there was one major setback. With the RAM I had been hoping to add a small overclock and/or tighten some timings to give some extra performance, but that ended up not panning out.
Whether due to bad motherboard design / design faults (unlikely), unusually low quality memory chips (plausible), or a horrifically bad IMC on the CPU (likely), the RAM couldn’t even POST using its XMP profile – even with additional DRAM / SoC / etc voltage. It took 2-3 days of testing to claw back stability with performance anywhere close to what the XMP settings would’ve provided. It was, by far, the worst memory experience on Ryzen 3000 I’ve ever seen either in person or online. Even at 3466/C20 (non-trivial decreases to IF and DRAM frequency, plus 10% looser primary timings), it still wouldn’t POST. It was pretty absurd. This is all after updating the BIOS to latest version as well, so it’s not like it was just a firmware issue.
What I ended up targeting was an even higher frequency so that I could overclock the Infinity Fabric while maintaining a manually-applied 1:1 mClock ratio beyond 3600 MHz.5 In doing so I hoped to reduce the performance loss from losing the memory / IMC lottery by just having the IF offset a small part of it.
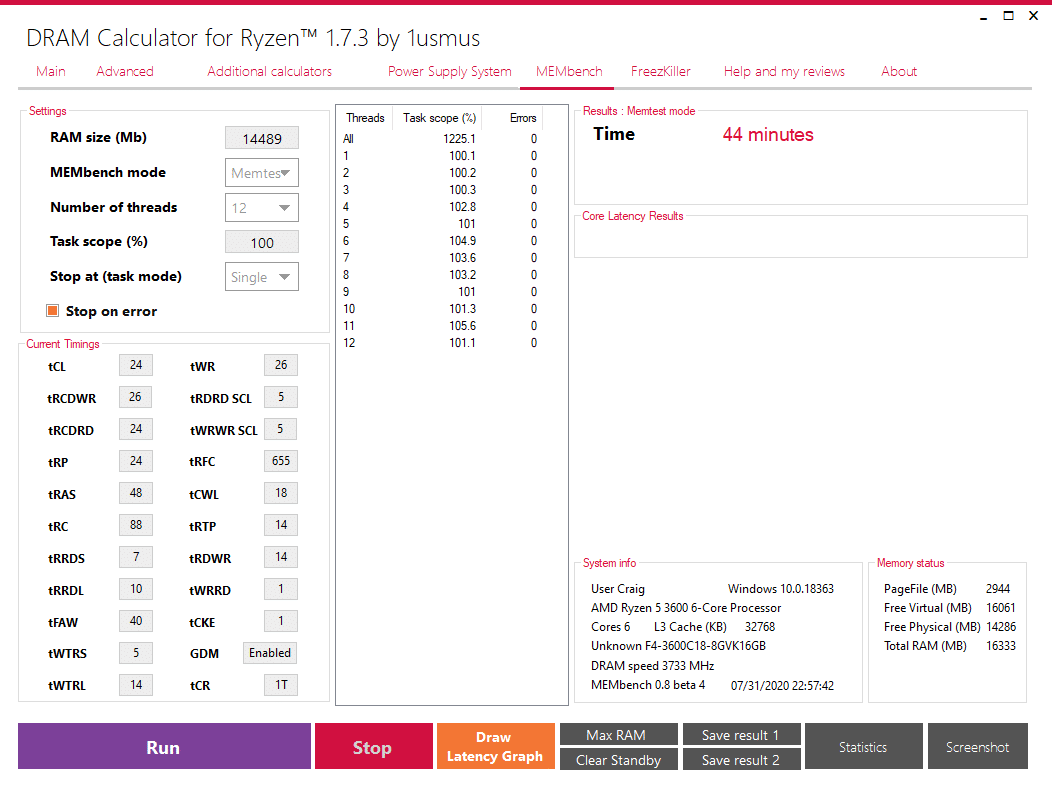
The highest performance (stable) settings I could get were at 3733 MHz / C24 (!!!!!!) with further manual loosening of a handful of timings and sub-timings to take care of the last of the stability issues I encountered during prolonged tests.
It’s regretful that the memory kit we switched to last-moment wasn’t on the QVL for either motherboard or memory manufacturer, as otherwise we probably would’ve had grounds for a replacement kit (although given that it might’ve been an IMC problem that might not have helped). Typically with Ryzen 3000 the QVL for memory dictates performance (via optimised subtimings) moreso than compatibility — especially at 3600/C18 and slower — so without additional hardware to test with it’s tough to figure out which component the problem is stemming from beyond educated guessing. I have DDR4 in my own system (the one I’m writing this up on), but it’s only a 3200/C18 kit (running at close to that speed even after tweaking), so would be of limited testing value due to that limited headroom.
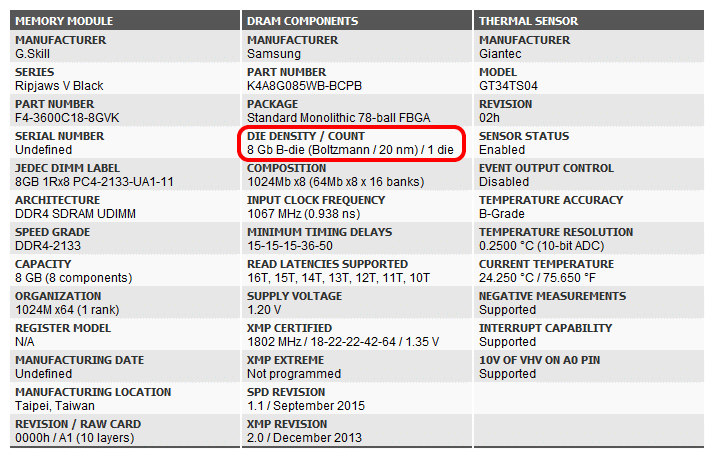
To shovel some irony onto the the experience, the F4-3600C18D-16GVK kit we got is Samsung B-die.6 Almost certainly low-bin B-die (i.e. not the same as “true” B-die kits), but still technically B-die. I can practically feel the rain on my wedding day from here. As mentioned in the update text, this is actually C-die that’s being misreported in Thaiphoon Burner.
In any case, here are the specific settings I ended up with, as shown in Ryzen DRAM Calculator for easy comparison. To be clear, due to stability reasons I didn’t use the calculator numbers as a baseline, but rather as a reference. It’s just easier to visualise the timings etc by having them in the Calculator’s layout.
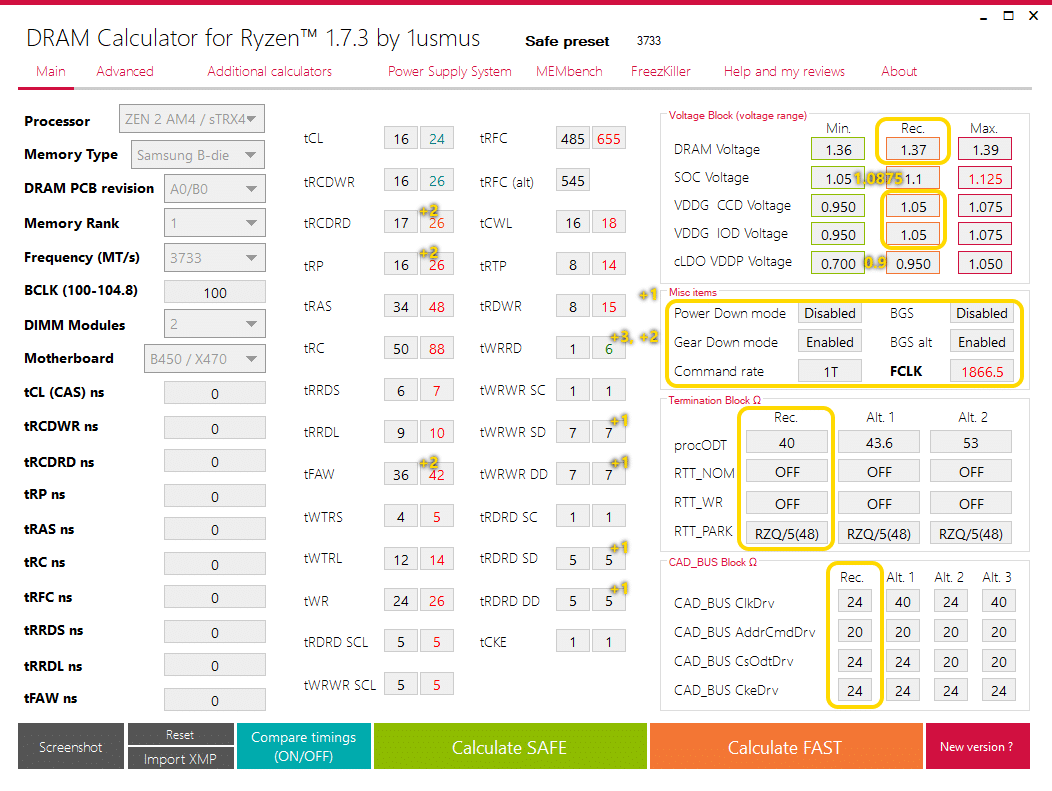
Voltages etc I’ve shown when I used the recommended setting and put my custom value if I used a custom value (the IF clock was set to 1867 in BIOS).
For timings I’ve shown the final numbers I used (the boxes on the right side column – the left is the recommendation from the calculator), but added notes in yellow for what I used to get from almost stable to actually stable. I.e. subtract the yellow numbers to get the almost-stable settings. By almost stable I mean exactly that – it passed 1200% on HCI but had a very small number of errors7 during prolonged testing in stressapptest (my current preferred memory stress tester). Most people would have probably called the “almost stable” settings “stable”.
For those yellow numbers (notated above the respective timings), the number on the top left is what I adjusted first (but that wasn’t enough to make the system stable), the number on the top right is what I adjusted second (but that still wasn’t stable), and the number on the far right is what I finally changed to get it fully stable.8 It’s possible I could actually revert some or all of the first two sets of changes to get back some negligible amount of performance, but I don’t think it’d be worth going through and testing each thing to find out what I can and I can’t adjust back without compromising the stability I was able to achieve.
Closing words
The P300A RGB was slightly disappointing due to the minor issues I mentioned above, and I’ll keep in mind checking on QC issues and the like in a wider range of reviews for my next personal case purchase.
I wish my dad had waited for the next gen of parts (which would’ve also given the currently-elevated prices a bit more time to settle). His current system is slow primarily because it needs a fresh install of Windows and an extra stick of RAM, two things which are easy and inexpensive to remedy. It could certainly use an SSD as well, but even just a fresh Windows install without an SSD or extra RAM would improve system responsiveness dramatically. I just hate how inefficient this build has been, even if the resulting system itself is perfectly serviceable.
In the November 2019 version of this article, I mentioned that I would’ve nearly been able to buy the parts outright if I had been paid for the time I spent on it. For the completed version of it, if I was paid for the amount of time I directly spent on this system (parts list + assembly + doing extra stuff like chipset drivers + testing) at my most common hourly rate, I would’ve been able to buy the pricier system myself as well, even including the peripherals and even with everything at elevated prices.
Oh well, at least I have a fun story to tell about Samsung B-die now learnt something about Thaiphoon Burner’s reporting.
- I bought an X370 board to pair with a 2700 7 months after the release of the latter, and the BIOS was still too out of date to have compatibility – I had to borrow a friend’s 1600 to flash my board.
- One other related point on the topic of 1660 SUPER vs 1660 Ti is that I expect the performance delta between the two cards to be slightly larger when overclocked than when at stock, although the difference still wouldn’t be very large and that’s just an educated guess anyway.
- For what it’s worth, the drive we received already had up to date firmware and so no extra steps were necessary to get the 8% performance boost.
- (haha)
- If you don’t know what this means you can read or watch more about this and its effects here: https://www.gamersnexus.net/guides/3508-ryzen-3000-memory-benchmark-best-ram-fclk-uclock-mclock
- I expect that this particular kit just gets varying chips depending on whatever memory is cheapest and available from suppliers.
- Beyond what you could pass off as “cosmic rays on non-ECC RAM” – 15 errors over ~880TB of data read/write, scattered in groups of 1-4 errors.
- 0 errors after ~400TB of read/write in stressapptest.