Chris’ system from December 2014 had — performance-wise — been un-upgraded for its life, and after a full eight year service life, the sales around Black Friday were a good time to do a full rebuild.

Back in 2014, the exact meaning of the “+” in “Gaming+” was very poorly defined. In the ~8 years since then the definition has clarified only somewhat, with single-threaded performance apparently being particularly important for whatever dev work is being done on the system these days.
The parts list was put together shortly after Michael’s, meaning I was able to recycle a lot of the research on component selection.1
Chris wanted a build that could be fairly quiet if he needed to do audio recordings (no GPU workload, some CPU workload), but wasn’t too concerned about the acoustics of the system under a gaming workload.
Here’s what we ended up with:
| Component | Model |
|---|---|
| CPU | Intel Core i5 13600KF |
| CPU Cooler | DeepCool AK620 |
| Motherboard | Gigabyte B660M AORUS Pro DDR4 |
| RAM | 2x G.Skill Aegis 16GB (1x16) DDR4 3200/C16 |
| Primary Storage | WD Black SN850X 2TB |
| Secondary Storage | Reused from previous PC |
| GPU | PowerColor RX 6800 XT 16GB Red Dragon OC |
| Case | Fractal Design Meshify 2 Compact RGB |
| PSU | Corsair RM750 |
This is by far the most extended purchasing window there’s been for a build I’ve helped with: nearly 3 months between the first purchase and the last purchase. Although I’m giving an overview of the purchasing decisions on a per-part basis, this does make a few chronological considerations a bit confusing. So given the unusual need for one, I’ve also added a rough chronological overview below the section for all the individual parts.
CPU
With a focus on single-threaded performance moreso than multi-threaded performance, the 13600K(F) was once again the ultimate winner in a system were CPU upgrades are unlikely to happen.
The only point of contention was whether the 13700K(F) was worth the upgrade, as although it wouldn’t make sense for purely gaming workloads (~5ish% performance improvement, hence its rejection in Michael’s build), there was a stronger case for it in non-gaming workloads (~15ish% performance improvement).
However, the difference in single-threaded performance — which is what was deemed more important for this build — is only around that same 5% figure from the gaming performance,2 and that’s just coming from just juicing up the cores with more power. So overall still not worth the $200 or so that typically separates the parts.
Just like with Michael’s build, the iGPU-less 13600KF was chosen over the 13600K to save a few bucks in a build that doesn’t really need integrated graphics.3
CPU Cooler
I’m personally still not a fan of using AIOs except where they’re needed: HEDT (or HEDT-levels of power consumption, at least), and SFF systems where a large tower cooler usually won’t fit. Their performance and value is fine (with the right models), but their lifespan is decidedly finite because the liquid will eventually evaporate. Since it’s a closed-loop system (it can’t easily be refilled), once this happens the entire cooler is just e-waste to the average user.
Chris also had the preference for reduced noise under CPU-only load, so it was worth spending a little extra to go from the adequate performance of the Thermalright PA 120 in Michael’s build to something a smidge better.
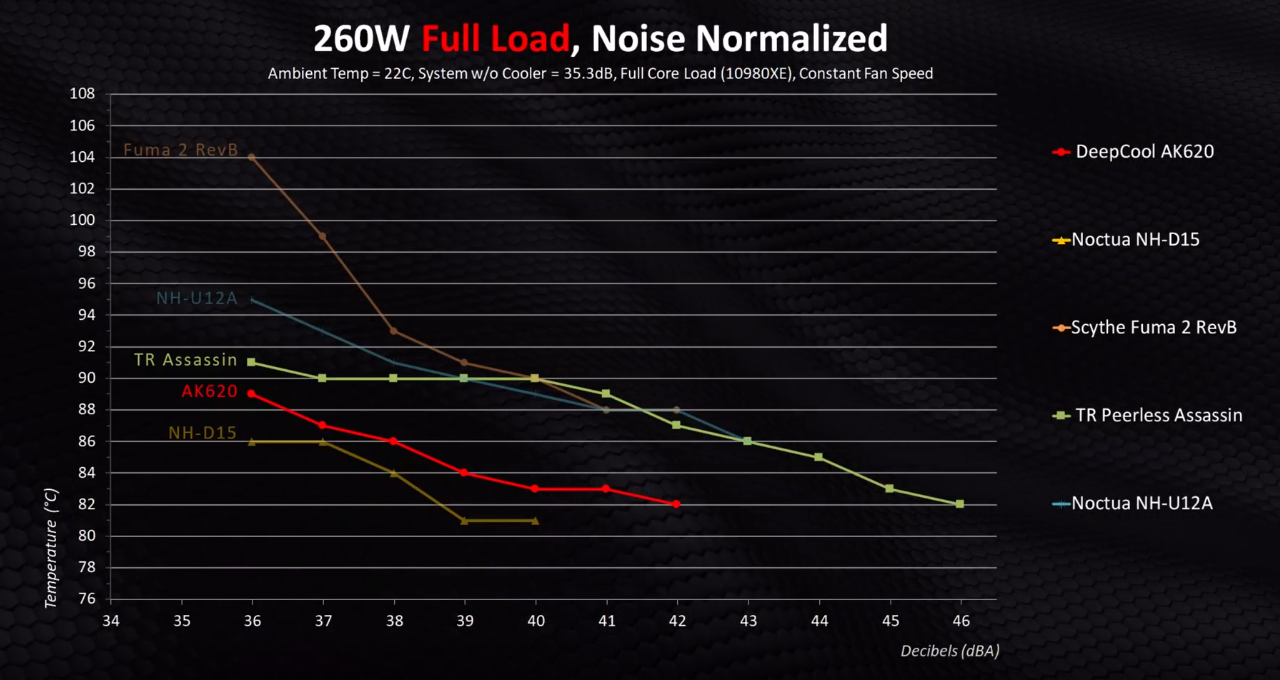
As such I specifically recommended the Deepcool AK620. It has slightly better noise-normalized results than the PA 120 under the heat load which a 13600K(F) will feed it, whilst still being notably cheaper than the stalwarts like a Noctua D15.
Motherboard
With no specific connectivity needs, I opted to recommend the same cost-saving mATX B660 board which Michael used. Having recently had a bad experience with Gigabyte’s returns/repairs department he preferred to avoid Gigabyte but there’s really just no equivalent unless you spend another $100+ because most boards don’t support CPU-less firmware flashing: a must when pairing a 13th gen CPU with a 12th gen motherboard.
Although an mATX board wasn’t strictly needed for size reasons in the same way it was for Michael’s build, the extra connectivity of a full-sized ATX board wasn’t needed here and the mATX option is cheaper.
RAM
As discussed in more detail yesterday, DDR4 still currently makes more sense value-wise than DDR5 for most builds. That’s especially true when buying 32GB rather than 16GB of RAM, as doing so naturally doubles the premium you end up paying to switch from the former to the latter.
There was a specific promotional offer on when buying the CPU + RAM, which meant that the best value option at the time was actually 2 single 16GB 3200/C16 sticks. These are only a smidge slower than the preferred 3600/C18 sticks (although once again note that subtimings will play a big role in memory performance). They’re of course slower again compared to say, 3600/C16, but the performance is enough to not be a bottleneck and the price is right.
Memory manufacturers actually explicitly recommend that you don’t pair up single sticks that aren’t sold together as kits because once in a blue moon you can run into compatibility issues where you can’t get both sticks to run at their rated speeds (but would have been able to if you had bought the same model in a kit that was tested together). Given how efficient memory testing has become, I don’t view this as a concern worth worrying about so long as I’m around to test the memory and sort things out in the unlikely event there is a problem. Alternatively, this.
Primary Storage
I would describe Chris’ system I/O needs as being more demanding than Michael’s so instead of outright recommending the (now-not-so-great)4 Kingston NV2, I gave the choice of that or whatever well-reviewed high-end drive was on sale at the time.
After prolonged deliberation and sales-waiting, we ended up going for a 2TB WD SN850X for under $300. This is an update to the SN850 (non-X) which was a drive that Mark Cerny quite liked. Thus, the club of Marks endorses these SSDs and I’ll be waiting for my cut of WD’s marketing dollars (but please go for the X these days; it wasn’t available when other-Mark bought his drives).
This is now my preferred high-end SSD, having performance in the same class as other drives like the Samsung 980 Pro and 990 Pro, but available at a much better price (at least sale price vs sale price). There’s an SK Hynix drive floating around that can be a slightly better option sometimes (I think it’s the Platinum P41? it’s been a few months since I looked through the SSD options), but availability in western markets is very poor and as a result it’s rarely available anywhere — and when you do find it in stock the price is typically a bit inflated, making the value proposition worse than the SN850X.
The slightly pricier version of the SN850X with integrated heat sink isn’t required since most motherboards (including the one in this build) come with their own heat sink solutions. Result = more minor cost savings.
Secondary Storage
Chris re-used most of the storage from his existing system (a couple of hard drives and a Samsung 970 Evo Plus NVMe drive for a game drive), so no new secondary storage was bought with the build.
GPU
Boy oh boy.
We started discussing this build around October, around the same time that the fabled 6900 XT and 6950 XT deals were on. At the time it wasn’t specified that a GPU in (and even above!) that price and performance bracket was in the cards, so I had pegged around the 6800 XT as the highest-end GPU for the build and not specifically recommended either of the the linked deals. They were in stock for quite a while (a few days at least), but it was only specified well after they ran out of stock that GPUs even exceeding the $1000 price point were being considered.
I also honestly expected equivalent deals during Black Friday sales, ideally on a 6800 XT (like this earlier deal for $799) where the price vs performance sweet spot seemed to be for a high-end build as of when we were building. Higher than that had greatly diminishing returns per dollar spent.

What actually ended up happening is that there were very few really good GPU sales during Black Friday and even up to the end of the year. The best thing I saw that had stock was a $888 6800 XT, which Chris gave a pass on — I think partly because of anchoring bias after seeing a 6900 XT for only $20 more. Skipping that left us in a GPU drought, and we went so far as to later on build the rest of the system without a new GPU, instead recycling his old GTX 970 while waiting.
Given that Chris was coming from that GTX 970 and never felt the need to upgrade it, I figured the GPU performance needs of the build would only be matching the modern-day equivalent of that GPU bracket (hence ~6800 XT max). In reality he eventually went so far as to consider stuff like the 4070 Ti and 7950 XT, around $500 more than I had originally expected the GPU budget to be.
So in hindsight the 6900 XT deal was probably worth taking! Even the 6950 XT (with some manual undervolting / power limiting to correct MSI’s decision to use ~100W more power to get ~3% more performance over the reference design) would’ve been a pretty good pickup given that it had a well-reviewed cooler on it. Alas, the cost of unclear build needs.
After holding out for a couple of months and spending far too much time regularly checking GPU prices, we eventually found a 6800 XT for $822.57, and that’s actually still being shipped right now. In the meantime there is an enormous performance mismatch between the build’s CPU and GPU lol.

Case
Chris was lukewarm on the Jonsbo D30 from Michael’s build which I think would’ve been a decent fit functionality-wise, but case buying is very much down to subjective preferences.
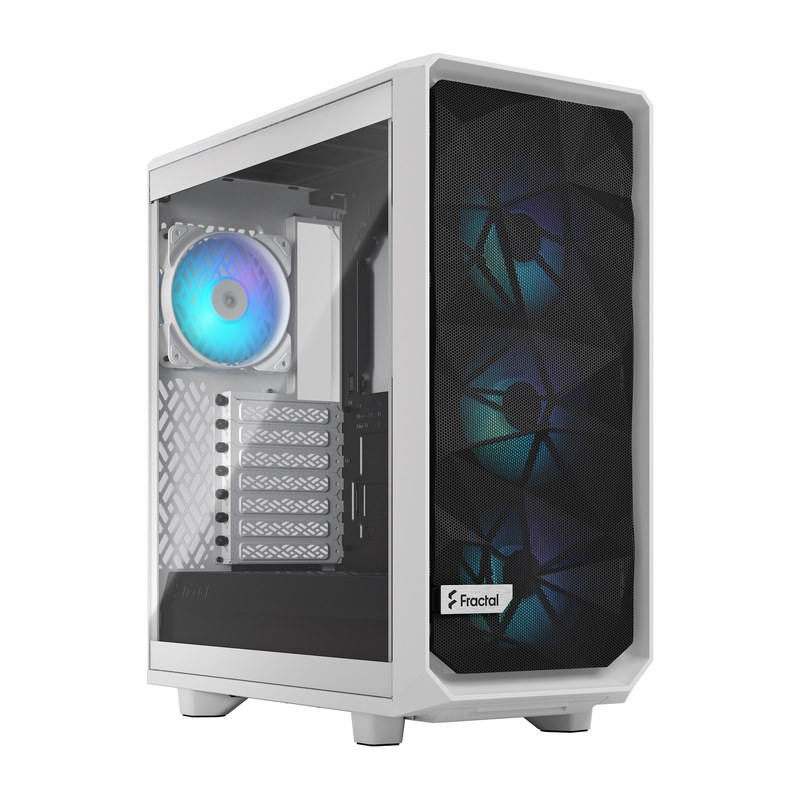
Towards the end of the Black Friday sales period I recommended The Fractal Meshify 2 Compact. It ticks all the boxes, is well reviewed, and was on sale for a pretty good price (because otherwise it tends to be a little pricey honestly). Chris also has an affinity for white cases, so having the whole range available in both black options and white options was another plus.
He settled on the White RGB variant of the case, which (as you might expect) swaps the included fans for RGB fans, but also swaps from what the fans are. It seems like a small downgrade in terms of fan quality, with the 2x 140mm Dynamic X2 intake fans being swapped to 3x Aspect 12 RGB fans. The total volume of air moved would be about the same, sure, but I would expect there to be a small hit on acoustics given the smaller, slightly lower quality fans.
Either way not a big deal, and Chris seemed to place mild-moderate value on the added bling, as well as possibly having the entire front intake filled-by-default. The default positioning of the non-RGB’s 2x 140mm fans is a little high, causing GPU temps to suffer a little for higher-end GPUs. It’s easy enough to remedy by moving the fans down slightly yourself, but it’s still one extra thing to worry about I guess.
PSU
Given the aforementioned GPU situation, I had originally allocated a 750W PSU for the build, which was by default the MSI MPG A750GF for the same reasons as Michael’s system.
With a higher-end GPU being later considered, suddenly an 850W PSU was going to be needed to more comfortably cover the system’s power needs. This meant the MSI MPG A850GF was the go-to, and it repeatedly went on sale previously for $109 plus delivery / pickup which is an astoundingly good price for a decent 850W unit.
Unfortunately PSU sales of good/great quality at the required capacity seemed to dry up around the time of the build.5 There was a brief shimmer with the Deepcool PQ850M showing up a couple of times for under $140, but the first time it showed up we were still sorting out build specifics, and the second time (after which I had resigned to there possibly being no more A850GF deals coming) it went out of stock before we’d confirmed that we wanted it. (after this happened I was given the green light to buy a few of the uncontentious components unilaterally to speed up purchasing in situations like that)
After a while of seeing the PSU sale drought, when I saw a Corsair RM750 for $135 (in white, so bonus points for Chris), I grabbed it. 750W is technically enough with room to spare with almost any non-4090 GPU on the market, but it would be pretty very close to its rated capacity for anything pulling more than 300W sustained. At the time I wasn’t really expecting any of the most power-hungry GPUs to be in the build though; I only found out about Chris’ willingness to consider even higher-end GPUs later on.
I actually use a Corsair TX850M as a testing PSU (for which it is comically overkill 99% of the time). In light of the later-discussed potential that we might overload the RM750 depending on what GPU went into the build, we agreed that we could swap the two PSUs around if needed, giving Chris’ build another 100W to work with if it came to it.
In the end though, the build ended up with a 6800 XT and so none of that concern about insufficient power ended up mattering.
Chronological Recap
Because of the extended time span of several months, the timeline for the build can be a bit confusing when I explain component choices by-component rather than by-time, so here’s a quick recap of the general timing:
- Mid Oct: Parts for Michael’s build start getting purchased.
- Late Oct: The 6900 XT and 6950 XT deals happen. Michael buys a 6950 XT, and stock runs out days later.
- Early Nov: Chris’ build is seriously starting to be considered.
- Early Nov: The 6900 XT deal runs out of stock. Build discussion continues.
- Mid Nov: Parts start getting purchased for Chris’ build.
- Late Nov: I buy the RM750.
- Later Nov – Dec: Chris drops that he is a frame snob, his GPU performance needs are slightly higher than I had modeled for, and he is willing to pay more and use more power to meet those needs (cue sweating a little more over both missing the 6900 XT and buying the RM750).
- Late Jan: The computer is assembled sans new GPU.
- Later Jan/Early Feb: The 6800 XT is purchased, but not yet delivered.
- Mid Feb: I write up this article.
Hopefully that helps clear up any confusing chronology issues.
Build Process
Amusingly, the time for the build process itself mirrored the extended buying process and I think set a new record for longest building time out of builds I’ve helped with. This build took roughly EIGHT. HOURS.
To be completely honest I still don’t fully know why, but two things in particular slowed it down significantly: flashing the motherboard and figuring out cable management.
With Michael’s build as the guinea pig, I had expected we figured out the kinks in the flashing process for this motherboard — Chris’ build set me straight.
We had set up the board to be flashed and I thought it had finished flashing after around 30 seconds or so. I did wonder why it was faster than when we flashed Michael’s board but I didn’t think too much of it and we continued with the build. Only later when we did a test boot did we realise that maybe the flashing had in fact not completed successfully, just without a clear indication (at the time) that it had failed.
Skipping along some troubleshooting steps, I decided to try flashing the board again, this time with an older USB stick. Pulling out a now ~15 year old 4GB stick from my high school days, we disassembled the build back down to just the motherboard and power supply6 and tried again. This time we witnessed not just the the same ~30 second phase as the first time, but also a followup phase lasting a few minutes.
As it turns out, the first phase is for reading from the USB stick, and the second phase is actually writing the update to the board. For whatever reason, the board was able to read (or mostly-read?) the updated UEFI/BIOS on the first USB stick, but not use it to complete the update. It’s plausible that it doesn’t like higher-capacity USB sticks, or maybe just doesn’t like newer USB sticks, regardless of whether they’re otherwise formatted correctly.
Whatever the reason for the flasher’s fussiness, with the motherboard updated the 13600KF would now work properly and we reassembled the system back to where we were at previously.
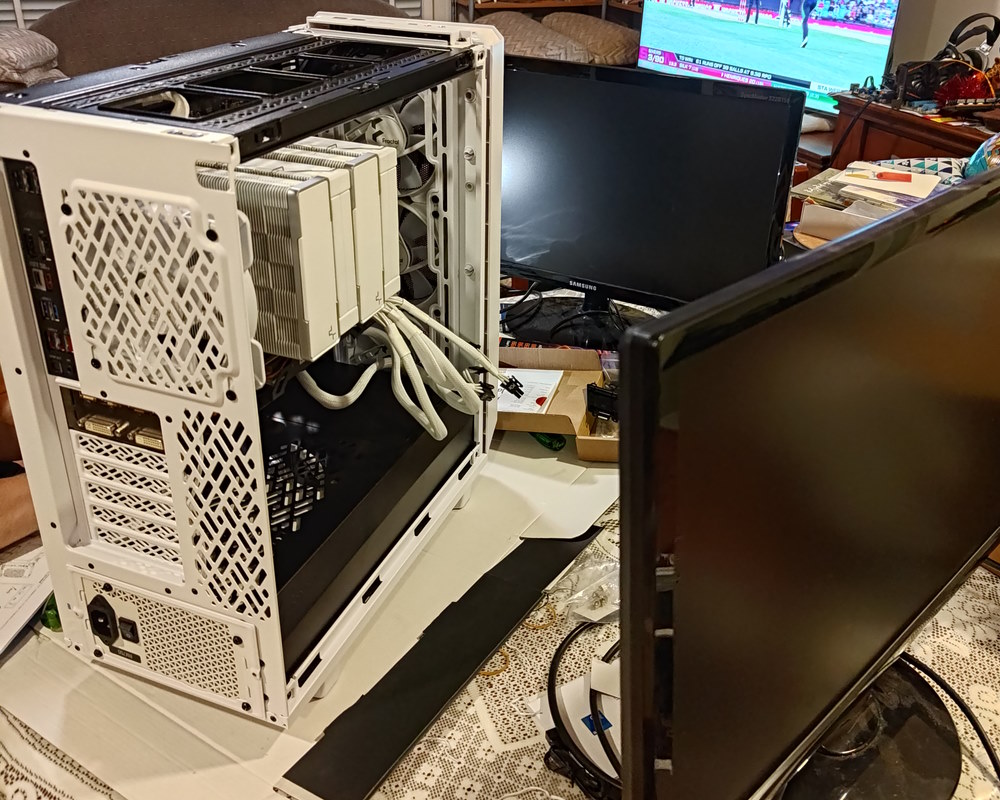
Cable management in the Meshify 2 Compact is a little janky because if the side panel has too much internal pressure on it from cables, it simply pops out thanks to its tool-less design. There are also a great many cables that come from having four RGB fans pre-installed in the case . The documentation for exactly what the cables were was slightly unclear for people who had not used RGB fans before (both of us), so it took a lot of double- and triple-checking to figure out what everything was and how best to hook all the fans up.
When we were finally done with the hardware side (after perhaps seven hours?) we got this fun error while trying to install Windows:
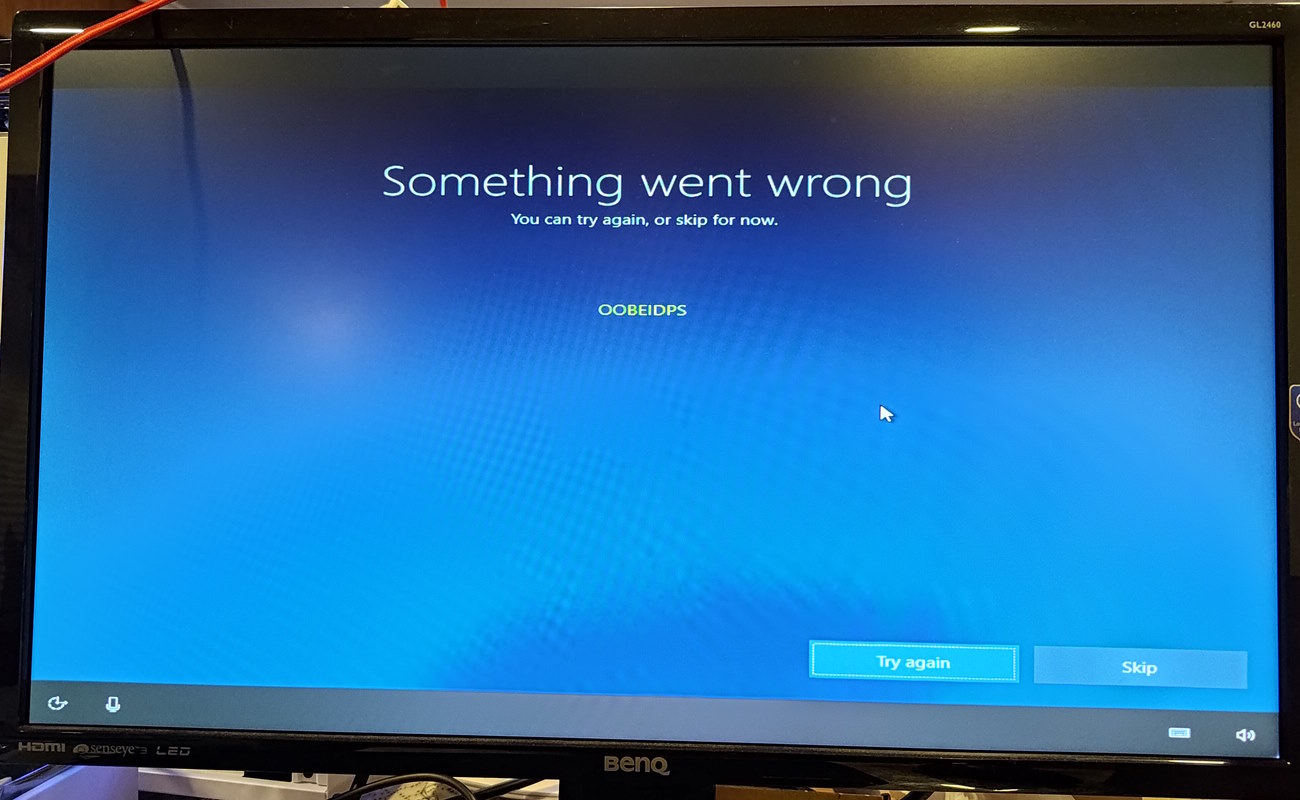
From memory, the solution to this was simply to try installing it again. Still a bit weird to get the error in the first place, but whatever I guess. After that hiccup things were straightforward enough, and thankfully nothing else went unexpectedly wrong.
In a short followup session a while later, I gave a quick crack at overclocking the system’s memory. As one might expect from budget RAM these days, it didn’t have a whole lot of headroom in terms of frequency and primary timings. I think I might’ve been able to squeeze either 3333/C16 or 3667/C18 or so out of it with some extra time but there wasn’t a whole lot of time to work with and both options are only small performance improvements on average.
If I get another chance where there’s enough time to test and tweak, I’ll see if I can dial in one of the above, but otherwise it’s not a big deal to just run 3200/C16.
Reflection
Being able to double-dip research from Michael’s build was invaluable, although the late-clarity about desired GPU performance did end up delaying the build a little because we skipped the 6900 XT at the start. To be fair we also gambled on Black Friday sales a little there as well, so it wasn’t necessarily a bad idea at the time to wait a bit longer for more sales.
While Michael’s build was enough for me to a general overview of the hardware landscape and complete that build for him, with Chris’ build I got the chance to dive a little deeper in a couple of areas like the primary storage SSD. It’s a bit of a shame really: all of this knowledge I now currently have about what the good purchases are for builds in this price/performance bracket are mostly going to languish away after only using it in a couple of builds. Three years from now when the next person needs build help, knowing that the SN850X was the go-to high-end NVMe drive in late 2022 is going to be as many years out of date; a pretty long time in computer hardware.
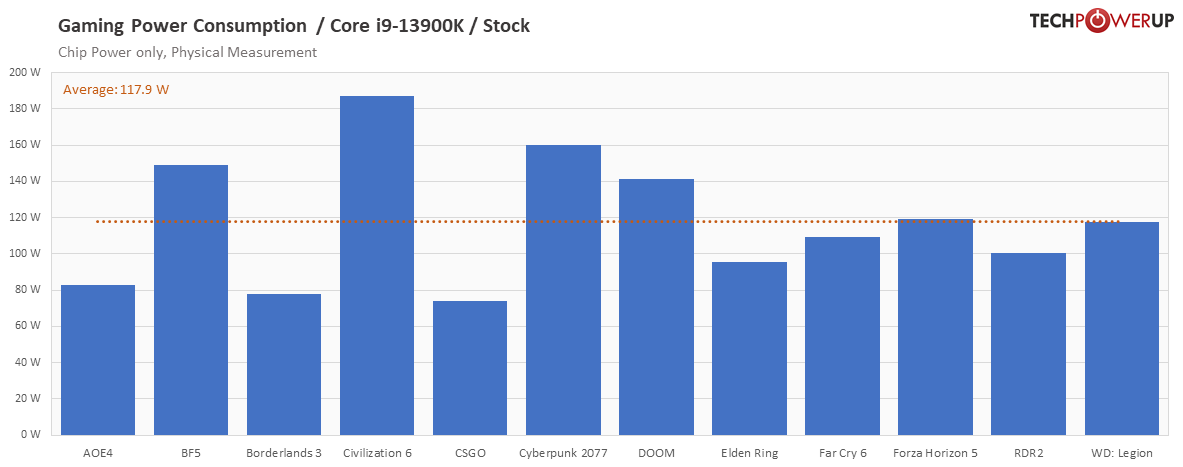
During the same session as the RAM overclocking, we measured the power consumption of the system at full CPU-only load, and both that and the accompanying load temperatures (even with the AK620) surprised me a little. Idle temps were great at only like 10-15 degrees above ambient, but our 13600KF was drawing more power than expected under load (wattage at the wall in the low 300s) even with the motherboard saying it was explicitly running at Intel’s spec. That lead to temperatures at and above 90 degrees under full CPU load!
TPU measured just under 200W of CPU-only power consumption and the system idles at well under 100W (with the GTX 970)7, which meant I was expecting sub 300W full-system power consumption in a CPU-only load. I wonder if there’s still something like an MCE setting which Gigabyte has hidden away somewhere in the UEFI? On just the side of thermals, it’s also possible that the system would benefit from a an aftermarket contact frame, something I didn’t specifically recommend. Installing one voids warranty, the gains are inconsistent, and the extra cost could instead be spent on a better cooler instead.
90 degrees seems to be normal enough with a good air cooler, so although recent-gen CPUs run hotter than we’re used to, 90 degrees for our 13600KF here is within its rated 100 degree Tjunction spec.
Back to power consumption, there’s something that seems.. wrong about making computer components run this inefficiently by default, and the fact that all three major compute manufacturers (Intel, Nvidia, AMD) are doing it really irks me. There are ways around it like undervolting, eco mode, power limiting and so on, but a lot of non-enthusiast users will never be touching any of those options. So much extra power for so little extra gain.
On a 13900K with Cinebench R20 (multi-threaded) as the workload, it takes roughly 50% extra power to increase performance by 10% once you’re using around 200W. Like dude, at that point just make the default power limit 200W. Defaults should be sane, with options to tune power in either direction for those who want it. In my opinion, a 300W CPU that’s just 10% faster than the same CPU at 200W means that using 300W as the default setting is not sane.

- It also means that a few things will be glossed over here under the likely-incorrect assumption that the previous build notes have been read.
- If we generalise the results of Cinebench R23 to everything else.
- And also just like with Michael’s build, I need to include a footnote saying that some users will find the encoding capabilities of the iGPU useful, as Intel’s current iGPUs can encode at a quality in the same ballpark as current-gen NVENC.
- See the build notes for Michael’s build.
- To avoid misinterpretation, I’m not only considering sales that are posted to OzBargain when making that statement.
- This may or not be necessary (it’s unclear to me), but I didn’t really want to take chances here because of how hard it was to know if the flash was successful, and to re-do it if it wasn’t.
- And a single monitor hooked up.