In December of 2016 I helped Michael put together a build I dubbed The Silent Whisper: a high-end gaming PC that had SPCR-level acoustics.
Towards the end of 2022, Michael was looking to upgrade the entire system, so I put on my PC building hat once more and gave him a hand.
The usage of the PC was going to be similar, but there were a few changes to priorities:
- Acoustics were no longer that important (as long as it wasn’t debilitatingly loud)
- Size was a new priority, with a small(ish) system desired
- Michael wanted an extra-powerful GPU to make his genitals tingle
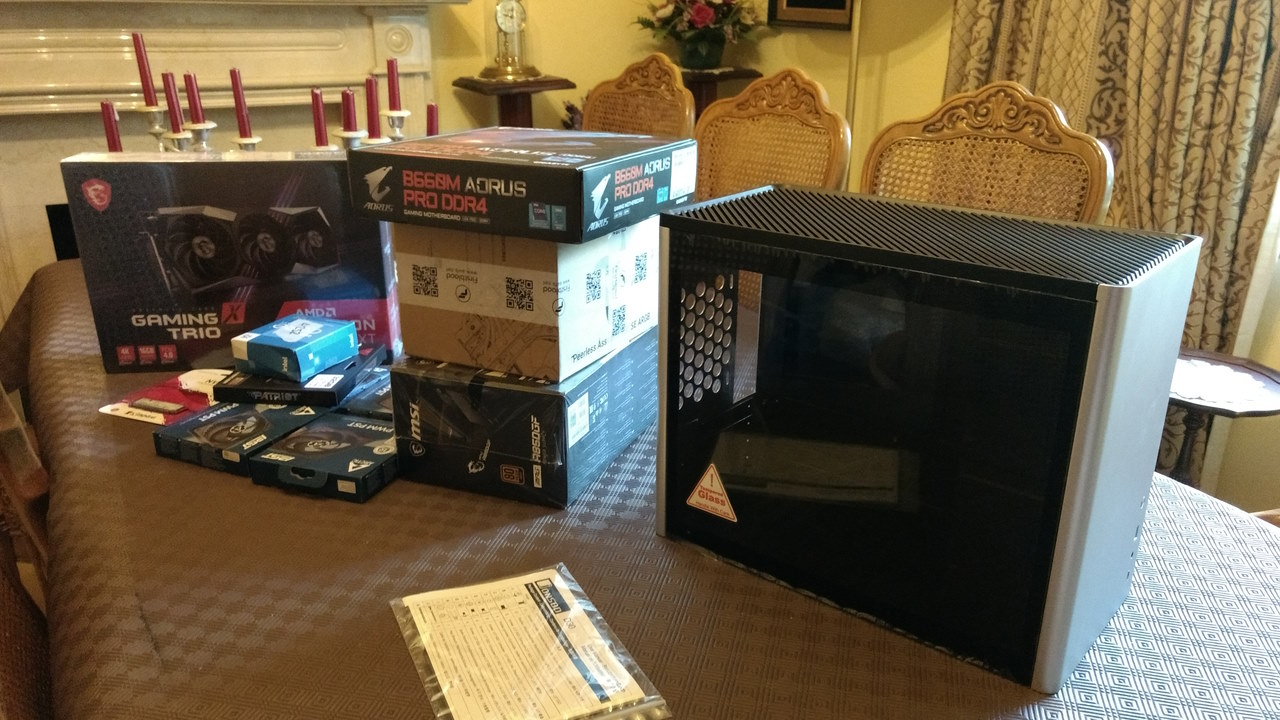
Here’s the final parts list of what was purchased; let’s do the usual drill of running through each component choice.
| Component | Model |
|---|---|
| CPU | Intel Core i5 13600KF |
| CPU Cooler | Thermalright Peerless Assassin 120 SE ARGB |
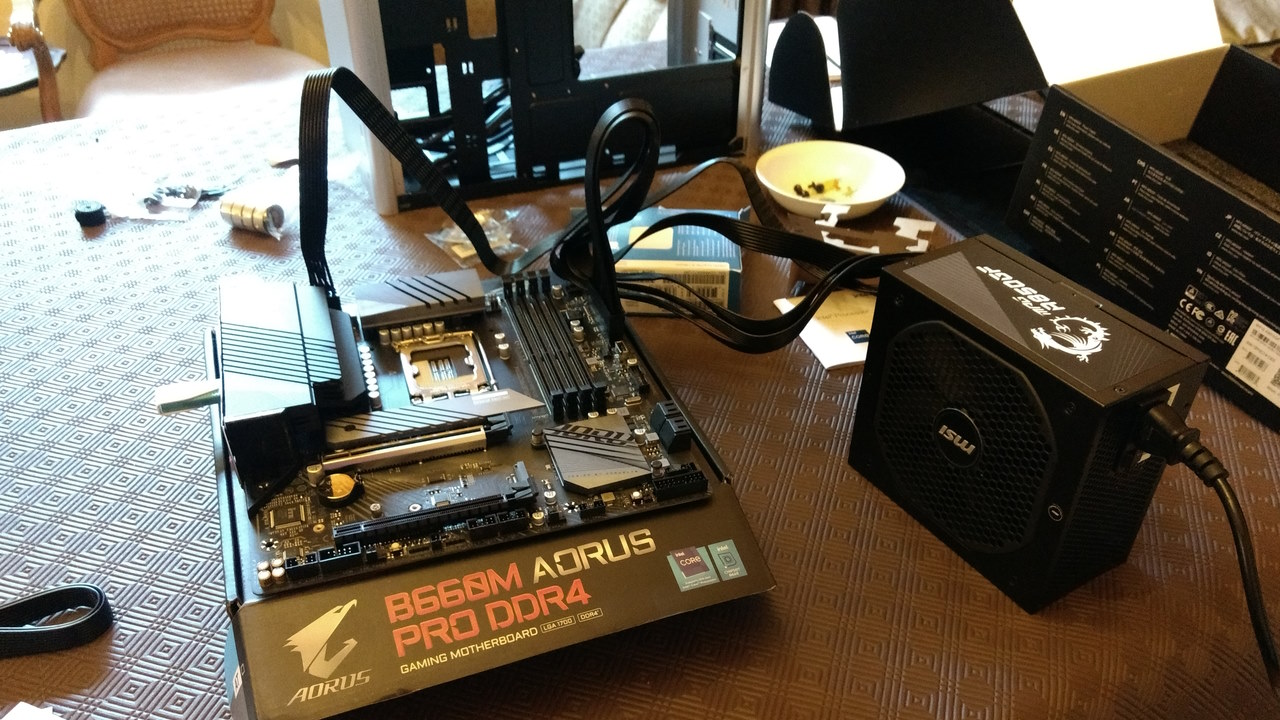
| Motherboard | Gigabyte B660M AORUS Pro DDR4 |
| RAM | Patriot Viper Steel 32GB (2x16) DDR4 3600/CL18 |
| Primary Storage | Kingston NV2 2TB |
| Secondary Storage | N/A |
| GPU | MSI RX 6950 XT GAMING X TRIO 16GB |
| Case | Jonsbo D30 (Silver) |
| PSU | MSI MPG A850GF |
| Other | 4x Arctic P14 PST |
CPU
If platform upgradeability isn’t important, Intel 13th gen is basically the only choice for a high-end gaming-focused build right now. 13th gen Raptor Lake parts consistently outperform equivalently priced Ryzen 7000 series chips in gaming workloads, and have enough of a performance uplift over 12th gen Intel CPUs and Ryzen 5000 chips to justify the price increase over each of those.
Speaking of cost, Intel 13th gen CPUs are also convenient in that they will still let you use a 12th-gen motherboard (cost savings) and DDR4 instead of DDR5 (a bit slower, but much better value, particularly a few months ago when this build was actually put together and DDR5 was even higher priced).
If you eliminate GPU bottleneck as much as possible using low resolutions and a top-end GPU, then a 13700K(F) gets ~5% better gaming performance than a 13600K(F), and a good chunk of that (maybe even most of it) comes from just juicing up the CPU to use more power in order to clock a little higher. Even at 5% the extra ~$200 to upgrade isn’t worth the money, but in real-world usage with a high-end (but not top-end) GPU, the performance gap would be <=2% and not at all worthwhile.
The iGPU wasn’t required,1 so a few bucks were additionally saved going for the 13600KF instead of a 13600K.
Although we’re not overclocking, Intel is currently segmenting baseline performance within the -K SKUs, not just their unlocked CPU multiplier. In other words, the 13600K(F) actually has a non-trivial performance lead over the other 13th gen i5s. Not that it mattered at the time though; Intel launched this generation with the 13600K(F) as the lowest-end part and those other SKUs only came to market a bit later.
CPU Cooler
The two semi-popular semi-new coolers on the block are the DeepCool AK620 and the Thermalright Peerless Assassin 120. The AK620 shows better cooling performance at high heat loads (which the 13600K(F) can produce under full load), but the PA120 is cheaper (at least locally here). Both of these coolers nearly match2 the traditional top-end air coolers like Noctua’s D15.
The PA120 also comes in an “SE” version which saves another $10 or so with only trivially worse cooling performance (3 less fins, contributing to a weight of 750g for the OG vs 730g for the SE) and cosmetic differences like no plate covering the heatpipe terminations at the top of the cooler.
With that and the low priority on acoustics in mind, the PA120 SE was my first preference, but any of the three models was fine and I was mostly shopping on price/value. The best cooler for the circumstances was determined more by what was in stock and on sale rather than what was best at its MSRP.
The build was purchased over an extended period of a few weeks or so, and this was one of the first parts that I instructed Michael to place an order for. I had originally linked Michael a PA120 SE for what I think was around $55 shipped, but he got distracted after clicking on the page and it literally sold out before he completed the order. With that option gone we waited until the other parts had all been purchased and then Michael decided to pay a small convenience fee by just buying what was in-stock at an acceptable price rather than what was actually a good sale price.
That ended up being the ARGB variant of the P120 SE for $75.

Motherboard
As mentioned in the CPU section, using a 12th gen motherboard (e.g. B660 instead of B760) is a significant cost saving.
The main issue here is that most 12th gen motherboards require a CPU to update their BIOS; doing it CPU-less is a feature typically left to only the high-end motherboards and buying one of those would kill the value angle here.
However, Gigabyte was the one vendor with the foresight to make CPU-less flashing available on their mainstream 12th gen boards, which I discovered thanks to this handy tool (link 1 link 2) which is kind of difficult to use because the extent of my German mostly revolves around calling people bread.
Unfortunately one HUGE counterbalancing blunder by Gigabyte is failing to document how the hell you actually use the flashing feature — more details in the build process later.
In any case, from the constraints of:
- Use B660 board to save costs vs newer/higher-end board
- Use mainstream Gigabyte board for CPU-less flashing to avoid needing to buy expensive high-end board
- Use non-ATX board to allow for a smaller build
I chose the Gigabyte B660M AORUS PRO DDR4. There’s little of particular note about the board itself other than the above unless you need a specific feature.
As a quick aside, an ITX build would have of course been smaller, but ITX builds are finicky to get right if you actually want to maximise space. In this build reduced size was a priority, but minimal size much less so, so mATX was the best overall form factor.
RAM
Based on all available information, it was and currently is still better value for most builds (in Australia) to use DDR4 (and compatible board) than DDR5 (and compatible board) with Intel 13th gen CPUs.
Performance is slightly lower on average, and moderately lower in specific tasks (and conversely not different in some other tasks), but the total cost saving is like $200+. Not only is DDR5 more expensive (and remember a few months ago it was even more expensive than it is at time of writing), but DDR5 motherboards are also a good chunk of extra change.
Michael wanted 32GB of RAM, the cost of which over a 16GB kit cemented the decision to stick with DDR4 over DDR5.
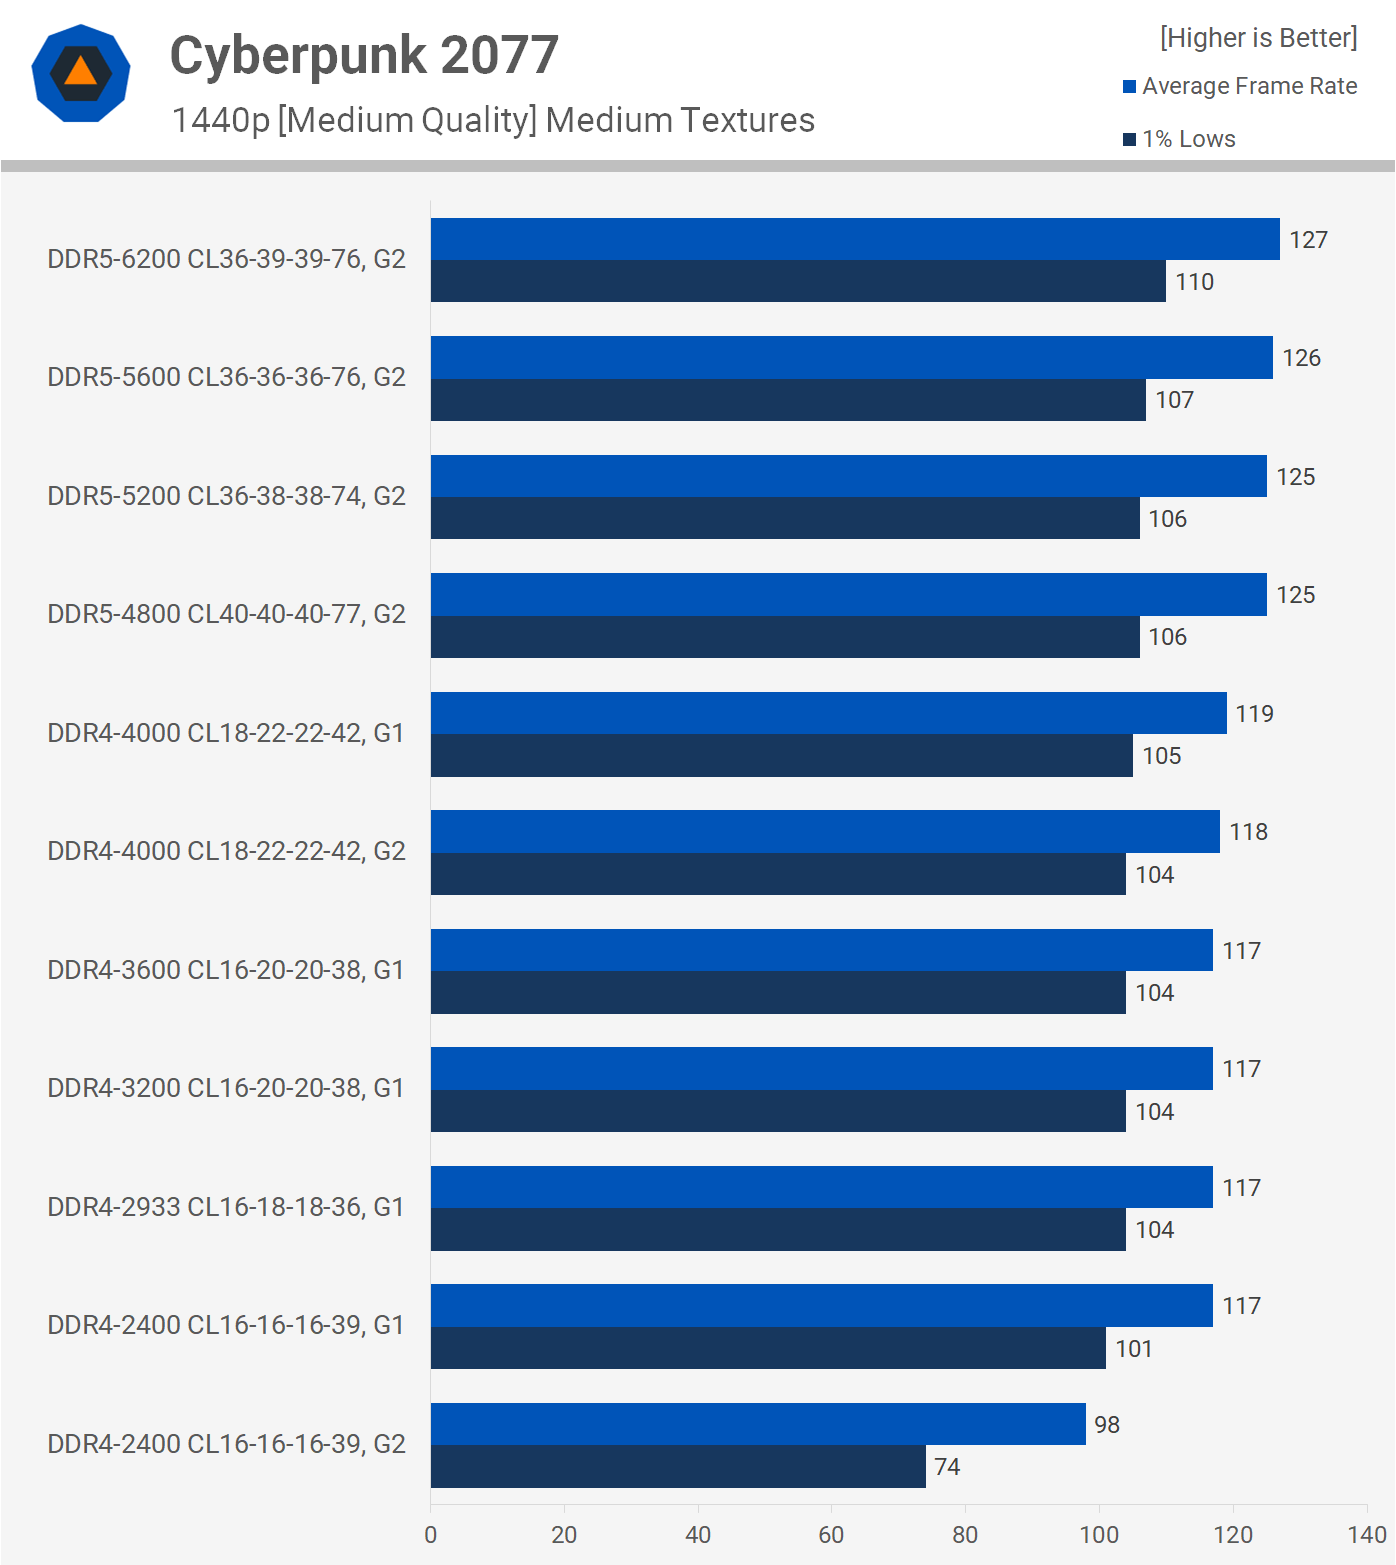
You can see in the above chart that even a game where DDR4 vs DDR5 has an above-average impact, the jump is still only a few percent going from 3600/C16 to 5200/C36. Compare this to the cost of doing so — which at the time was something like $300 — and it’s just not worth it.
With memory overclocking not really in the cards I just shopped on price vs speed and latency, ending up with the 3600/C18 kit used in the build.
It’s worth pointing out that there is room to improve or reduce performance measurably (although generally not considerably) because the subtimings (secondary and tertiary timings) of kits can vary wildly even when they have the same bandwidth and primary timings. These non-primary timings are basically decided by the motherboard, and you may get tighter timings on average if you stick to sticks (haha) on the board vendor’s QVL.
However, the time it takes to cross-check the QVL and sort through dozens of kits is basically just not worth the time unless you’re money poor and time rich; you would get more mileage (on average) by just spending extra on a kit with a higher rated bandwidth/primary timings than trying to min-max on the out-of-the-box subtimings. Alternatively if you did want to spend the extra few hours finding a QVL-approved kit at a good price, you would also (on average) get more mileage out of just tweaking the speed / timings / subtimings yourself. Memory testing utilities are pretty robust these days, so you can probably match the (not-guaranteed) potential performance gain from improved out-of-the-box-because-of-QVL memory subtimings using manually applied settings.
SYSTEM MESSAGE: end of small RAM infodump.
Now, if a GPU upgrade was likely to happen during the lifecycle of this system, the value proposition of DDR4 vs DDR5 would be more complicated. More compute power is more likely to show non-trivial performance differences between the two options. Michael has an “upgrade the entire system” kind of approach to his computer though, so we stick with the much simpler current-hardware-only value calculation.
Primary Storage
My opinion on SSDs for non-enthusiast / non-professional users is semi-controversial within the hardware enthusiast sphere: as mentioned in my recent upgrade build notes, in day-to-day usage I don’t think it matters much whether you use a high-end or mid-range drive.
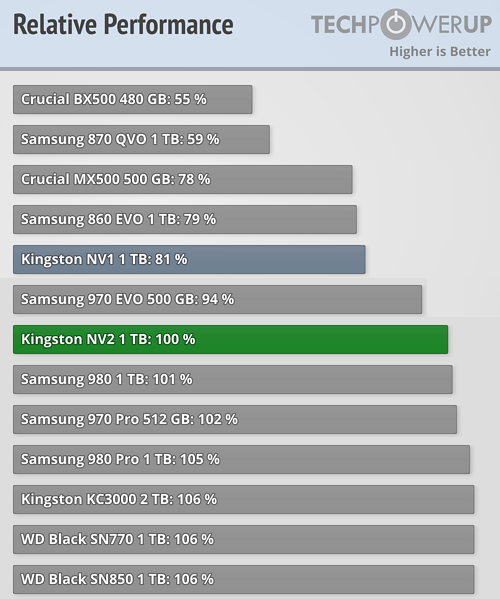
With this in mind I recommended a Kingston NV2 for Michael, which performed surprisingly well for a cheap gen 4 drive in initial reviews. DRAM-less drives these days aren’t the end of the world, since Host-Memory-Buffer (HMB) makes up some (most?) of the performance gap.
At the time of purchase the NV2 was a fair choice. Performance was good enough and the pricing of higher-end drives wasn’t as low as it is now, just four(ish) months later.
These days Kingston seems to be component-swapping the NV2 not just a little bit but actually a huge fucking lot,3 and so it’s definitely not a drive I would recommend for primary storage duties anymore. The gap between mid-range and high-end may not be significant for day-to-day usage, but in a high-end system it’s hard to justify the performance of a low end drive for primary storage.
2TB is the standard capacity for mid and high-end builds right now, primarily because 4TB+ drives still cost disproportionately more per TB; otherwise I imagine a 4TB drive would be the default choice for high-end builds.
Secondary Storage
Michael didn’t need any extra secondary storage, but can of course add drives later if needed.
GPU
The graphics card market continues to fucking suck.
One bright shining light during in the darkness was a random sale on a 6900 XT and 6950 XT while parts were being purchased. Of these the former of course has much better price:performance given that a 6950 XT only marginally outperforms a 6900 XT (~5% at 1080p, and only a little more at higher resolutions).
The reason I nonetheless recommended the 6950 XT was partly because the MSI Gaming X Trio cooler was a known factor (and more specifically known-good), vs the Asus TUF which I couldn’t find reviews for.
The other reason was because Michael was jumping to spend more on the GPU than I think is reasonable. Based on the reference performance and pricing that I provided to help him decide, he picked the 6900 XT as the target for price and performance that he was after. With this sale he ended up getting a well-cooled 6950 XT for less than what we were originally expecting to spend on a 6900 XT.
Although the card we picked does have good cooler on it, the power usage is — in my opinion — not sane.
- A reference 6900 XT uses ~300W of power during games.
- A reference 6950 XT uses ~340W of power during games.
- The MSI 6950 XT Gaming X Trio uses ~450W during games.
- The MSI card gains only a ~10% performance improvement over the reference 6900 XT for that 50% (!!!) extra power draw, for a ratio of 1:5 (!!!!!!!!!!).
- The MSI card gains only a ~3% performance improvement over the reference 6950 XT for that 30% extra power draw, for a ratio of 1:10 (!!!!!!!!!!!!!!!!!!!!!!!!!!!).
If this was my own system I would personally refuse to use the card except with manually adjusted power/voltage settings to make efficiency sane again, but it’s not my system — I’m just the parts guy. Michael didn’t (and so far still doesn’t) care about the extra power which the card draws (and consequently turns into heat), and his reaction to the room being heated too much is just to burn more power by cranking the AC.
It is…………………………….. not what I would do, but it is what it is.

Case
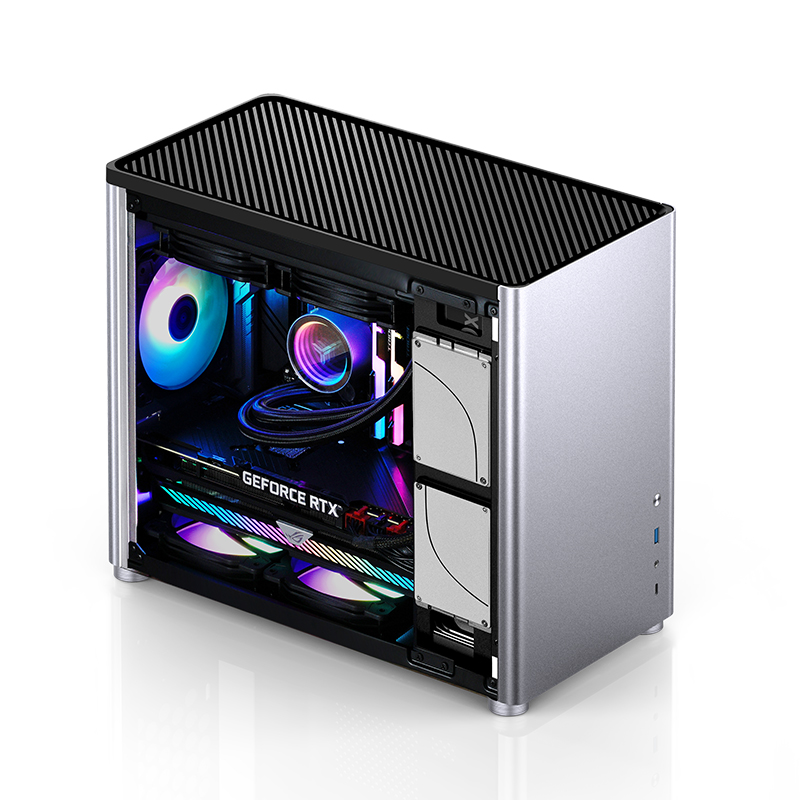
If you have specific needs, finding the right case for your needs can be rather a challenge. In this case (raucous laughter), we were after a well-priced, compact mATX case that would be able to keep the 450W 6950 XT beast — as well as the ~200W 13600KF — cool.
One reliable way to cool an extremely power-hungry GPU is to reduce the distance between a case’s air intake and where the GPU is situated.
In the past this was done using side-panel intakes, although these fell out of favor4 and aren’t found on many cases right now.5 Another way to do this is to simply change the overall airflow layout of the case, putting the primary intake at the bottom of the case below the GPU. This is what the Jonsbo D30 does.
Although it doesn’t come with any fans, it’s easy enough to tack on some of the extremely popular decent-yet-cheap Arctic fans (we used P14s, specifically the PST versions) and still end up with a case option that’s still competitively-priced overall. The case is available in either silver and black or all-white. Michael opted for for the former.
This case hasn’t hit mainstream tech reviewers and so took a while to find, but I was only willing to pair The Beast with either a case with known-excellent GPU cooling, or a case with direct-to-GPU intake (even if it didn’t have many reviews).
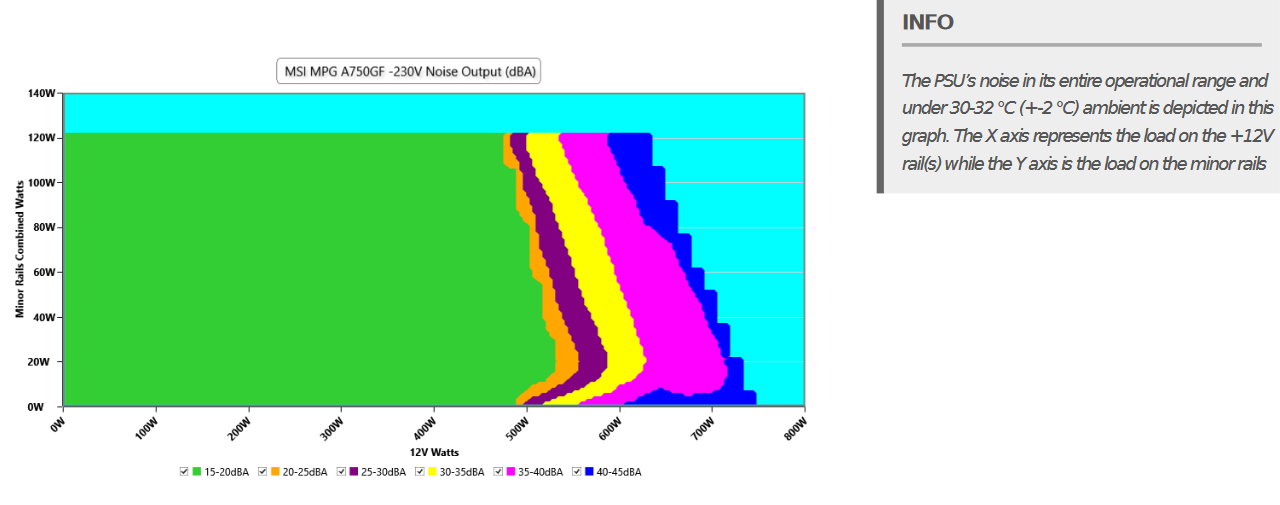
PSU
At both time of purchase and time of writing, MSI’s MPG -GF series seemingly dominates the “good-but-not-best-in-class” PSU market for the 650~850W market6 in Australia.
They’re not literally always the best deal available, but something like 80-90% of the times that I’ve checked over the past several months, they’re offering a comparable power supply for $10-30 less than most/all competing models, or a better power supply for similarly-priced models. They also frequently go on sale and are frequently restocked, contributing to their typically-best-choice dominance in this bracket.
They do have decidedly mediocre acoustics when you start to push them past ~2/3 load, but for this build that’s not a concern and to be fair, most builds will not push a power supply to its rated wattage (this build included), so the worst acoustics are typically avoided.
850W is enough to cover the rest of the parts with a little bit of breathing room leftover. Limited (if any) upgrading is expected based on Michael’s history of building entirely new systems instead of upgrading individual parts, so only having that ~150W expected buffer is fine. Unlike the jump from 750W to 850W units, 1000W units tend to be a hefty price hike over 850W units, so you really need to be confident you’ll need/use that extra power if you delve into that territory.
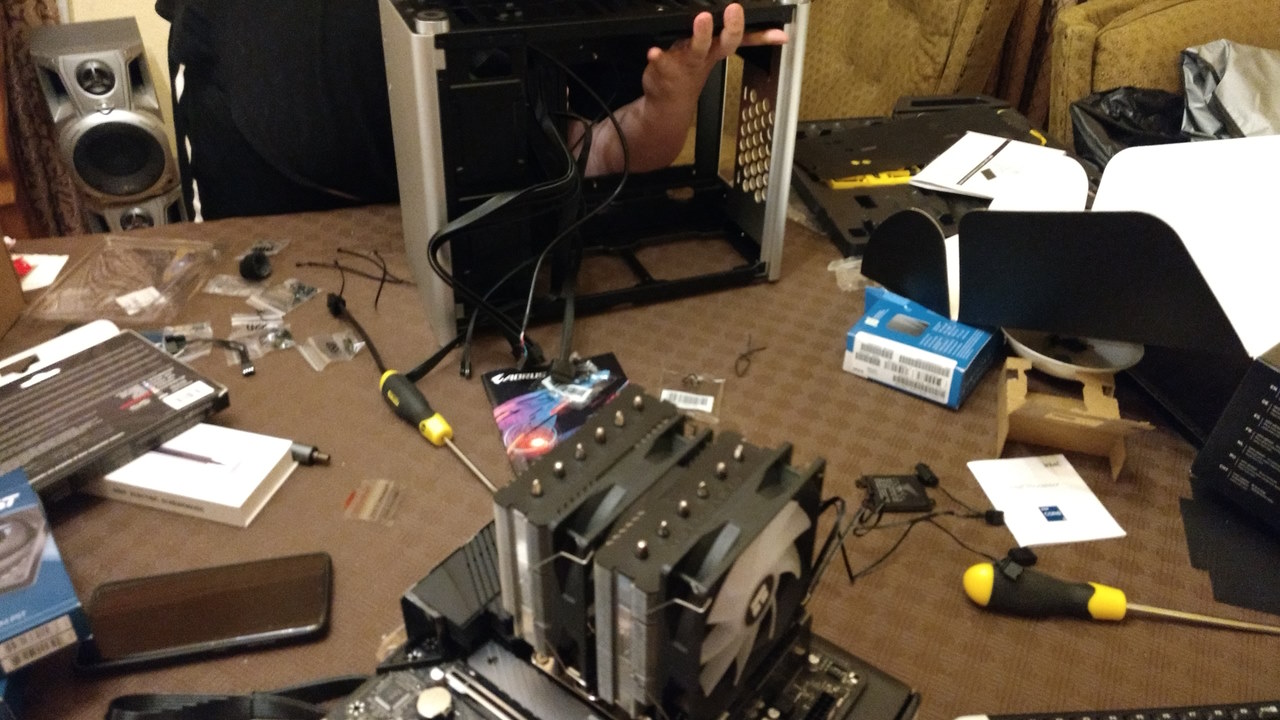
The build process
I helped with only part of the build process itself, so don’t have full insight to the last few steps of the process and also no final build pictures.
The main build hiccup was figuring out how the hell to flash the motherboard.
- In the motherboard manual you’re instructed to visit their website to find instructions.
- It’s not immediately obvious what page you go to on their website to get the flashing instructions.
- When you do go to the right page, THE INSTRUCTIONS MISS A STEP, AND WITHOUT IT THE BOARD WILL NOT BE ABLE TO UPDATE.
The missing step has somehow been discovered and documented by the community (example 1 | example 2), and it requires renaming the updated BIOS/UEFI file to gigabyte.bin because obviously we would know that without being told it. Gigabyte has a video that includes this step, but good luck finding it if you’re starting from the manual under the crazy assumption it will tell you what you need to know.
The flasher seems to also be a bit fussy about what USB stick you use, but that’s a story for another build.
This process slowed us down by an hour or two, trying various things without knowing why the process didn’t work until we started looking up the problem online, and found resources such as reddit discussions and the videos linked above.
A second build hiccup was with the 140mm intake fans for the D30. Although 140mm fans are listed as supported, if you actually try to install them you end up having clearance issues with front panel connectors on essentially every mATX motherboard in existence, including ours. Realistically this means that the case does not support 140mm bottom intake fans (although they’re fine for top exhaust).
Before being able to complete the build, we had to stop early since Michael had a movie screening to catch.7
Michael discovered while finishing the build that two of the four 140mm fans he bought were DOA lol. One benefit of having the GPU be so close to the intake is that it can double-duty as its own case intake. This isn’t ideal because it means the fans have to run faster to pull in that air unassisted. It also means the CPU gets fed almost exclusively with GPU-reject air, raising temps by a few extra degrees compared to the expected combination of fresh air intake and also GPU-reject air.
Followup / Reflection
A month or two ago one (or both) of his CPU fans also started making a noise resembling a scream of torment over its nihilistic rotational existence, so presumably Michael is afflicted with a curse of fan death. I assume he’s gone through an RMA for it.
Other than the aforementioned issues things went fine, and as far as I know Michael has been happy with the PC and its performance — other than the screaming fan(s).
If I had these parts myself, I would be tweaking the GPU power down to sane(r) levels and adjusting everything’s fan curves to keep things quiet at idle, rather than leaving it up to whatever Gigabyte and MSI set as defaults. But again, not my build so acoustics and power consumption are not of great concern.
All of the parts were actually bought leading up to Black Friday sales, missing out on a few of the best deals (although the 2022 BF sales were overall quite underwhelming). This was primarily because Michael had what he thought was a motherboard issue that was quite irritating, and so it made sense to hurry up the build by a month or so by buying at “good” prices rather than “great” prices that might’ve taken a month to materialize.
As it turns out, the problem could be resolved by just plugging things into different ports, so we didn’t need to rush the build quite so much after all. Of course, we only confirmed this after actually buying everything. Go figure.
This is so far the highest-end build I’ve helped with, so it was a bit of an adjustment to build a mental model of “value” within the context of the higher-end parts. For most systems prior to this (including my own) a $1000 GPU — even adjusting for inflation — was very much beyond the realm of consideration. It’s also been a long time since I kept up with hardware closely enough to be able to help with builds other than my own, and actually putting together a parts list for this build took multiple days of intensive research and another week or three of on-and-off followup research. It was honestly a lot of fun to get back into the hardware scene while I had some free time over my uni break, but I doubt it’s something I can afford to do very often.
Doing this write up also takes extra time, and I’ve intentionally gone light on details in many areas of component selection to save a few hours of writing time. I used to do multiple passes between the draft and publishing, and I’ve also skipped most of those passes here for the same reason. There may soon come a time when all I document with builds is the list of parts and anything especially notable, skipping over the bulk of the finer details entirely. Hopefully that’s still a ways off.
- Do note that the iGPU may be useful for some people that aren’t using it graphics because the integrated video encoder seems to be very good quality, comparable to the current NVENC.
- In some reviews they actually do match, but if you average reviews (that use an appropriately high heat load) then the old school kings do still perform a bit better.
- You’ll have to search through discussions online for more info, it’s hard to provide a detailed summary without spending a couple hours on that myself.
- Maybe mostly for cosmetic reasons?
- Although they seem to be having something of a small resurgence what with the inefficient-by-default CPU and GPUs coming out lately.
- (which covers most mid and high-end builds right now)
- I’ve since forgotten what the movie was, ruining the entire build narrative and making the article literally unreadable.