After looking around online, nobody quite seems to know exactly how Caravans work.1 People agree that Caravans generate Wealth, but even how they do it doesn’t seem to be universally understood, much less how the amount generated is calculated.
Well, since nobody else seems to have tested to figure it out how all of it works, I did. Here’s how Caravans work, in detail.
Update July 2022: With help from InvisibleManX, I’ve corrected a mistake with the distance scaling – rather than being continuous (smooth), it actually has discrete jumps and through a mix of testing error and bad luck, I didn’t notice this in my original tests. During updated testing I also noticed that the distance required for each multiplier seems to correlate with map size, and so have noted this accordingly.
How Caravans Function
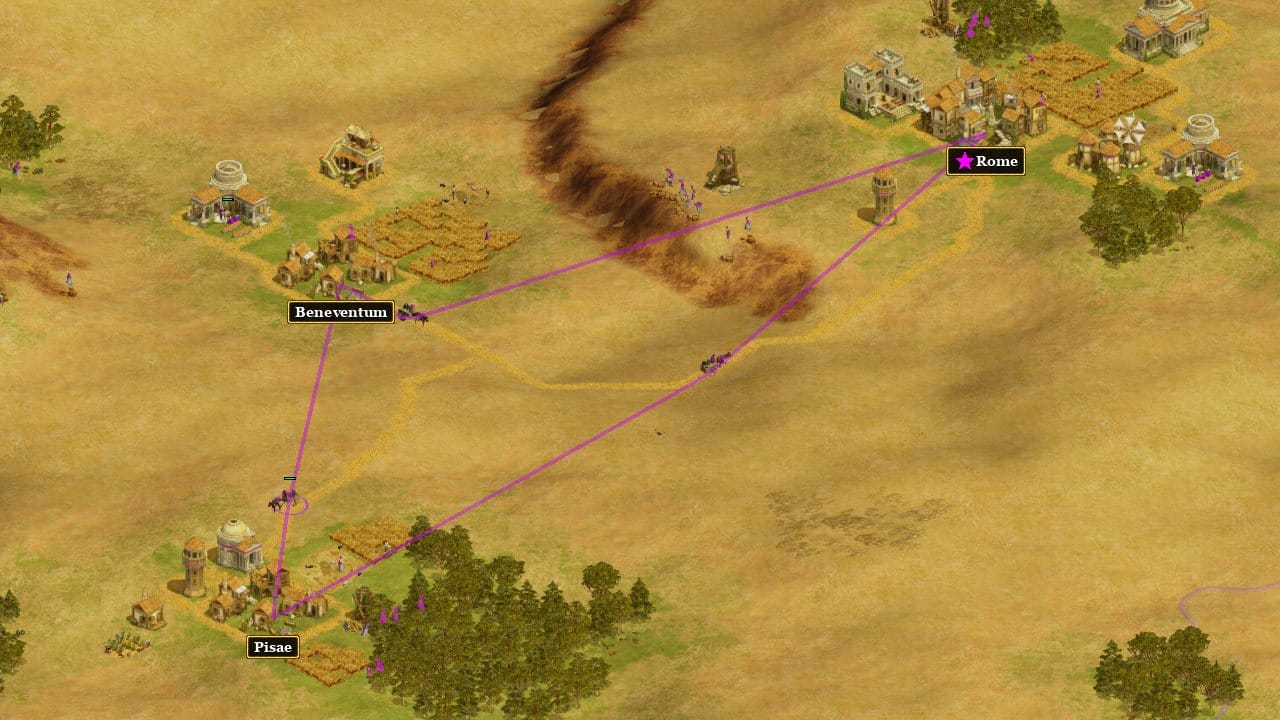
Caravans form trade routes between two of your cities, where they’ll move from one city to the other and then repeat the process until they can’t anymore (such as if one of the cities is captured by an enemy), or until you tell them otherwise. Caravans are hard workers like that.2
Every route can only have a single Caravan on it, but there is no inherent limit to the number of routes that a single City can have beyond that – the limit comes from the number of available Caravans, and the number of other cities available for unique trade routes.
The maximum number of Caravans you can have at once is 1 + (1 x Commerce tech level). For nations with no specific Caravan-related bonuses, this means that unlocking the Market with Commerce 1 actually allows for a maximum of two Caravans to be produced, although you would need to have three cities in order to utilise the second Caravan because two cities allow for only one unique trade route to be created.
In order to calculate the number of Caravans required to saturate all available Caravan routes with Caravans, you take the number of cities you have and then add together the numbers below that figure. For example, with 5 cities it takes (4+3+2+1) caravans to fully saturate the available routes (which is more caravans than a single player can build). This can expressed more succinctly with the mathematical formula of:
N = 1 / 2 * (x2 – x)
Where N is the number of Caravans required for saturation, and x if the number of cities you have.
Some people seem to be under the impression that Caravans generate Wealth in large chunks (for example, 30 gold at once). This is.. not entirely incorrect but far from the whole picture.
The Wealth from Caravans comes in two stages, kind of like it does with a Farm or Woodcutter’s Camp. You get a bonus chunk of Wealth (twice, see below) for initially setting up a trade route, after which you get constant Wealth production for as long as that Caravan continues to use that trade route.
Forming Trade Routes, Wealth Bonuses
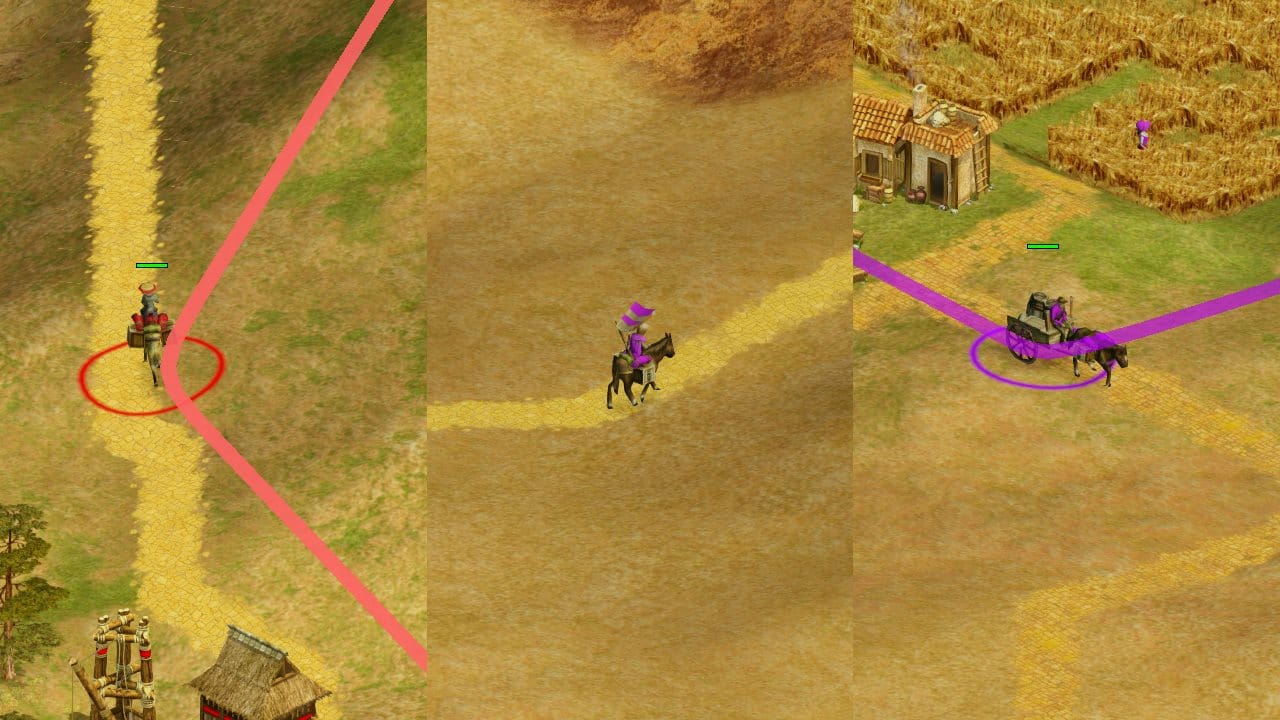
Caravans will automatically use the highest-income route available to them given your directions or lack thereof. For example, if you select a Caravan and right click on a specific city, it will select whichever available route from that city which is most profitable. If you were to leave the Caravan to its own devices, it might select a route that doesn’t involve that city at all.
Routes can be manually selected by selecting a Caravan and right-click-dragging between two valid cities – this can also be done on the minimap. This may be helpful if the most profitable trade routes are actually dangerous to travel along, in which case specifically choosing a safe route may be preferable to having your Caravans killed. This doesn’t occur too frequently in 1v1 matches, but does become a more common issue in larger ones involving more players. The most profitable route in these games will often take a Caravan just about to the other side of the map, potentially walking right into (or next to) danger along the way.
In order to create a new trade route, a Caravan must first go to City A, then to City B, and then return once again to City A. The trade route is formed only after it has finished an entire loop between two cities, and until this process is completed you will not receive a constant income from the Caravan.
On the second and third steps of this loop (i.e. arriving at City B, and returning afterwards to City A), the Caravan will provide a once-off Wealth bonus. This bonus is equal to 10 + (Commerce tech level x 10). For example, having Commerce level 2 provides a Wealth bonus of 30 (twice), whereas a Commerce level of 4 provides a Wealth bonus of 50 (twice).
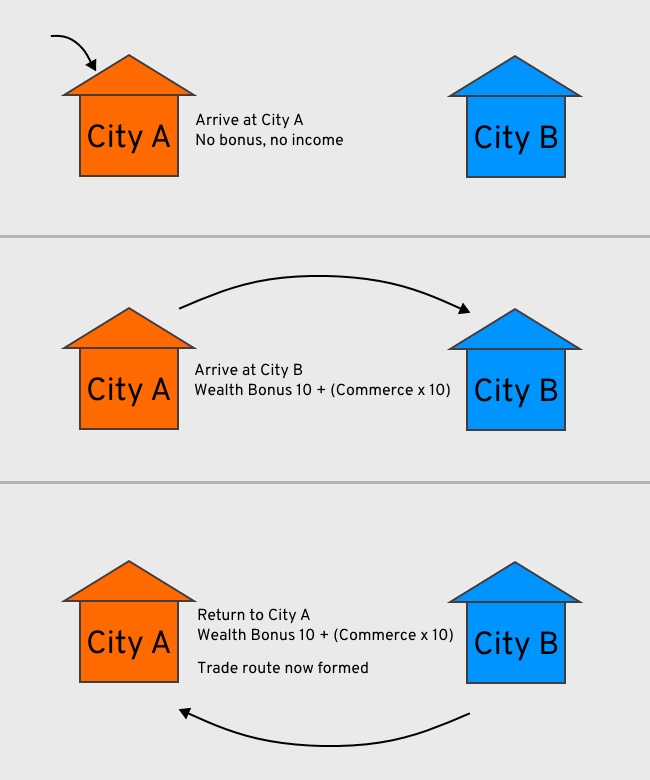
Once a route is set up, the position of the Caravan has no influence on its income. It could theoretically be forced into an extremely slow path around the entire map in order to move between two cities, but this would not affect the route’s income so long as the trade route is already set up. Obviously a long travel time would increase the time it takes to initially set up a new route though.
If a Caravan is no longer able to continue with its trade route (e.g. losing a city), it will once again automatically select the highest-income trade route available after a brief idle period. If no route is available, it will simply halt and await further instructions, probably while quietly crying.
Increasing Trade Route Income
Based on my testing, this is how the amount of income from a trade route is calculated:3
Income = (2 + (2 x each Large City + 4 x each Major City) + (1 x each building in either city’s economic radius)) x Distance multiplier
Let’s break that down step by step.
- The base income for a trade route is 2 Wealth.
- If you have two Small Cities directly next to each other with no additional structures at either of them, a trade route between them will generate an income of 2 Wealth.
- Each step up from a Small City adds 2 additional Wealth.
- Small City <-> Large City = 4 (2 + 2) Wealth.
- Small City <-> Major City = 6 (2 + (1×4)) Wealth.
- Large City <-> Large City = 6 (2 + (2×2)) Wealth.
- Large City <-> Major City = 8 (2 + (1×2) + (1×4)) Wealth.
- Major City <-> Major City = 10 (2 + (2×4)) Wealth.
- Each building within the economic radius of either city adds 1 additional Wealth.
- From my testing, this includes military buildings such as Stables, Towers, and Lookouts.
- Small City (+4 Farms) <-> Small City (+3 Farms) = 9 (2 + 4 + 3) Wealth.
- The distance between the two cities multiplies the rest of the equation by a range between 100% (no increase) and 200% (double).
- The multiplier depends on the distance, and it scales from 100% to 200% in discrete jumps as the distance between the two cities increases. These jumps seem to be 100%, 130%, 160%, 180%, and 200%.
- Two cities built fairly close to each other will receive a 100% multiplier i.e. no bonus.
- Two cities built extremely far from each other (something like the distance from one edge of the island to the other on Australian Outback) will receive a 200% multiplier, doubling the income of that trade route.
- Cities with an “in between” amount of distance will receive a multiplier of 130%, 160%, or 180% based on that distance.
- The distance required for each multiplier jump seems to correlate with map size, so on larger maps you need cities further apart to gain the same multiplier. This will also mean that just hitting the 130% multiplier may require a non-trivial amount of distance if you’re playing on the larger map sizes.
- You cannot exceed the 200% multiplier by going from “extremely far” to “other side of the map”; you will still only receive a 200% multiplier on the route.
- As best as I can tell, the distance calculation is based on a direct line between the two cities; if terrain is in the way this does not increase the multiplier even if the effective distance between the two cities increases.
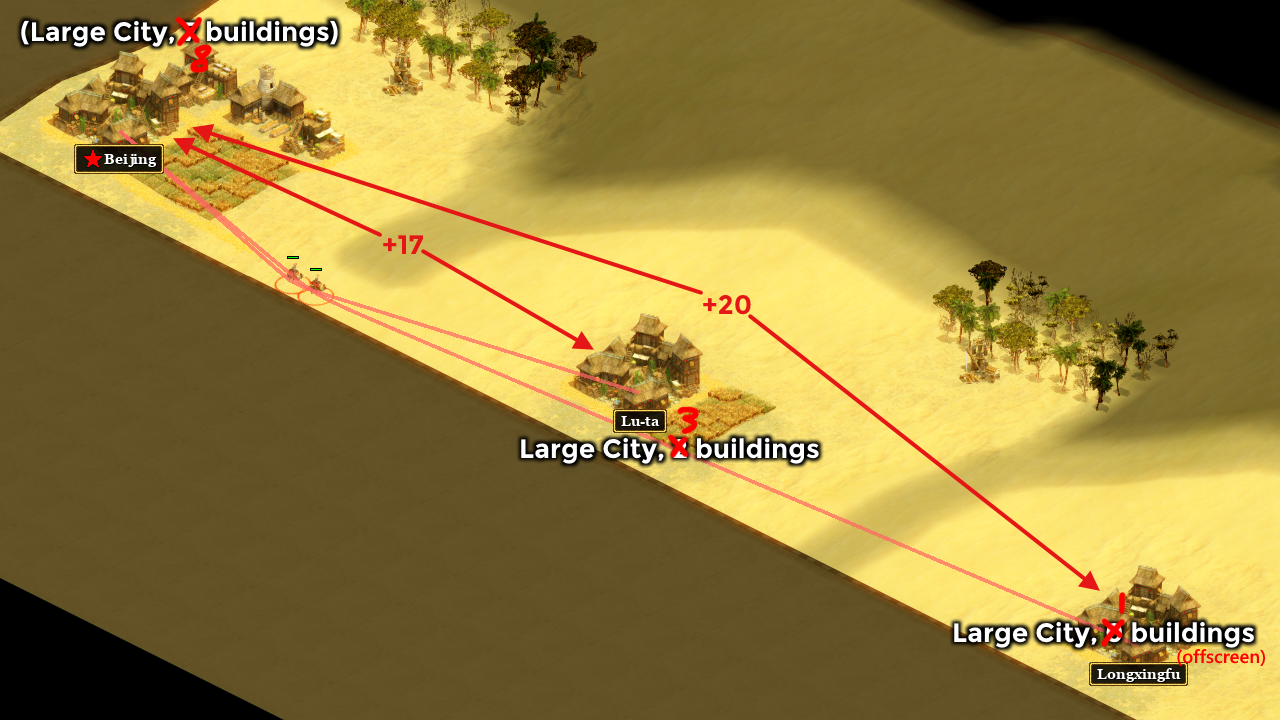
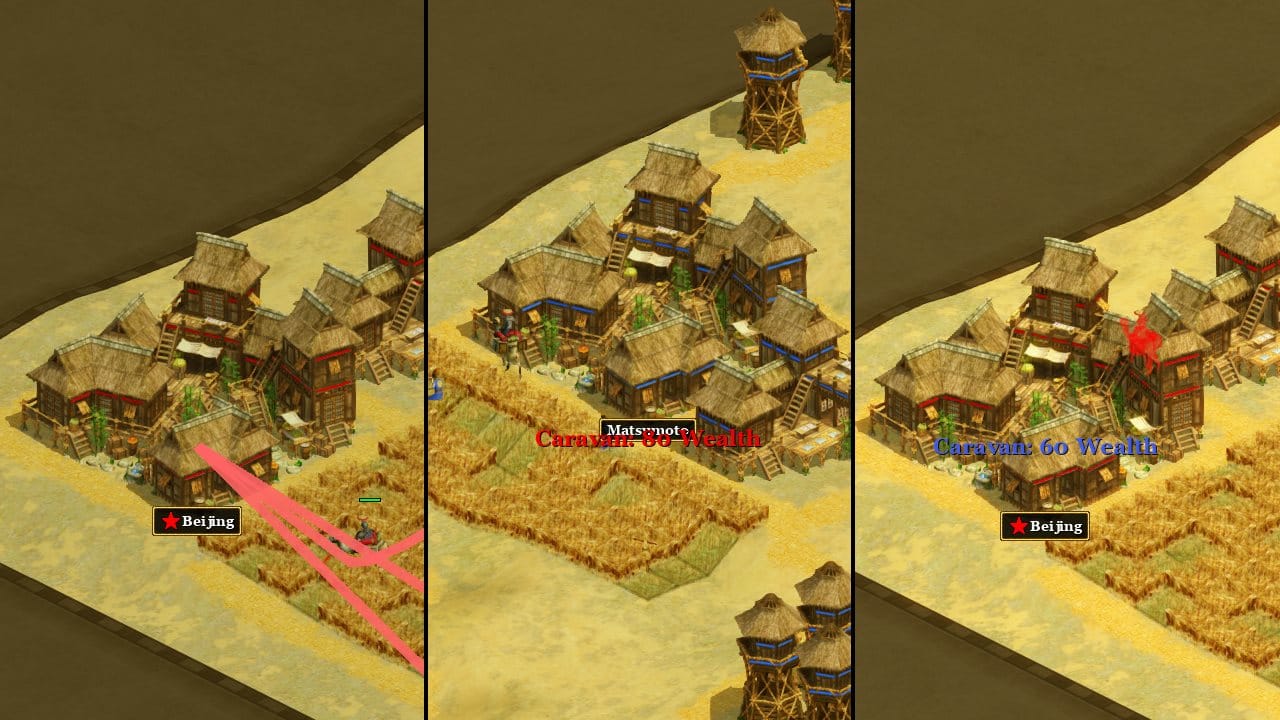
Breaking down the +17 route in the picture above:
- Base of 2 Wealth
- +4 Wealth due to 2x Large City on the route
- +11 Wealth due to 11x buildings in economic radius
- A multiplier of only 100% (no bonus), because the cities are fairly close
(2 + 4 + 11) x 1.00 = 17 Wealth
Examining the +20 route instead:
- Base of 2 Wealth
- +4 Wealth due to 2x Large City on the route
- +9 Wealth due to 9x buildings in economic radius
- A slight multiplier of 130% due to distance
(2 + 4 + 9) x ~1.3 = 19.5 Wealth (rounded to 20)
Trade Routes with Allied Cities
Once you reach Commerce 3, your Caravans are able to create trade routes with other nations so long as you’re not at war with them. This usually implies that the other nation is your ally, but you could also simply be in a state of peace, without an alliance.
Trade routes work the same way whether the other nation is an ally or not. The caveat is that Caravans don’t automatically select trade routes involving other non-allied players, but will do so with allied players. If you want a trade route with a non-allied player used, you’ll need to explicitly instruct a Caravan to set one up.
Trade routes with other nations are typically extremely lucrative for both parties. The calculation for the route’s passive income is the same as normal, except that the full income is given to both parties, without splitting it. In other words, each nation gains income from the trade route as if they owned both cities, which effectively doubles the total Wealth the route produces, since both nations get the full amount. Given that the cities of different nations are likely to be further apart than cities of the same nation, route income is usually higher when the trade route involves international travel.
As for the once-off Wealth bonus for setting up a trade route, this bonus alternates between the two nations. When setting up a trade route with an ally, your Caravan will provide double the normal bonus to you upon reaching City B (typically the other player’s city). Once it completes the loop and returns to city A, the other player receives the second Wealth bonus, which is also double the normal amount.
The once-off bonus in this situation is still based on the Commerce level of the player receiving the bonus, not the Commerce level of the player that owns the Caravan.
Final Words
You will probably rarely if ever use the information in this article to change your Caravan routes, given that Caravans already figure out the highest income routes by themselves and there’s few reasons to deviate from them. It’s also rarely worth changing a Caravan’s existing route except due to danger,4 because swapping from a medium-income route to a high-income route introduces downtime where the Caravan is no longer generating Wealth while setting up its new route.
Regardless of that, I trust this article is informative nonetheless, and that the notes I’ve made are helpful to have available. If nothing else, you can rest easy knowing that your Caravans have got it all figured out for you.
One practical use for all of this info is to wait on a Caravan’s once-off bonus to get enough Wealth to build or research something important. Being able to know the incoming Wealth bonus ahead of time allows you to make more efficient use of said Wealth, particularly in the early game.
For a default-dangerous Caravan route you could also eyeball your cities to estimate which actually-safe route would be most profitable when re-routing your Caravan. If you regularly play games with higher player counts you may need to get used to doing this to avoid providing “Caravan donations” to your opponents.
“Building a Strong Economy” series:
- Part 1: Basic Resources
- Part 2: General Concepts
- Part 3: Fish and Rare Resources
- Part 4: Enhancement / Amplifier Buildings
- half_lotus gets most of it at least.
- At least one person online was under the impression that Caravans will automatically re-route themselves when a higher-income route is available – I’ve been unable to replicate this in any of my testing, and have also never noticed it happening in my own games. As such, I believe it to be incorrect. It’s possible that this person lost Caravans and/or Cities and then the new Caravans (or existing now route-less Caravans) simply [re]calculated the best available route as you’d expect them to.
- note: this is completely separate from the once-off Wealth bonuses for initially setting up the trade route
- As mentioned earlier, Caravans are more likely to choose profitable but dangerous routes in higher-player games.
Well done mate great article. Is it fair to say you don’t get another bonus if you have to move your caravan and he needs to establish the route again?
If you re-route it immediately – as far as I know, yep, no extra bonus. I haven’t tested what happens if you wait a while first.
Thanks bro, great piece of info. As you said, probably most people wont change routes on the go, BUT, it helps to know the best distances between cities.
This is very helpful for me, thanks